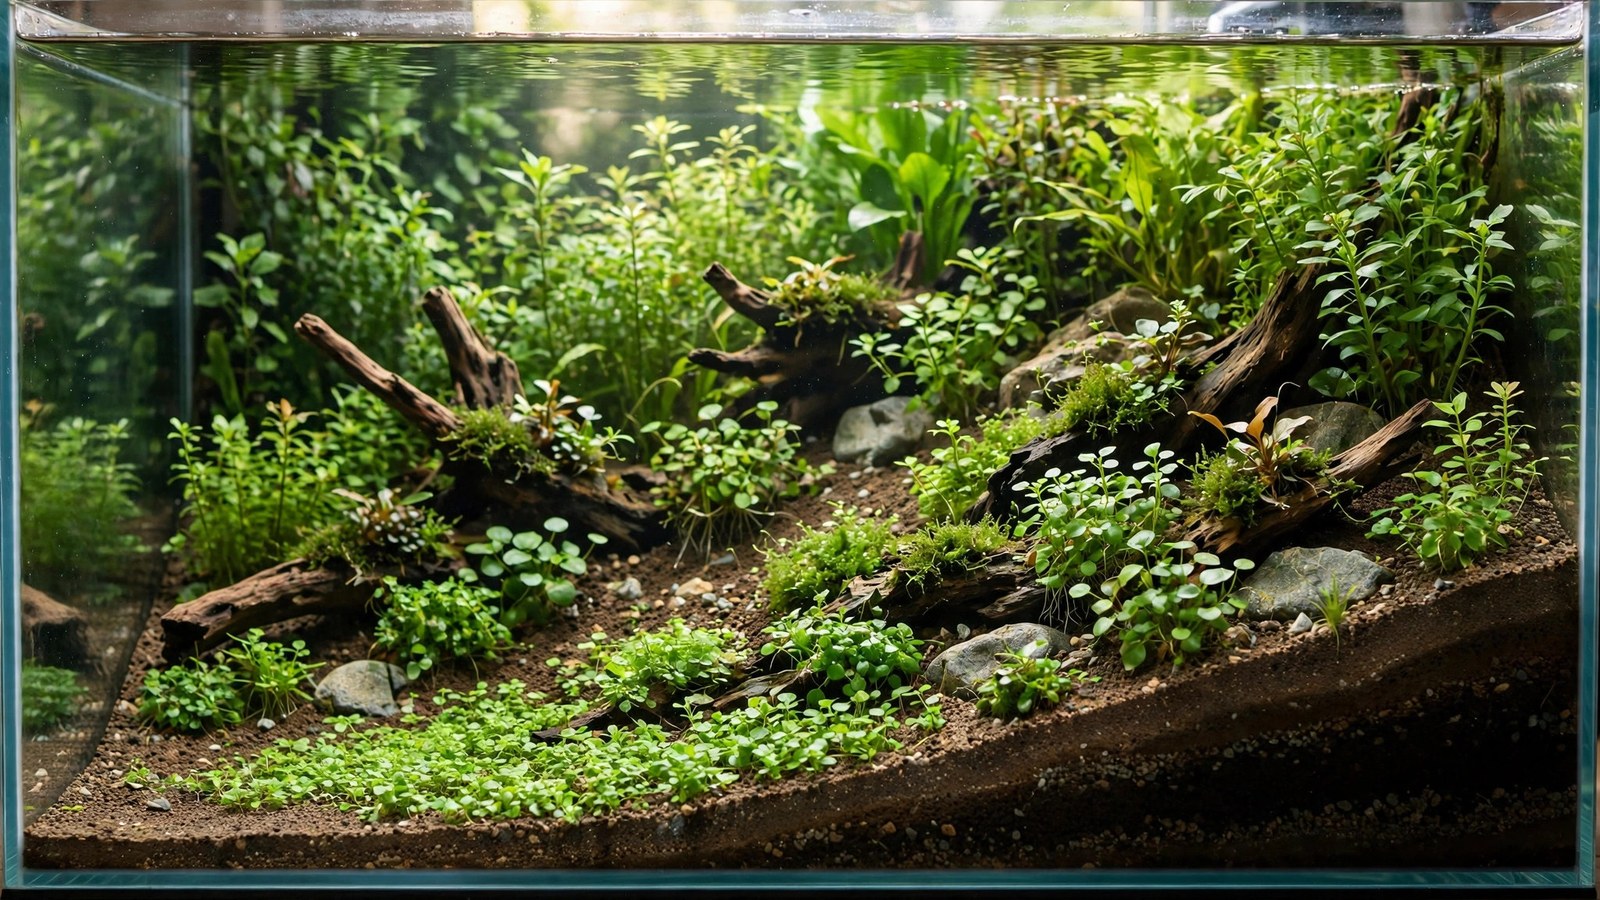
Flat substrate makes flat aquascapes. It's that simple — and it's why sloping substrate for depth is one of the highest-impact techniques a beginner can learn: raise the back, lower the front, and a glass box suddenly reads as a landscape with real distance. The slope costs nothing, takes ten minutes during setup, and transforms every layout style from Iwagumi to jungle. Here's how to build slopes that look natural, stay put, and grow plants well.
Why Slopes Create Depth
Your eye judges depth partly by vertical position: things higher in the visual field read as farther away. A flat substrate puts the back plants at the same level as the front plants, so the tank reads as a shallow stage. Raise the back by 5–8 cm and the background plants sit higher in the frame — instantly, the tank gains a horizon and a sense of receding distance.
The slope does three jobs at once:
- Perspective illusion: elevated background + low foreground mimics how real landscapes recede.
- Root depth where it matters: background stem plants are the hungriest root feeders; deep substrate at the back gives them room.
- Compositional structure: the slope itself becomes a design element — valleys, terraces, and hills are just slopes with intention.
This technique underpins our guide to creating depth in aquascapes — slope is the foundation; plant scaling and hardscape placement build on it.
How Much Slope: Rules of Thumb
| Tank depth (front to back) | Front substrate depth | Back substrate depth |
|---|---|---|
| Nano (≤30 cm deep) | 2–3 cm | 5–7 cm |
| Standard 60cm (30–36 cm deep) | 2–3 cm | 7–10 cm |
| Large (45 cm+ deep) | 3–4 cm | 10–15 cm |
The classic ratio: the back should be 2–3× as deep as the front. Less than that and the effect is invisible; much more and you risk anaerobic dead zones and an unstable hill. For dramatic concave valley layouts or Nature Aquarium hills, you'll exceed these numbers — but those builds use internal supports (see below).
Front glass rule: keep substrate at the front glass thin (2 cm) and clean. A deep substrate line visible through the front glass looks messy and wastes the depth illusion — the slope should read in the tank, not through the glass.
Building Slopes That Don't Collapse
Loose substrate slumps. Every aquascaper learns this watching a beautiful hill flatten itself over two weeks. Prevention methods, from simple to structural:
1. The simple mound (small slopes)
For gentle slopes under 5 cm of elevation change, just pile aquasoil higher at the back and plant it immediately. Plant roots are the retaining wall — a densely planted slope stabilizes itself within weeks as roots bind the soil. The danger window is the first month before roots establish; avoid strong current blasting the slope face during this period.
2. Stone terracing
For medium slopes, build retaining walls from flat stones stacked like dry-stone walling across the slope. Each terrace holds back the level above it. This looks fantastic — the stone edges read as natural rock strata — and it's the traditional method in Iwagumi layouts with elevated back sections. Bury each stone's base well; a visible gap under a retaining stone ruins the effect.
3. Hidden supports (big hills)
For dramatic elevation (10 cm+), don't use pure substrate — it's wasteful and compacts. Instead:
- Lava rock bags: mesh bags filled with lava rock form the hill's core; cap with 3–4 cm of aquasoil. Cheap, lightweight, porous (no anaerobic issues), and plants root through the mesh.
- Egg crate + rock: egg-crate platforms on PVC legs create terraces; fill around with substrate.
- Filter media bags of pumice: same principle — inert, porous volume filler.
Cap any support with enough substrate for planting (minimum 3 cm over the support), and slope the cap naturally. From the front glass, viewers see only soil and plants — the engineering stays invisible.
4. The "bank and plant" method
Shape the slope before adding water, mist it to settle, then plant densely and flood carefully (pour over a plate or plastic bag to avoid cratering). Flooding is when most slopes die — a careless pour carves gullies. The dry start method is the ultimate slope protector: grow the carpet emersed for weeks, and by flooding time the roots have locked the hill in place.
Slope Shapes for Different Layouts
- Classic back-to-front: the default. High back, low front. Works for every style; start here.
- Corner mounds: slope rising toward the back corners with a valley in the center-back — the foundation of concave layouts. Creates a natural "amphitheater" drawing the eye inward.
- Side slope: high on one side, descending across the tank — pairs with diagonal compositions for strong directional flow.
- Island mound: raised center falling away on all sides — the base of island-style aquascapes. Needs retaining support; a center mound is the least stable shape.
- Terraced: stepped levels held by stone — formal, architectural, stunning with Dutch-style ordered planting on each level.
Planting on Slopes
Slopes change planting logic:
- Plant the slope face densely. Bare slope erodes; planted slope endures. Carpeting plants are ideal slope-holders — their runners knit the surface together.
- Match plant height to elevation. Tall stems planted on top of a high back section may hit the water surface and need constant trimming. Either lower the hill or choose mid-size background plants.
- Foreground plants at the front stay short — the low front is where your carpet or open sand lives, preserving the "valley floor" that makes the back look distant.
- Stagger heights down the slope: tall at the back crest, medium mid-slope, short at the front — this gradient amplifies the depth illusion beyond what the soil alone achieves.
Root tabs pushed into deep back sections feed heavy root feeders (swords, crypts) for months — deep substrate is only useful if it's also nutritious.
Maintenance: Keeping the Slope Alive
- Siphon gently on slopes. Jamming a gravel vac into a hill undoes weeks of root binding. Hover above the surface to lift detritus.
- Replant uprooted stems promptly. Every hole left in a slope is an erosion start. Keep spare plantlets to plug gaps.
- Watch for slumping after rescapes. Any time you pull plants from a slope, expect some settling — top up soil and replant the same session. Our rescape guide covers slope-safe replanting.
- Trim the crest. Plants on the hilltop grow fastest (closest to light); trim them most often or the hill disappears under a hedge. See trimming maintenance for shaping technique.
Choosing Substrate for Slopes
Not all substrates slope equally. Aquasoils (ADA Amazonia and equivalents) are the best sloping media — their irregular, angular granules interlock and resist sliding, and they hold a sculpted shape well when misted during setup. Coarse sand and fine gravel slope acceptably for gentle grades but migrate over time on anything steep; use them for subtle back-to-front rises, not hills. Very fine, round-grained sand is the worst — it flows like sugar and flattens within weeks unless terraced with stone. A popular compromise is an aquasoil core for structure capped with a thin sand veneer for looks: you get the stability of soil with the aesthetic of sand, and plant roots punch through the cap easily.
Frequently Asked Questions
Will a deep substrate cause anaerobic gas pockets?
In fine sand, possibly — hydrogen sulfide pockets can form in compacted sand deeper than 7–8 cm. In porous aquasoil or over lava-rock supports, it's rarely an issue because water circulates through the granules. Mitigate with Malaysian trumpet snails (they burrow and aerate), rooted plants (roots oxygenate substrate), and avoiding ultra-fine compacted sand at depth.
How do I slope substrate in an already-filled tank?
Carefully: push substrate back with a flat tool or your hand during a water change when the level is low, building the back up gradually over several sessions. It's fiddly and clouds water — the honest answer is that slopes are a setup-stage job. For major regrades, our rescape guide walks through doing it properly.
Can I slope inert sand, or does it need aquasoil?
You can slope any substrate, but aquasoil holds slopes better (angular granules interlock; round sand grains slide). For sand slopes, keep them gentler, terrace with stones, and plant densely. A sand cap over an aquasoil slope gives you the look of sand with the stability of soil — a common pro trick.
How steep is too steep?
Beyond about 30–35 degrees, even planted aquasoil migrates downhill over time. If your design needs steeper, you need terracing or hidden retaining structures — soil alone won't hold it. When in doubt, build the support; a collapsed hill mid-cycle is heartbreaking.
Does sloping waste substrate?
A big hill in a large tank can double substrate needs — which is exactly why hidden supports (lava rock bags) exist: they provide volume without cost or compaction. Budget one extra bag of aquasoil for a 60cm sloped build versus flat, and use supports for anything dramatic.
The Cheapest Upgrade in Aquascaping
No new light, no CO2 system, no rare plant — just soil, shaped with intention. A slope is the difference between a tank that looks like a box of plants and one that looks like a place. Build it during setup, support it honestly, plant it densely, and every layout you ever make benefits. Pair it with the focal discipline in our focal point placement guide and the compositional frameworks in triangle composition, and you have the complete structural toolkit for convincing depth.
Tissue-culture plants are the exception — they’re grown in sterile gel and adapt with minimal melting, which is part of what you’re paying for. Plants bought submersed from another hobbyist’s tank also transition with little melt, since they’re already in the right form.
Which Plants Melt Most (and Least)
Heavy melters (expect significant leaf loss)
- Cryptocorynes — infamous for “crypt melt,” sometimes dropping every leaf after any disturbance. They almost always recover from the roots within weeks.
- Stem plants grown emersed — rotala, ludwigia, and hygrophila often shed lower emersed leaves while the growing tips transition.
- Amazon swords — emersed-grown swords typically lose their broad oval aerial leaves and replace them with longer submersed ribbon leaves.
Light melters
- Anubias, java fern, bucephalandra — slow-growing rhizome plants transition gradually; occasional old-leaf melt but rarely dramatic.
- Vallisneria — usually transitions well, though it dislikes the move itself and may sulk for a week.
- Floating plants — minimal melt since their leaves were already at the air-water interface.
The Acclimation Protocol
Step 1: Quarantine or dip first
Before acclimating to your tank’s conditions, make sure you’re not acclimating pests along with the plant. Run new arrivals through our quarantine and dip protocol — it adds days upfront but prevents months of regret.
Step 2: Float to temperature-match (30 minutes)
Float the bag or container in your tank for 20–30 minutes to equalize temperature. Plants are less temperature-sensitive than fish, but a 10°F shock on top of transplant stress is an avoidable insult.
Step 3: Trim before planting
Remove any leaves that are already damaged, yellowing, or heavily algae-covered — they won’t recover and they’ll rot in your tank, feeding algae. For stem plants, trim off the bottom inch and any emersed leaves that look unlikely to adapt; the plant wastes energy maintaining leaves it’s going to shed anyway. Keep the healthy growing tips — that’s where recovery starts.
Step 4: Plant correctly the first time
Follow our planting guide — right depth, crown exposed on rosettes, rhizomes unburied on epiphytes. Every uprooting and replanting restarts the acclimation clock, so get placement right on the first attempt. Decide where each plant goes before it goes in the water.
Step 5: Run a gentle first week
For the first 7 days after planting:
- Moderate light — run your normal photoperiod but consider dropping intensity 20–30% if your light is dimmable. Blast-level light on a melting plant grows algae on the dying leaves, not recovery.
- Stable CO2 — if you inject CO2, keep it consistent. Fluctuating CO2 during acclimation is a melt accelerator. If you’re low-tech, this doesn’t apply — see growing without CO2.
- Half-strength fertilizer — new plants with damaged leaves can’t use full dosing, and the excess feeds algae. Ramp to full strength over 2–3 weeks per our fertilizer schedule.
- No disturbance — don’t move, trim, or “check on” new plants for at least two weeks. Every touch resets root establishment. This is especially critical for crypts.
Step 6: Remove melt, keep the base
As emersed leaves melt, remove the mushy material promptly — decaying leaves release ammonia and grow fungus that can spread to healthy tissue. But never discard the plant while the crown, rhizome, or roots are firm and alive. A crypt that’s lost every leaf but has firm roots is a plant that’s about to recover, not a dead plant. Give it 3–4 weeks before judging.
Telling Normal Melt From Real Problems
Normal transition melt:
- Affects oldest/emersed leaves first, newest growth last
- New submersed leaves emerge even as old ones dissolve
- Roots and crown stay firm and white/green
- Timeline: 1–4 weeks, then obvious new growth
Concerning melt (see our full melting diagnosis guide):
- New growth also melts or emerges deformed
- Rhizome or crown turns mushy and brown — this is rot, not transition
- Entire plant dissolves within days with no new growth after 4+ weeks
- Melting spreads to established plants that weren’t recently moved
Buying Tips to Minimize Melt
- Buy submersed-grown when available — hobbyist-grown cuttings transition with almost no melt.
- Choose tissue culture for sensitive species — crypts and delicate stems establish far more reliably from sterile cups.
- Avoid plants already melting in the store tank — some melt is normal, but a plant that’s mostly mush at purchase has less energy for recovery.
- Transport carefully — keep plants damp and out of direct sun/heat. A plant that dries out or cooks in a hot car melts far worse than one transported properly.
The First-Month Timeline: What to Expect Week by Week
Knowing what’s normal when removes most acclimation anxiety. Here’s the typical timeline for a healthy plant adapting to a new tank:
Week 1: The quiet week
Almost nothing visible happens. The plant is growing roots you can’t see and assessing its new environment. Some species (vallisneria, stem plants) may start shedding their lowest leaves. This is normal. Resist the urge to “help” — no moving, no extra fertilizer, no light changes. The most common beginner mistake is intervening during a week when the correct action is nothing.
Week 2: Melt peaks
This is when emersed leaves give up in earnest. Crypts may drop everything; swords shed their broad aerial leaves; stem plants lose lower foliage. It looks catastrophic and it’s usually fine. Keep removing mushy material, keep conditions stable, and watch the crown and growing tips — if those are firm and green, recovery is already underway.
Week 3: The turn
New submersed-adapted leaves emerge — smaller, thinner, often a slightly different shade of green than the emersed foliage. Stem plant tips start growing visibly; crypts push tiny curled leaves from the crown; swords unfurl narrow ribbon leaves. This is the moment most beginners exhale for the first time.
Week 4+: Established
New growth outpaces melt, and the plant is functionally yours. You can resume full-strength fertilizer, normal trimming, and stop treating it as fragile. Some slow growers (anubias, bucephalandra) take 6–8 weeks to show obvious progress — that’s their normal speed, not a problem.
Acclimating Different Plant Formats
Tissue-culture cups
Sterile, pest-free, and already adapted to high-humidity (not emersed) growth — tissue cultures melt the least of any format. Rinse the agar gel off gently (leftover gel rots and feeds fungus), split the portion into small plantlets, and plant per our planting guide. They establish slowly for the first two weeks, then accelerate. No dip needed, minimal acclimation stress — this is the premium experience you’re paying for.
Potted plants
Remove the pot and strip away the rockwool completely — leftover rockwool traps debris and rots. Tease the root mass apart gently; if it’s a dense mat, splitting it into 2–3 smaller portions actually establishes faster than planting one big clump (more growing points, better water flow around roots). Potted plants are usually emersed-grown, so expect the standard 2–4 week melt cycle.
Bare-root / bunched stems
Typically sold as weighted bunches. Remove any bands, foam, or weights, strip the lower leaves, and plant stems individually or in small groups. Bunched stems from the store are often already transitioning — check for new submersed growth at the tips, which tells you the plant is mid-adaptation and will settle quickly.
Hobbyist cuttings
Already submersed-grown and the fastest to establish — often showing new growth within days. The main acclimation factor is water-parameter difference between the two tanks. Float to temperature-match, plant promptly, and they’ll usually take off with minimal melt. This is why experienced hobbyists prefer trading cuttings over buying potted plants.
Frequently Asked Questions
Should I use a “plant starter” or transplant fertilizer?
Products marketed for transplant shock are mostly B-vitamins and mild hormones. They don’t hurt, but there’s no strong evidence they help aquarium plants specifically. Stable conditions and patience outperform any bottle. Save the money for more plants.
My new plant melted completely — bare crown, no leaves. Is it dead?
Probably not, if the crown or rhizome is firm. Crypts and swords routinely lose 100% of their leaves and regrow from the base within a month. The test is firmness: firm and pale/green means alive; mushy and brown/black means rot. Give firm-but-leafless plants a full 4 weeks before declaring them dead.
Can I speed up acclimation with extra light or CO2?
No — and trying usually backfires. A melting plant can’t use extra light; the excess just grows algae on its dying leaves. Keep light moderate and CO2 stable (not boosted) during acclimation. Growth speed comes from the plant’s own adaptation timeline, which you can’t rush, only avoid delaying.
Should new plants go straight into my main display tank?
After quarantine/dipping, yes — there’s no benefit to a separate “growing-in” tank for most plants. They acclimate to your water fastest in the tank they’ll live in. The exception is very delicate species going into a tank with boisterous fish; give those a few weeks in a calm corner or breeder box first.
The Patience Rule
The single most important acclimation skill is restraint: plant it right, set gentle conditions, remove decay, and then leave it alone for a month. The hobbyists with the best plant growth aren’t doing something clever in week one — they’re simply not interfering in weeks two through four while the plants do what they’ve evolved to do. Melt looks like failure and feels like failure, but in most cases it’s the visible part of a plant successfully becoming yours.