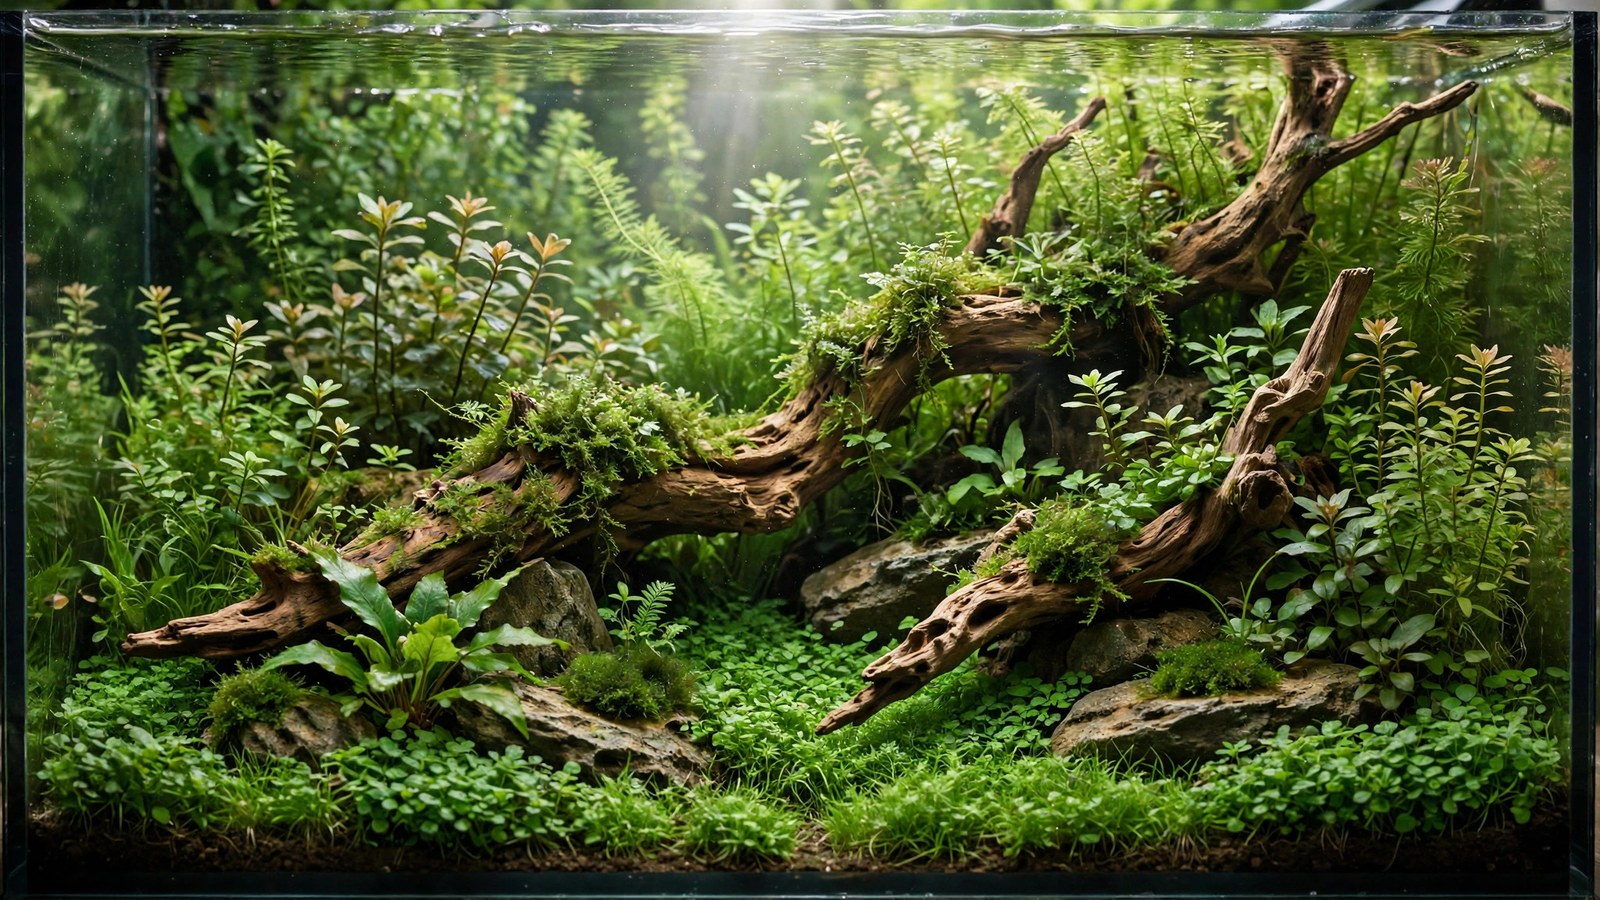
The Nature Aquarium style is the single most influential aquascaping movement ever — a nature aquarium style guide begins with understanding that Takashi Amano didn't just arrange plants in a tank, he imported Japanese garden philosophy into the aquarium and turned fishkeeping into landscape art. Before Amano, planted tanks were collections of plants; after him, they were forests, meadows, and mountain valleys rendered in miniature. If you want to build a layout that feels like a landscape instead of a fish tank with plants, this is the style to study first.
What the Nature Aquarium Style Actually Is
Amano founded the Nature Aquarium concept in the 1980s and codified it through his company ADA (Aqua Design Amano) and his legendary photo books, especially Nature Aquarium World. The style mimics natural terrestrial landscapes — forests, grasslands, mountain ridges — using aquatic plants as stand-ins for trees, grass, and shrubs. Unlike the Dutch style, which showcases plant specimens in ordered rows, the Nature Aquarium hides the artifice: plants grow in drifts and masses, hardscape peeks through vegetation like real geology, and the composition follows rules borrowed from Japanese gardens and landscape photography.
The philosophy rests on wabi-sabi — the Japanese aesthetic of finding beauty in imperfection and transience. Amano's tanks were never meant to be frozen in perfection; they were living landscapes that grew, filled in, and evolved. This is a crucial mindset shift for beginners: a Nature Aquarium at week two looks sparse and awkward. The same tank at month four, once plants have filled in and matured, can be breathtaking. Patience isn't optional in this style — it's the medium.
The Golden Ratio and Focal Placement
Amano's most famous technical contribution is applying the golden ratio (roughly 1:1.618) to aquarium composition. In practice, this means placing your focal point — the main stone, the hero piece of driftwood, the tallest plant grouping — not in the center, but at a point about 1/3 to 2/5 across the tank. A centered focal point divides the tank into two equal, competing halves; an off-center one creates visual tension and movement, pulling the eye through the scene.
This principle pairs directly with what we cover in our guide to focal point placement in aquascaping. In a Nature Aquarium, the focal point is often the largest stone (the "oyaishi" in Iwagumi layouts) or the main driftwood structure, and everything else — plant masses, secondary stones, open negative space — is arranged to support it. The focal point should draw the eye first, then release it to wander the rest of the composition. If your eye gets stuck in one spot and never moves, the layout needs adjustment.
Height matters as much as horizontal position. The golden ratio also governs the classic triangular compositions: the tallest element sits at one end (or at the golden-ratio point) and plant height descends diagonally across the tank. Our triangle composition guide walks through the three variations — standard, inverse, and island triangles — that dominate Nature Aquarium layouts.
Hardscape: Stone and Driftwood as Geology
In the Nature Aquarium, hardscape isn't decoration — it's the skeleton the whole layout hangs on. Amano's layouts begin with stone and wood selection and placement, and plants are chosen to complement the hardscape's character. This is why our hardscape-first method is essentially the Nature Aquarium workflow formalized for hobbyists: place your rocks and wood, live with the arrangement for days if needed, and only plant once the geology looks right.
Stone selection: Amano favored stones with character — Seiryu stone (with its white calcite veining), Ryuoh stone, and later Manten and other varieties. The key is consistency: use one type of stone per layout. Mixing stone types looks artificial because real landscapes don't mix geology randomly. Choose 3, 5, or 7 stones (odd numbers read as natural), with one dominant stone roughly 2/3 the height of the tank, and arrange them so they share a visual "flow" — tilted in the same direction, as if shaped by the same water or wind. See our one-rock minimalist layouts for what a single perfect stone can do.
Driftwood: Branchy wood like manzanita, spider wood, or ADA's famous Horn Wood creates the "forest" effect — plants like mosses and ferns attach to branches to suggest canopy. Root-style wood (red moor, bogwood) creates riverbank and mangrove scenes. Our single-driftwood layout guide covers building a whole scene around one piece. Amano often combined both: stone for the base structure, wood for vertical accents — but never in equal competing amounts. One material dominates; the other supports.
The critical Nature Aquarium rule for hardscape: bury at least 1/3 of every stone. Stones sitting on top of substrate look placed; stones emerging from substrate look geological. This single habit separates beginner layouts from convincing ones.
Substrate: The Layered Foundation
Amano pioneered the layered substrate system that the entire hobby now uses: a nutrient-rich base layer (his famous Power Sand) capped with a fine aquasoil (Aqua Soil Amazonia). The base layer feeds heavy root feeders over the long term; the aquasoil provides immediate nutrients, buffers pH slightly acidic, and gives plants something to root in. You don't need ADA-branded products — any quality aquasoil over a base of pumice or lava rock with root tabs achieves the same architecture.
Depth is part of the composition: Nature Aquariums almost always use a sloped substrate, deeper at the back (5–8 cm or more) and shallow at the front (2–3 cm). The slope does double duty — it creates the illusion of depth by raising the back of the scene, and it gives background stem plants the root depth they need. In larger tanks, Amano built dramatic terraces and hills using lava rock bags hidden under the soil, a technique that lets you sculpt genuine topography rather than a flat plane.
Plant Selection: The Classic Palette
The Nature Aquarium plant palette is deliberately restrained — typically 5 to 12 species per layout, repeated in masses. Fewer species, more of each. This is the opposite of the collector impulse to plant one of everything, and it's why Amano's tanks look coherent while beginner tanks look like plant soup.
The foreground: carpeting plants
The foreground is almost always a carpet — Hemianthus callitrichoides (HC Cuba), Glossostigma elatinoides, Eleocharis parvula (dwarf hairgrass), or Micranthemum 'Monte Carlo'. The carpet is the "meadow" or "forest floor" of the landscape, and its manicured flatness contrasts with the taller midground masses. Carpets are CO2-hungry; the classic Amano look essentially requires injected CO2 and strong light. If you're running low-tech, our carpeting without CO2 guide covers what's realistic, but set expectations honestly — the postcard Amano carpet is a high-tech achievement.
The midground: texture and transition
Midground plants bridge the carpet and the background. Amano's staples: Anubias nana 'Petite' and Bucephalandra on hardscape, Cryptocoryne parva and Staurogyne repens as low mounds, mosses (Taxiphyllum 'Spiky', Vesicularia) softening stone edges. Ferns — Microsorum pterotrichoides (narrow-leaf java fern), Bolbitis heudelotii — attach to wood to create the layered forest understory. This is where texture contrast between leaf shapes does its heaviest lifting: fine moss against broad anubias leaves, feathery Bolbitis against solid stone.
The background: height and depth
Background stems create the "forest" — Rotala species (rotundifolia, 'Colorata', wallichii), Ludwigia arcuata and inclinata, Hygrophila pinnatifida, Limnophila aromatica. Amano used color deliberately but sparingly: a drift of red Rotala against green, never a rainbow. Our color theory guide for aquascapers expands on his restraint — one or two accent colors maximum, with green doing 80% of the work. Red plants in a Nature Aquarium are punctuation, not prose.
The open space: negative space is a plant
Perhaps the most misunderstood Nature Aquarium element is negative space — areas of open sand, bare foreground, or clear water that give the composition room to breathe. Amano's layouts often leave a third or more of the foreground as open sand path or empty carpet-free zone. Beginners fill every centimeter; masters leave space. Negative space is what makes a 60cm tank feel like a valley instead of a crowded box.
CO2, Light, and the High-Tech Engine
Let's be direct: the classic Nature Aquarium look is a high-tech endeavor. Amano's tanks ran pressurized CO2 at roughly 30 ppm (the famous 1 bubble per second per 20 gallons starting point, tuned by drop checker), strong lighting (in his era, metal halides and power compacts; today, quality LEDs at 40–60+ PAR at substrate), and lean-but-consistent fertilization following the ADA system (Brighty K, Step series, etc.).
The CO2 isn't optional for the signature effects — dense HC Cuba carpets, vivid red stems, and the explosive growth that lets a layout "fill in" on schedule. Without it, you can still build a beautiful Nature-Aquarium-inspired layout with Monte Carlo, hairgrass, anubias, and ferns, but the growth will be slower and some species simply won't thrive. Our dry start method guide offers one workaround for carpets: grow the foreground emersed for 4–8 weeks before flooding, giving it a massive head start.
Water changes are part of the engine, not an afterthought. Amano's regime: 50% weekly water changes, religiously, especially in the first two months when aquasoil leaches ammonia. This single habit prevents more algae disasters than any product. New Nature Aquariums go through an ugly phase — diatoms, some hair algae — and heavy water changes plus fast-growing stems carry the tank through it.
Maintenance: The Gardener's Discipline
A Nature Aquarium is gardening, and Amano treated maintenance as the art's second half. Stem plants get trimmed weekly or biweekly once established — not hacked back all at once, but shaped. The technique: trim the tops, let side shoots bush out, replant the healthiest tops periodically to keep the mass dense from top to bottom. Our aquascape trimming maintenance guide details the methods that keep layouts sharp for months.
Carpets need mowing — yes, mowing. HC Cuba and Monte Carlo carpets are trimmed flat with curved scissors every few weeks, the clippings siphoned out, so the carpet stays dense instead of growing upward and detaching. Mosses get thinned before they smother hardscape. Foreground plants that creep into the negative space get edged back like a lawn. The layout you photograph at month six is maintained into existence, not planted into existence.
Plan on 30–60 minutes of maintenance weekly for a 60cm high-tech Nature Aquarium: water change, glass cleaning, trimming, filter check, fertilizing. It's a real commitment. If that sounds like too much, scale the ambition — a smaller tank or a lower-tech plant list still honors the style's principles without the workload.
Common Nature Aquarium Mistakes
- Too many species. The #1 beginner error. Pick 6–10 species and plant them in masses. One of everything looks like a nursery, not a landscape.
- Centered focal point. The hero stone dead-center splits the tank in two. Offset it to the golden-ratio point and watch the composition come alive.
- Stones sitting on the substrate. Bury a third of every stone or it looks placed, not geological.
- No slope. Flat substrate flattens the whole scene. Even 3–4 cm of back-to-front slope transforms depth perception.
- Judging the layout at week two. Nature Aquariums are grown, not assembled. Give any layout 8–12 weeks before declaring it a failure — most "failed" scapes were just impatient owners.
- Skipping the ugly phase plan. New aquasoil + strong light + no plant mass yet = algae. Heavy water changes and fast-growing stems in the first month aren't optional.
Many of these overlap with the errors in our beginner aquascaping mistakes guide — worth a read before you spend money on stone.
Frequently Asked Questions
Do I need ADA products to build a Nature Aquarium?
No. ADA pioneered the concepts — layered substrates, aquasoil, lily pipes, CO2 systems — but every element now has quality alternatives. Any nutrient-rich aquasoil, any reliable pressurized CO2 kit, and any full-spectrum LED will do. What you can't substitute is the design discipline: the golden ratio, restrained species count, and maintenance routine. Spend money on CO2 and light before brand-name substrate.
What tank size is best for a first Nature Aquarium?
The classic 60cm (roughly 20-gallon, 60×30×36cm) tank is the sweet spot — it's the size Amano designed most of his famous layouts for, big enough for real composition but small enough for affordable lighting and CO2. Smaller tanks compress the style awkwardly; larger ones multiply cost and maintenance. Start at 60cm, learn the style, then scale.
Can I do a Nature Aquarium without CO2?
You can build a Nature-Aquarium-inspired low-tech layout using Monte Carlo or hairgrass carpets (slow), anubias, ferns, mosses, and crypts — and it can look genuinely good. But the signature dense HC Cuba carpet, vivid red stems, and fast fill-in are high-tech results. Be honest about which you're building so your plant choices match your equipment.
How long does it take for a Nature Aquarium to look good?
Expect 8–16 weeks from planting to a mature, photogenic layout with CO2; 4–6 months without. The first month is the ugly phase (sparse plants, possible algae), months two and three are fill-in, and month four onward is refinement. Our guide on how long aquascapes take to fill in breaks down the timeline by plant type.
What's the difference between Nature Aquarium and Iwagumi?
Iwagumi is a sub-style within the Nature Aquarium umbrella — a minimalist rock-only layout (traditionally odd-numbered stones, one carpet species, minimal stems) governed by strict stone-placement rules. Nature Aquarium is the broader philosophy covering driftwood forests, valleys, and mixed hardscape scenes. Our Iwagumi layout guide covers the rock-only discipline specifically.
How many fish should a Nature Aquarium have?
Few, and small. Amano stocked lightly — a school of 20–30 small tetras or rasboras in a 60cm tank — because the layout is the star and heavy bioloads fight the pristine water the style demands. Small schooling fish also provide scale, making the landscape feel vast. Avoid large or boisterous fish that uproot carpets or shred stems.
Start With the Hardscape, End With Patience
The Nature Aquarium rewards the hobbyist who plans like a landscape architect and waits like a gardener. Choose your stone and wood with obsession, place them by the golden ratio, slope your substrate, plant restrained masses of a few species, inject CO2, change water relentlessly, and trim like you mean it. Do that for four months and you'll have a tank that stops visitors mid-sentence. For deeper technique on the structural side, continue with our concave valley layouts and diagonal leading-line compositions — both are Nature Aquarium compositional tools in their own right. And when the layout is mature, learn to photograph your aquascape properly — Amano was a photographer first, and presentation is part of the art.
For the historical and technical source material, ADA's official site (adana.co.jp) archives Amano's layouts and product philosophy, and the Tropica inspiration gallery offers hundreds of Nature-Aquarium-style layouts with full plant lists.
Tissue-culture plants are the exception — they’re grown in sterile gel and adapt with minimal melting, which is part of what you’re paying for. Plants bought submersed from another hobbyist’s tank also transition with little melt, since they’re already in the right form.
Which Plants Melt Most (and Least)
Heavy melters (expect significant leaf loss)
- Cryptocorynes — infamous for “crypt melt,” sometimes dropping every leaf after any disturbance. They almost always recover from the roots within weeks.
- Stem plants grown emersed — rotala, ludwigia, and hygrophila often shed lower emersed leaves while the growing tips transition.
- Amazon swords — emersed-grown swords typically lose their broad oval aerial leaves and replace them with longer submersed ribbon leaves.
Light melters
- Anubias, java fern, bucephalandra — slow-growing rhizome plants transition gradually; occasional old-leaf melt but rarely dramatic.
- Vallisneria — usually transitions well, though it dislikes the move itself and may sulk for a week.
- Floating plants — minimal melt since their leaves were already at the air-water interface.
The Acclimation Protocol
Step 1: Quarantine or dip first
Before acclimating to your tank’s conditions, make sure you’re not acclimating pests along with the plant. Run new arrivals through our quarantine and dip protocol — it adds days upfront but prevents months of regret.
Step 2: Float to temperature-match (30 minutes)
Float the bag or container in your tank for 20–30 minutes to equalize temperature. Plants are less temperature-sensitive than fish, but a 10°F shock on top of transplant stress is an avoidable insult.
Step 3: Trim before planting
Remove any leaves that are already damaged, yellowing, or heavily algae-covered — they won’t recover and they’ll rot in your tank, feeding algae. For stem plants, trim off the bottom inch and any emersed leaves that look unlikely to adapt; the plant wastes energy maintaining leaves it’s going to shed anyway. Keep the healthy growing tips — that’s where recovery starts.
Step 4: Plant correctly the first time
Follow our planting guide — right depth, crown exposed on rosettes, rhizomes unburied on epiphytes. Every uprooting and replanting restarts the acclimation clock, so get placement right on the first attempt. Decide where each plant goes before it goes in the water.
Step 5: Run a gentle first week
For the first 7 days after planting:
- Moderate light — run your normal photoperiod but consider dropping intensity 20–30% if your light is dimmable. Blast-level light on a melting plant grows algae on the dying leaves, not recovery.
- Stable CO2 — if you inject CO2, keep it consistent. Fluctuating CO2 during acclimation is a melt accelerator. If you’re low-tech, this doesn’t apply — see growing without CO2.
- Half-strength fertilizer — new plants with damaged leaves can’t use full dosing, and the excess feeds algae. Ramp to full strength over 2–3 weeks per our fertilizer schedule.
- No disturbance — don’t move, trim, or “check on” new plants for at least two weeks. Every touch resets root establishment. This is especially critical for crypts.
Step 6: Remove melt, keep the base
As emersed leaves melt, remove the mushy material promptly — decaying leaves release ammonia and grow fungus that can spread to healthy tissue. But never discard the plant while the crown, rhizome, or roots are firm and alive. A crypt that’s lost every leaf but has firm roots is a plant that’s about to recover, not a dead plant. Give it 3–4 weeks before judging.
Telling Normal Melt From Real Problems
Normal transition melt:
- Affects oldest/emersed leaves first, newest growth last
- New submersed leaves emerge even as old ones dissolve
- Roots and crown stay firm and white/green
- Timeline: 1–4 weeks, then obvious new growth
Concerning melt (see our full melting diagnosis guide):
- New growth also melts or emerges deformed
- Rhizome or crown turns mushy and brown — this is rot, not transition
- Entire plant dissolves within days with no new growth after 4+ weeks
- Melting spreads to established plants that weren’t recently moved
Buying Tips to Minimize Melt
- Buy submersed-grown when available — hobbyist-grown cuttings transition with almost no melt.
- Choose tissue culture for sensitive species — crypts and delicate stems establish far more reliably from sterile cups.
- Avoid plants already melting in the store tank — some melt is normal, but a plant that’s mostly mush at purchase has less energy for recovery.
- Transport carefully — keep plants damp and out of direct sun/heat. A plant that dries out or cooks in a hot car melts far worse than one transported properly.
The First-Month Timeline: What to Expect Week by Week
Knowing what’s normal when removes most acclimation anxiety. Here’s the typical timeline for a healthy plant adapting to a new tank:
Week 1: The quiet week
Almost nothing visible happens. The plant is growing roots you can’t see and assessing its new environment. Some species (vallisneria, stem plants) may start shedding their lowest leaves. This is normal. Resist the urge to “help” — no moving, no extra fertilizer, no light changes. The most common beginner mistake is intervening during a week when the correct action is nothing.
Week 2: Melt peaks
This is when emersed leaves give up in earnest. Crypts may drop everything; swords shed their broad aerial leaves; stem plants lose lower foliage. It looks catastrophic and it’s usually fine. Keep removing mushy material, keep conditions stable, and watch the crown and growing tips — if those are firm and green, recovery is already underway.
Week 3: The turn
New submersed-adapted leaves emerge — smaller, thinner, often a slightly different shade of green than the emersed foliage. Stem plant tips start growing visibly; crypts push tiny curled leaves from the crown; swords unfurl narrow ribbon leaves. This is the moment most beginners exhale for the first time.
Week 4+: Established
New growth outpaces melt, and the plant is functionally yours. You can resume full-strength fertilizer, normal trimming, and stop treating it as fragile. Some slow growers (anubias, bucephalandra) take 6–8 weeks to show obvious progress — that’s their normal speed, not a problem.
Acclimating Different Plant Formats
Tissue-culture cups
Sterile, pest-free, and already adapted to high-humidity (not emersed) growth — tissue cultures melt the least of any format. Rinse the agar gel off gently (leftover gel rots and feeds fungus), split the portion into small plantlets, and plant per our planting guide. They establish slowly for the first two weeks, then accelerate. No dip needed, minimal acclimation stress — this is the premium experience you’re paying for.
Potted plants
Remove the pot and strip away the rockwool completely — leftover rockwool traps debris and rots. Tease the root mass apart gently; if it’s a dense mat, splitting it into 2–3 smaller portions actually establishes faster than planting one big clump (more growing points, better water flow around roots). Potted plants are usually emersed-grown, so expect the standard 2–4 week melt cycle.
Bare-root / bunched stems
Typically sold as weighted bunches. Remove any bands, foam, or weights, strip the lower leaves, and plant stems individually or in small groups. Bunched stems from the store are often already transitioning — check for new submersed growth at the tips, which tells you the plant is mid-adaptation and will settle quickly.
Hobbyist cuttings
Already submersed-grown and the fastest to establish — often showing new growth within days. The main acclimation factor is water-parameter difference between the two tanks. Float to temperature-match, plant promptly, and they’ll usually take off with minimal melt. This is why experienced hobbyists prefer trading cuttings over buying potted plants.
Frequently Asked Questions
Should I use a “plant starter” or transplant fertilizer?
Products marketed for transplant shock are mostly B-vitamins and mild hormones. They don’t hurt, but there’s no strong evidence they help aquarium plants specifically. Stable conditions and patience outperform any bottle. Save the money for more plants.
My new plant melted completely — bare crown, no leaves. Is it dead?
Probably not, if the crown or rhizome is firm. Crypts and swords routinely lose 100% of their leaves and regrow from the base within a month. The test is firmness: firm and pale/green means alive; mushy and brown/black means rot. Give firm-but-leafless plants a full 4 weeks before declaring them dead.
Can I speed up acclimation with extra light or CO2?
No — and trying usually backfires. A melting plant can’t use extra light; the excess just grows algae on its dying leaves. Keep light moderate and CO2 stable (not boosted) during acclimation. Growth speed comes from the plant’s own adaptation timeline, which you can’t rush, only avoid delaying.
Should new plants go straight into my main display tank?
After quarantine/dipping, yes — there’s no benefit to a separate “growing-in” tank for most plants. They acclimate to your water fastest in the tank they’ll live in. The exception is very delicate species going into a tank with boisterous fish; give those a few weeks in a calm corner or breeder box first.
The Patience Rule
The single most important acclimation skill is restraint: plant it right, set gentle conditions, remove decay, and then leave it alone for a month. The hobbyists with the best plant growth aren’t doing something clever in week one — they’re simply not interfering in weeks two through four while the plants do what they’ve evolved to do. Melt looks like failure and feels like failure, but in most cases it’s the visible part of a plant successfully becoming yours.