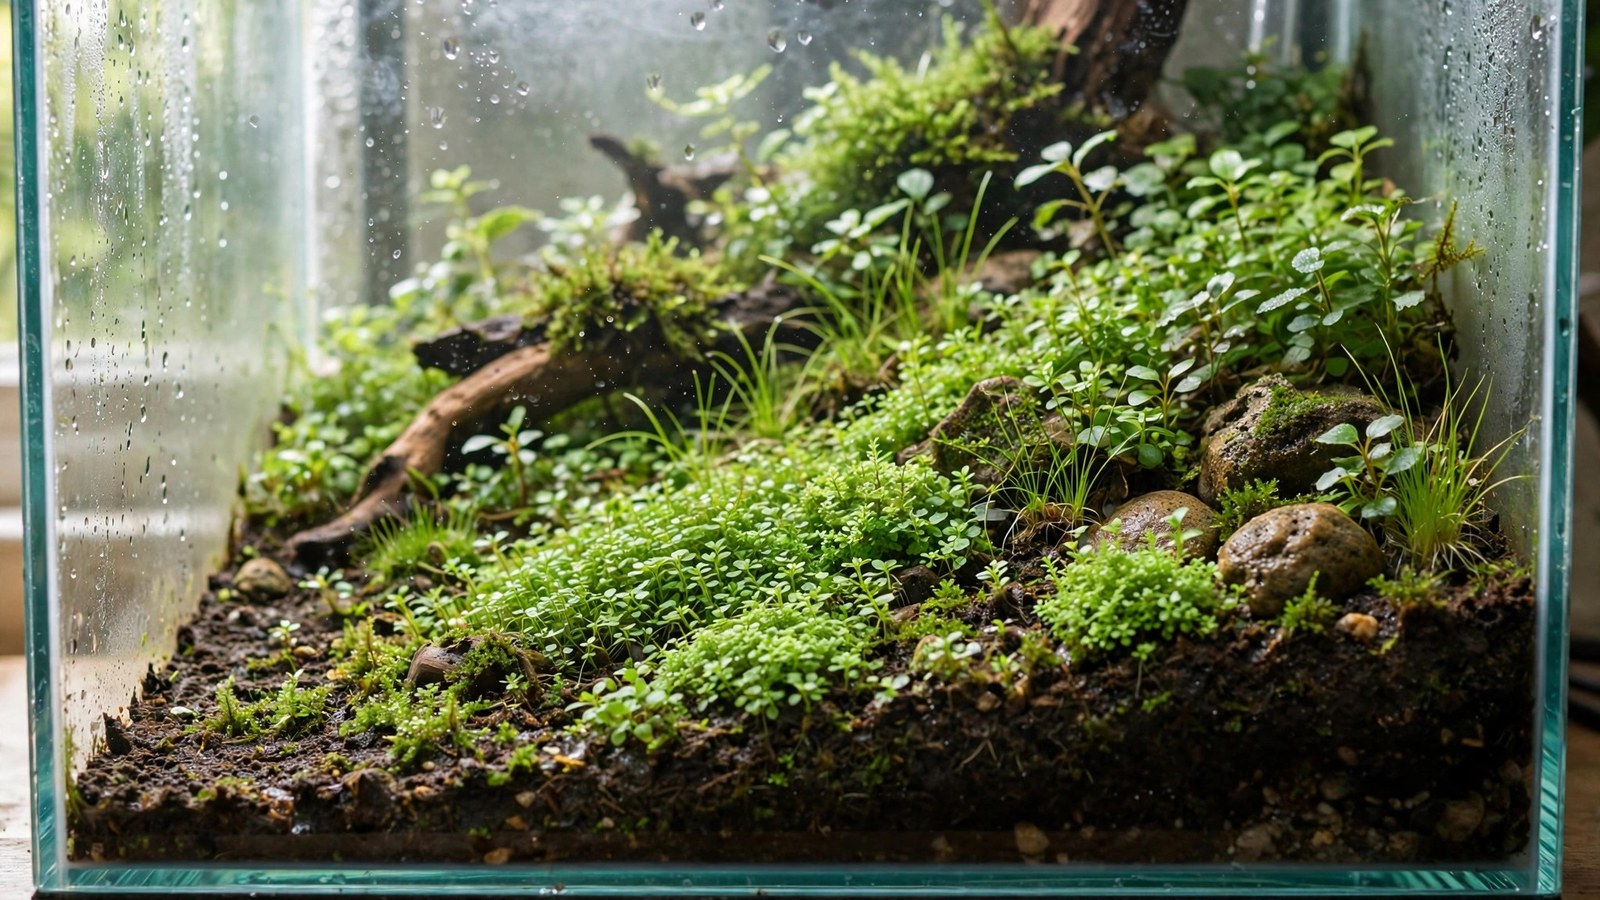
The dry start method (DSM) is beautifully counterintuitive: to grow an underwater carpet faster, don't add water. By growing carpeting plants emersed — in humid air, with their roots in damp substrate — for 4 to 8 weeks before flooding, you exploit a simple fact: plants grow dramatically faster with access to atmospheric CO2 than submerged with injected CO2. The result is a dense, deeply rooted carpet on flooding day instead of a few struggling plantlets. Here's the complete step-by-step.
Why Dry Start Works: The CO2 Advantage
Underwater, CO2 is scarce — even injected tanks max out around 30 ppm, and diffusion through water is slow. In air, CO2 sits at ~400 ppm and diffuses freely to every leaf. Emersed plants also get full, unfiltered light (no water column absorbing it) and zero algae competition on their leaves. The growth rate difference is staggering: a Hemianthus callitrichoides carpet that takes 3–4 months to establish submerged can fully carpet in 4–6 weeks via dry start.
The second advantage is root establishment. Dry-started plants develop deep, extensive root systems anchoring them firmly. When you flood, there's no melting-and-floating phase — the #1 carpet killer in conventional setups. The carpet is already a mat; flooding just changes its growing medium.
The trade-off: DSM only works for plants with viable emersed forms (most carpeting species qualify), and the transition to submerged growth still takes 1–2 weeks of adjustment after flooding. It's a technique for carpets and foregrounds, not whole-tank planting.
Best Plants for the Dry Start Method
- Hemianthus callitrichoides (HC Cuba / dwarf baby tears): the DSM poster child. Explosive emersed growth, carpets densely, transitions well. The reason most people try this method.
- Micranthemum 'Monte Carlo': slightly larger leaves, very forgiving emersed, arguably easier than HC Cuba for beginners.
- Glossostigma elatinoides: fast emersed spreader; needs strong light to stay compact.
- Eleocharis parvula / acicularis (dwarf hairgrass): excellent DSM candidate — sends runners aggressively in humid air.
- Staurogyne repens: creeps and roots firmly; great for foreground slopes.
- Mosses (Taxiphyllum, Vesicularia): attach to hardscape during DSM; they establish firmly before water arrives.
- Cryptocoryne parva: slow but steady; plant during DSM so it's established at flood.
Skip DSM for: stem plants (they grow leggy emersed and melt hard on flooding — plant these after flooding), Anubias/ferns (they're fine emersed but gain little from it; attach them anytime), and anything you can't keep humid.
The Setup: Building Your Dry Start
Step 1: Hardscape and substrate first
Complete your entire hardscape and substrate slope before planting — you won't want to rearrange once the carpet is growing. This is pure hardscape-first discipline: stone, wood, soil contours, all finalized. Mist the substrate as you shape it so slopes settle now, not later.
Step 2: Plant densely into damp substrate
Divide tissue-culture or potted carpets into small portions (pea-sized clumps for HC Cuba, 1cm plugs for Monte Carlo) and plant them 1–2 cm apart using tweezers. Small portions spread faster than big clumps — more growing edges. Push each portion firmly into the damp aquasoil so it contacts moisture. Cover the target area generously; DSM rewards heavy initial planting.
For mosses on hardscape: blend moss with yogurt or buttermilk (the traditional "moss milkshake"), paint it onto wood and stone, and it'll colonize during the dry phase. It looks absurd for a week; then it greens up.
Step 3: Mist, cover, and light
- Mist thoroughly with dechlorinated water — the substrate surface should glisten, with no puddles. Puddles = too wet = mold and rot.
- Cover with cling film (or a glass lid), leaving a small gap or a few holes for slight air exchange. You're building a greenhouse: near-100% humidity.
- Light 10–12 hours daily at the intensity you'd use for the flooded tank. Emersed plants want strong light; weak light grows leggy, pale spread.
- Temperature: normal room temp (70–78°F). Avoid heat mats and direct sun — a sealed tank in sun becomes an oven.
Step 4: The waiting game (4–8 weeks)
Daily: peek through the cover. Every 2–3 days: mist if the substrate surface looks dry, and air out the tank for 15–30 minutes (remove the cover) to exchange air and discourage mold. Weekly: check for mold spots (dab with hydrogen peroxide on a cotton swab; increase airing if persistent).
You'll see: week 1–2, plantlets establish and new tiny leaves appear; week 3–4, runners visibly spread; week 5–8, portions merge into a continuous mat. Don't flood early. The #1 DSM failure is impatience — flooding a patchy carpet gives you a patchy submerged carpet that then melts. Wait until coverage is 80%+ and you can't easily see substrate between plantlets.
Step 5: Flood slowly and carefully
When the carpet is dense:
- Fill very slowly — pour over a plate, plastic bag, or your hand to avoid cratering the carpet. Siphon water in if you're cautious (recommended).
- Fill to the top in one session; don't half-fill and wait days.
- Plant your stem plants and background now, into the flooded tank.
- Start CO2 and filtration immediately; begin your normal photoperiod (consider starting at 6 hours and ramping to 8 over two weeks).
- Do a 50% water change on day 2–3 — aquasoil releases ammonia when first flooded, and the established carpet plus water changes handle it.
Step 6: The transition (1–3 weeks post-flood)
Expect some melting of emersed leaves as the carpet grows submerged replacements — this is normal and far less severe than planting submerged-grown stock, because the root system is already massive. Don't uproot melting patches; trim away mush and let the roots push new growth. Within 2–3 weeks the carpet greens up in submerged form and resumes spreading. Our fill-in timeline guide covers what to expect week by week.
DSM Variations and Pro Tips
- DSM for slopes: the method's hidden superpower. A dry-started carpet's roots lock sloped substrate in place better than any retaining wall. If you're building hills, DSM isn't optional — it's structural.
- Fertilize the mist: after week 3, mist occasionally with heavily diluted all-in-one fertilizer (1/10 strength) to fuel the explosive growth phase.
- Dark start alternative: some aquascapers flood first, then run 2–3 weeks of no light with filtration (letting the cycle establish and soil settle) before planting and lighting. Different technique, similar patience payoff — but it doesn't give you the emersed growth boost.
- Partial DSM: dry-start only the foreground carpet area (dam the back with plastic wrap), then flood and plant the back normally. Useful when background stems can't wait.
- Photograph the process: weekly top-down photos of the spreading carpet are deeply satisfying and great for our aquascape photography practice.
Troubleshooting
- White mold on substrate: too wet, too sealed. Air out longer, mist less, dab mold with peroxide. Usually harmless to plants.
- Plants drying out: cover isn't sealed enough or misting too infrequent. Seal gaps; mist daily. Crispy plantlets rarely recover — replant those spots.
- No spreading after 3 weeks: usually insufficient light or the portions were planted too large. Increase light; divide remaining clumps smaller.
- Massive melt after flooding: flooded too early (sparse carpet), or CO2/light not started promptly. Keep CO2 strong, lights moderate, and wait — rooted carpets recover.
- Algae on the carpet post-flood: the transition window is vulnerable. Keep photoperiod short initially, maintain CO2, and let the established root mass outcompete it.
Frequently Asked Questions
Can I dry start without CO2 equipment for the flooded phase?
Yes — that's actually a major DSM use case. The emersed phase needs no CO2 system (the air provides it), and a densely rooted carpet transitions to low-tech submerged life far better than fresh plantlets. Pair DSM with our carpeting without CO2 guide for a genuinely achievable low-tech carpet.
How do I know when it's ready to flood?
Coverage test: look straight down — if you see more plant than substrate (80%+ coverage) and the portions have merged into a continuous mat that resists gentle tugging, it's ready. Time is secondary; some carpets take 4 weeks, some take 10. Coverage is the metric.
Can I dry start stem plants too?
Technically yes, practically no. Stems grow tall and leggy emersed, then melt dramatically on flooding — you gain little and risk a mess. DSM is for carpets, foregrounds, and mosses. Plant stems after flooding; they'll catch up fast in a mature tank.
Will the cling film cover cause problems?
Only if fully sealed with zero air exchange — then mold thrives and CO2 depletes. Leave a corner gap or poke holes, and air out 15–30 minutes every couple of days. Think greenhouse, not vacuum chamber.
Can I do DSM in a tank that already has water and fish?
No — DSM requires an empty, unfilled tank. It's a setup-stage technique. For established tanks, the alternative is planting heavily with tissue-culture carpets and managing the transition submerged, or doing a full rescape with a dry-start phase built in.
Does DSM work for Monte Carlo / hairgrass / Glosso specifically?
All three are excellent DSM candidates — Monte Carlo is arguably the most forgiving, hairgrass runners spread aggressively emersed, and Glosso carpets fast given strong light. HC Cuba gives the most dramatic before/after but is the fussiest about humidity consistency during the dry phase.
Patience, Compounded
The dry start method is delayed gratification as technique: two months of staring at a plastic-wrapped tank, then a flooding day where you unveil a lawn that would have taken four months the conventional way. For Nature Aquarium carpets, Iwagumi foregrounds, and any serious slope build, it's the closest thing to a cheat code the hobby offers — no extra equipment, just humidity, light, and the discipline to wait until the mat is truly ready.
Tissue-culture plants are the exception — they’re grown in sterile gel and adapt with minimal melting, which is part of what you’re paying for. Plants bought submersed from another hobbyist’s tank also transition with little melt, since they’re already in the right form.
Which Plants Melt Most (and Least)
Heavy melters (expect significant leaf loss)
- Cryptocorynes — infamous for “crypt melt,” sometimes dropping every leaf after any disturbance. They almost always recover from the roots within weeks.
- Stem plants grown emersed — rotala, ludwigia, and hygrophila often shed lower emersed leaves while the growing tips transition.
- Amazon swords — emersed-grown swords typically lose their broad oval aerial leaves and replace them with longer submersed ribbon leaves.
Light melters
- Anubias, java fern, bucephalandra — slow-growing rhizome plants transition gradually; occasional old-leaf melt but rarely dramatic.
- Vallisneria — usually transitions well, though it dislikes the move itself and may sulk for a week.
- Floating plants — minimal melt since their leaves were already at the air-water interface.
The Acclimation Protocol
Step 1: Quarantine or dip first
Before acclimating to your tank’s conditions, make sure you’re not acclimating pests along with the plant. Run new arrivals through our quarantine and dip protocol — it adds days upfront but prevents months of regret.
Step 2: Float to temperature-match (30 minutes)
Float the bag or container in your tank for 20–30 minutes to equalize temperature. Plants are less temperature-sensitive than fish, but a 10°F shock on top of transplant stress is an avoidable insult.
Step 3: Trim before planting
Remove any leaves that are already damaged, yellowing, or heavily algae-covered — they won’t recover and they’ll rot in your tank, feeding algae. For stem plants, trim off the bottom inch and any emersed leaves that look unlikely to adapt; the plant wastes energy maintaining leaves it’s going to shed anyway. Keep the healthy growing tips — that’s where recovery starts.
Step 4: Plant correctly the first time
Follow our planting guide — right depth, crown exposed on rosettes, rhizomes unburied on epiphytes. Every uprooting and replanting restarts the acclimation clock, so get placement right on the first attempt. Decide where each plant goes before it goes in the water.
Step 5: Run a gentle first week
For the first 7 days after planting:
- Moderate light — run your normal photoperiod but consider dropping intensity 20–30% if your light is dimmable. Blast-level light on a melting plant grows algae on the dying leaves, not recovery.
- Stable CO2 — if you inject CO2, keep it consistent. Fluctuating CO2 during acclimation is a melt accelerator. If you’re low-tech, this doesn’t apply — see growing without CO2.
- Half-strength fertilizer — new plants with damaged leaves can’t use full dosing, and the excess feeds algae. Ramp to full strength over 2–3 weeks per our fertilizer schedule.
- No disturbance — don’t move, trim, or “check on” new plants for at least two weeks. Every touch resets root establishment. This is especially critical for crypts.
Step 6: Remove melt, keep the base
As emersed leaves melt, remove the mushy material promptly — decaying leaves release ammonia and grow fungus that can spread to healthy tissue. But never discard the plant while the crown, rhizome, or roots are firm and alive. A crypt that’s lost every leaf but has firm roots is a plant that’s about to recover, not a dead plant. Give it 3–4 weeks before judging.
Telling Normal Melt From Real Problems
Normal transition melt:
- Affects oldest/emersed leaves first, newest growth last
- New submersed leaves emerge even as old ones dissolve
- Roots and crown stay firm and white/green
- Timeline: 1–4 weeks, then obvious new growth
Concerning melt (see our full melting diagnosis guide):
- New growth also melts or emerges deformed
- Rhizome or crown turns mushy and brown — this is rot, not transition
- Entire plant dissolves within days with no new growth after 4+ weeks
- Melting spreads to established plants that weren’t recently moved
Buying Tips to Minimize Melt
- Buy submersed-grown when available — hobbyist-grown cuttings transition with almost no melt.
- Choose tissue culture for sensitive species — crypts and delicate stems establish far more reliably from sterile cups.
- Avoid plants already melting in the store tank — some melt is normal, but a plant that’s mostly mush at purchase has less energy for recovery.
- Transport carefully — keep plants damp and out of direct sun/heat. A plant that dries out or cooks in a hot car melts far worse than one transported properly.
The First-Month Timeline: What to Expect Week by Week
Knowing what’s normal when removes most acclimation anxiety. Here’s the typical timeline for a healthy plant adapting to a new tank:
Week 1: The quiet week
Almost nothing visible happens. The plant is growing roots you can’t see and assessing its new environment. Some species (vallisneria, stem plants) may start shedding their lowest leaves. This is normal. Resist the urge to “help” — no moving, no extra fertilizer, no light changes. The most common beginner mistake is intervening during a week when the correct action is nothing.
Week 2: Melt peaks
This is when emersed leaves give up in earnest. Crypts may drop everything; swords shed their broad aerial leaves; stem plants lose lower foliage. It looks catastrophic and it’s usually fine. Keep removing mushy material, keep conditions stable, and watch the crown and growing tips — if those are firm and green, recovery is already underway.
Week 3: The turn
New submersed-adapted leaves emerge — smaller, thinner, often a slightly different shade of green than the emersed foliage. Stem plant tips start growing visibly; crypts push tiny curled leaves from the crown; swords unfurl narrow ribbon leaves. This is the moment most beginners exhale for the first time.
Week 4+: Established
New growth outpaces melt, and the plant is functionally yours. You can resume full-strength fertilizer, normal trimming, and stop treating it as fragile. Some slow growers (anubias, bucephalandra) take 6–8 weeks to show obvious progress — that’s their normal speed, not a problem.
Acclimating Different Plant Formats
Tissue-culture cups
Sterile, pest-free, and already adapted to high-humidity (not emersed) growth — tissue cultures melt the least of any format. Rinse the agar gel off gently (leftover gel rots and feeds fungus), split the portion into small plantlets, and plant per our planting guide. They establish slowly for the first two weeks, then accelerate. No dip needed, minimal acclimation stress — this is the premium experience you’re paying for.
Potted plants
Remove the pot and strip away the rockwool completely — leftover rockwool traps debris and rots. Tease the root mass apart gently; if it’s a dense mat, splitting it into 2–3 smaller portions actually establishes faster than planting one big clump (more growing points, better water flow around roots). Potted plants are usually emersed-grown, so expect the standard 2–4 week melt cycle.
Bare-root / bunched stems
Typically sold as weighted bunches. Remove any bands, foam, or weights, strip the lower leaves, and plant stems individually or in small groups. Bunched stems from the store are often already transitioning — check for new submersed growth at the tips, which tells you the plant is mid-adaptation and will settle quickly.
Hobbyist cuttings
Already submersed-grown and the fastest to establish — often showing new growth within days. The main acclimation factor is water-parameter difference between the two tanks. Float to temperature-match, plant promptly, and they’ll usually take off with minimal melt. This is why experienced hobbyists prefer trading cuttings over buying potted plants.
Frequently Asked Questions
Should I use a “plant starter” or transplant fertilizer?
Products marketed for transplant shock are mostly B-vitamins and mild hormones. They don’t hurt, but there’s no strong evidence they help aquarium plants specifically. Stable conditions and patience outperform any bottle. Save the money for more plants.
My new plant melted completely — bare crown, no leaves. Is it dead?
Probably not, if the crown or rhizome is firm. Crypts and swords routinely lose 100% of their leaves and regrow from the base within a month. The test is firmness: firm and pale/green means alive; mushy and brown/black means rot. Give firm-but-leafless plants a full 4 weeks before declaring them dead.
Can I speed up acclimation with extra light or CO2?
No — and trying usually backfires. A melting plant can’t use extra light; the excess just grows algae on its dying leaves. Keep light moderate and CO2 stable (not boosted) during acclimation. Growth speed comes from the plant’s own adaptation timeline, which you can’t rush, only avoid delaying.
Should new plants go straight into my main display tank?
After quarantine/dipping, yes — there’s no benefit to a separate “growing-in” tank for most plants. They acclimate to your water fastest in the tank they’ll live in. The exception is very delicate species going into a tank with boisterous fish; give those a few weeks in a calm corner or breeder box first.
The Patience Rule
The single most important acclimation skill is restraint: plant it right, set gentle conditions, remove decay, and then leave it alone for a month. The hobbyists with the best plant growth aren’t doing something clever in week one — they’re simply not interfering in weeks two through four while the plants do what they’ve evolved to do. Melt looks like failure and feels like failure, but in most cases it’s the visible part of a plant successfully becoming yours.