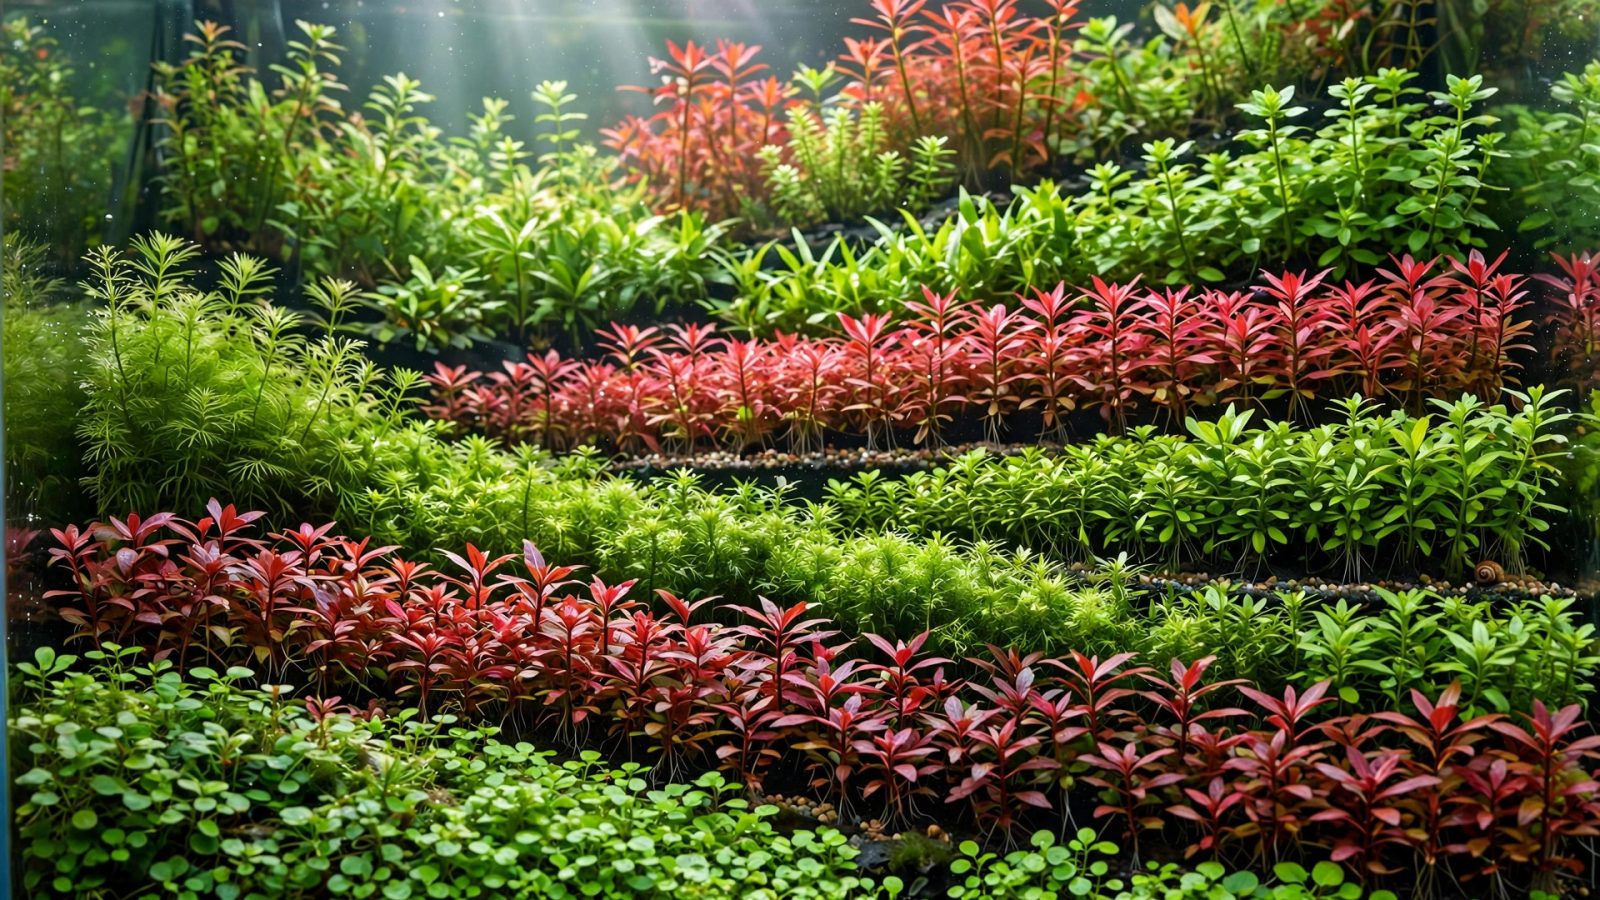
Dutch-style aquascaping is the oldest formal aquascaping tradition in the hobby — and in many ways the opposite of the minimalist iwagumi. Where iwagumi whispers with stone and carpet, a Dutch aquascape shouts with plants: dense, terraced rows of contrasting stem plants arranged like a flower garden, with color, leaf shape, and height doing all the compositional work. No hardscape focal points. No negative space. Just plants, disciplined into streets and terraces.
This guide covers the plant arrangement rules that define Dutch style: the terrace structure, the famous “one species per row” discipline, color and texture contrast, the rule-of-thirds planting streets, and which plants actually behave in a Dutch layout. Get these rules right and a Dutch tank looks like an underwater botanical garden; get them wrong and it looks like an overgrown weed bed.
Dutch Style vs. Other Aquascaping Styles
Understanding what Dutch isn’t clarifies what it is:
- vs. Iwagumi: Iwagumi is stone-dominant with one carpet species. Dutch is plant-dominant with dozens of species and (traditionally) no visible hardscape at all.
- vs. Nature style: Nature style mimics wild landscapes with wood and rock. Dutch mimics a formal garden — it celebrates cultivation, not wilderness.
- vs. Jungle style: Both are plant-heavy, but jungle style is deliberately wild and low-maintenance. Dutch is deliberately controlled and high-maintenance.
Dutch is the most horticulturally demanding mainstream style. It needs high light, CO2, rich substrate, and weekly trimming discipline. If that sounds like a lot, it is — but the payoff is a tank with more color and variety than any other style.
The Core Rules of Dutch Plant Arrangement
Rule 1 — Terraces, not flat substrate
Dutch tanks are built on terraces: the substrate rises from front to back in distinct steps, like rice paddies. Each terrace holds one “street” of plants. Terraces serve two purposes: they lift background plants into view (critical in a style with no hardscape height), and they create the layered depth the style is famous for.
Build terraces 8–15 cm tall using substrate supports — lava rock in mesh bags, cut pond foam, or purpose-made terrace walls hidden under the substrate. Bare aquasoil slumps; a terrace that collapses after three months ruins the layout’s geometry.
Rule 2 — One species per group (“streets”)
The defining Dutch discipline: each plant group contains a single species, planted in a distinct block or “street” running front-to-back or side-to-side. Minimum group size is traditionally about 10 cm wide — big enough to read as a deliberate mass, not a stray clump.
This is the rule beginners break most. Mixing three stem species in one bunch looks “natural,” but in Dutch style it reads as messy. Each street should be a pure, readable color-and-texture statement: a street of red Ludwigia, a street of fine-leaved Rotala, a street of broad Hygrophila.
Rule 3 — Contrast every neighbor
Adjacent streets must contrast in at least two of three ways: color, leaf size, leaf shape. Red next to green. Fine leaves next to broad leaves. Feathery texture next to solid. Two similar green stem plants side by side blur into one indistinguishable mass — the most common reason Dutch layouts look muddy.
Plan your streets on paper first. Lay out the sequence — e.g., bright green Hemianthus → red Alternanthera → fine Rotala wallichii → broad green Hygrophila — and check that every boundary is a visible contrast.
Rule 4 — The rule of thirds, in streets
Dutch layouts traditionally place their primary focal street at the one-third or two-thirds mark of the tank’s width — the same focal-point discipline other styles use, applied to plant masses instead of stones. The showpiece street (often the reddest or most unusual plant) sits at the golden-ratio point; supporting streets step down in visual intensity toward the edges.
Rule 5 — Height flows back and to the sides
Plant height increases toward the back and (traditionally) toward one side, creating a diagonal flow across the tank. Foreground: carpets and low rosettes. Midground: bushy stems 15–25 cm. Background: tall stems reaching the surface. The classic Dutch silhouette, viewed from the side, is a rising wedge — never a flat wall of plants all one height.
Choosing Plants for a Dutch Layout
A Dutch tank typically uses 10–15 species. You need reliable, fast-growing stems that respond well to trimming — slow or fussy plants can’t keep up with the style’s maintenance rhythm. Proven Dutch performers:
Red and orange streets (the focal colors)
- Ludwigia super red / Ludwigia palustris — the workhorse red. Intense color under high light, fast grower, trims well.
- Alternanthera reineckii ‘Mini’ — compact red rosette for midground streets; slower than Ludwigia, so place it where it won’t be shaded out.
- Rotala macrandra — spectacular red-pink under high light and CO2, but demanding; a showpiece street, not a beginner pick.
- Ammannia gracilis — orange-gold tones, broad leaves; excellent contrast next to fine red stems.
Green streets (the structure)
- Hygrophila polysperma / corymbosa — bulletproof broad-leaf green; the backbone street in countless Dutch tanks.
- Rotala rotundifolia / green — fine leaves, fast, trims into dense bushes; the classic fine-texture green.
- Limnophila sessiliflora — feathery, bright green, extremely fast; great for background fill.
- Bacopa caroliniana — succulent round leaves, slow and tidy; good where you want a calm green block.
Foreground and accents
- Staurogyne repens — the Dutch foreground standard: compact, bright green, carpets under high light.
- Helanthium tenellum (pygmy chain sword) — grassy foreground texture contrasting with broad-leaf streets.
- Anubias nana ‘Petite’ on the rare visible stone — traditional Dutch uses no hardscape, but a single small accent stone with Anubias is a common modern concession.
For individual species care, browse our plant profiles — and note that nearly every Dutch street plant wants the high-light, CO2-enriched conditions our lighting and CO2 guides describe.
Building the Layout: Step by Step
Step 1 — Plan on paper
Draw the tank footprint from above. Mark the terraces, then assign one species per street, checking the contrast rule at every boundary. Count your species (aim for 10–15) and your focal street position (one-third mark). This planning hour saves months of replanting.
Step 2 — Build terraces
Place supports, then aquasoil: shallowest at the front (3–4 cm), stepping up to 15–20 cm at the back. Mist and firm each layer. The terraces must be stable — they’ll carry the whole composition.
Step 3 — Plant back to front, tallest first
Plant background streets first (tall stems in the deepest substrate), then midground, then foreground last. Plant stems in staggered rows 3–4 cm apart within each street — dense from day one. Dutch tanks are planted heavily at setup; sparse planting invites algae into a high-light, high-nutrient system.
Step 4 — Flood, CO2 on, lights at 6 hours
Start the photoperiod short (6 hours) and ramp to 8 over two weeks as plants establish. CO2 from day one — Dutch plants without CO2 grow leggy and lose the compact form the style depends on.
The Dutch Trimming Discipline
This is where Dutch tanks are won or lost. Stem plants must be trimmed every 1–2 weeks:
- Top and replant: cut stems at the desired height, replant the healthy tops, discard or compost the leggy bottoms. This keeps streets dense from base to tip.
- Never let streets shade each other. A tall street shading its neighbor for two weeks can melt the shaded street’s lower leaves, opening a bare patch that takes a month to fill.
- Thin aggressively. Dutch streets get denser with each trim cycle; remove excess stems ruthlessly or the street chokes itself and rots from the inside.
- Keep street boundaries crisp. Runners and stray stems crossing into the neighboring street blur the contrast the whole style depends on. Weed the boundaries weekly.
Expect to spend 45–90 minutes per week maintaining a Dutch tank. If that sounds like too much, the style will punish you — consider jungle style or a nature-style triangle layout instead. Honesty here saves you a failed scape.
Fertilizer and Water: Feeding a Dutch Tank
A Dutch layout is the most nutrient-hungry style in the hobby. Dozens of fast-growing stems under high light and CO2 strip nutrients fast. Run a complete EI-style dosing regime: macros (nitrogen, phosphorus, potassium) and micros (iron, traces) dosed on alternating days, with a 50% weekly water change to reset. Pale new growth = bump iron and nitrogen; pinholes in older leaves = potassium.
The aquasoil base handles root nutrition for the first 6–12 months; after that, root tabs under heavy-feeding streets keep them lush. Because every street is a different species with slightly different appetites, watch each street individually — the Rotala will tell you about iron before the Hygrophila does.
Common Dutch Mistakes
- Mixed-species streets — one species per group, no exceptions.
- Low-contrast neighbors — every boundary must contrast in color, leaf size, or shape.
- Flat substrate — without terraces, background streets disappear behind midground ones.
- Too few plants at setup — plant heavily on day one; a high-energy Dutch tank with bare substrate grows algae, not plants.
- Skipping trims — two missed weeks can collapse a street. The style demands the schedule.
- No CO2 — Dutch without CO2 produces leggy, pale streets that never achieve the dense, colorful form. This is a high-tech style; embrace it or choose another.
See 11 aquascaping mistakes beginners make for the broader list.
Is Dutch Right for You?
Choose Dutch if: you love horticulture as much as fishkeeping, you enjoy weekly hands-on maintenance, you want maximum color and variety, and you’re ready for high light + CO2 + EI dosing. Skip Dutch if: you want a low-maintenance tank, you’re new to CO2, or you’d rather watch fish than trim plants. There’s no shame in that — island style and jungle style deliver beauty with a fraction of the work.
Frequently Asked Questions
How many plant species go in a Dutch aquascape?
Typically 10–15 species, each in its own pure “street” at least 10 cm wide. Fewer than 8 streets starts looking sparse for the style; more than 18 gets hard to maintain.
Can I do a Dutch aquascape without CO2?
Not successfully in the traditional sense. The dense, compact, colorful growth Dutch depends on requires CO2 enrichment. Low-tech plant-heavy tanks are better built as jungle style.
Do Dutch aquascapes use hardscape?
Traditionally, no visible hardscape at all — plants are the entire composition. Modern interpretations sometimes include a single small accent stone, but wood-and-rock focal points belong to other styles.
How often do you trim a Dutch tank?
Every 1–2 weeks for stem streets, plus weekly boundary weeding. Budget 45–90 minutes a week.
Sample Dutch Street Plan (60 cm Tank)
Here’s a concrete 12-street plan for a standard 60×30×36 cm tank, left to right. Every boundary contrasts in color, leaf size, or texture:
- Left edge: Hygrophila polysperma (broad green, tall) — the calm anchor
- Street 2: Ludwigia super red (red, medium leaf) — first color hit
- Street 3: Rotala rotundifolia green (fine green) — texture contrast
- Street 4: Alternanthera reineckii ‘Mini’ (red rosette, compact) — focal street at the one-third mark
- Street 5: Limnophila sessiliflora (feathery bright green) — fine texture against the compact red
- Street 6: Ammannia gracilis (broad orange-gold) — warm color mass
- Street 7: Rotala wallichii (fine pink-red) — delicate contrast to the broad Ammannia
- Street 8: Bacopa caroliniana (round succulent green) — calm green rest
- Street 9: Ludwigia palustris (red-green) — color return
- Street 10: Hygrophila corymbosa (broad green, tall) — structural backbone
- Right edge: Vallisneria nana (grassy vertical) — edge screen
- Foreground throughout: Staurogyne repens carpet with a Cryptocoryne parva accent
Check every adjacent pair: green→red (color), red→fine-green (texture), fine→rosette (form)… no two neighbors share both color and leaf type. That’s the discipline. Adapt the species to what your local shop stocks — the pattern of contrasts matters more than exact species.
CO2 and Lighting: Dutch Non-Negotiables
Dutch is a high-energy style. The requirements aren’t suggestions:
- Light: 50–70 PAR at substrate, 8-hour photoperiod. Red plants need high light for color — under medium light, “red” streets grow green.
- CO2: pressurized, 25–30 ppm, on 1–2 hours before lights-on, off 1 hour before lights-off. Drop-checker lime-green by the time lights start.
- Flow: gentle but thorough — CO2 and nutrients must reach every street. A spray bar along the back wall gives even distribution without blasting plants.
- Water changes: 50% weekly. EI dosing plus heavy feeding plus dense plants = reset weekly or algae compounds.
Without CO2, Dutch streets grow leggy, lose color, and the trimming response (bushy regrowth) barely happens. This is the style where CO2 matters most — more than iwagumi, more than nature style. Budget for it or choose jungle style instead.
The Dutch Learning Curve: Year One
- Months 1–3: streets establish; you’re learning each species’ growth rate. Some streets will outrun others — replant slower streets with more stems to compensate.
- Months 4–6: the trimming rhythm clicks. Streets get denser with each cut-and-replant cycle. This is when the tank starts looking like the plan.
- Months 6–12: maturity. Streets are thick, colors are saturated, and you’re propagating enough trimmings to start a second tank (every Dutch keeper’s inevitable fate).
- Month 12+: substrate exhaustion begins — aquasoil depletes around the one-year mark under heavy feeding. Add root tabs or plan a substrate refresh. Some keepers rescape annually; the teardown is also a deep-clean opportunity.