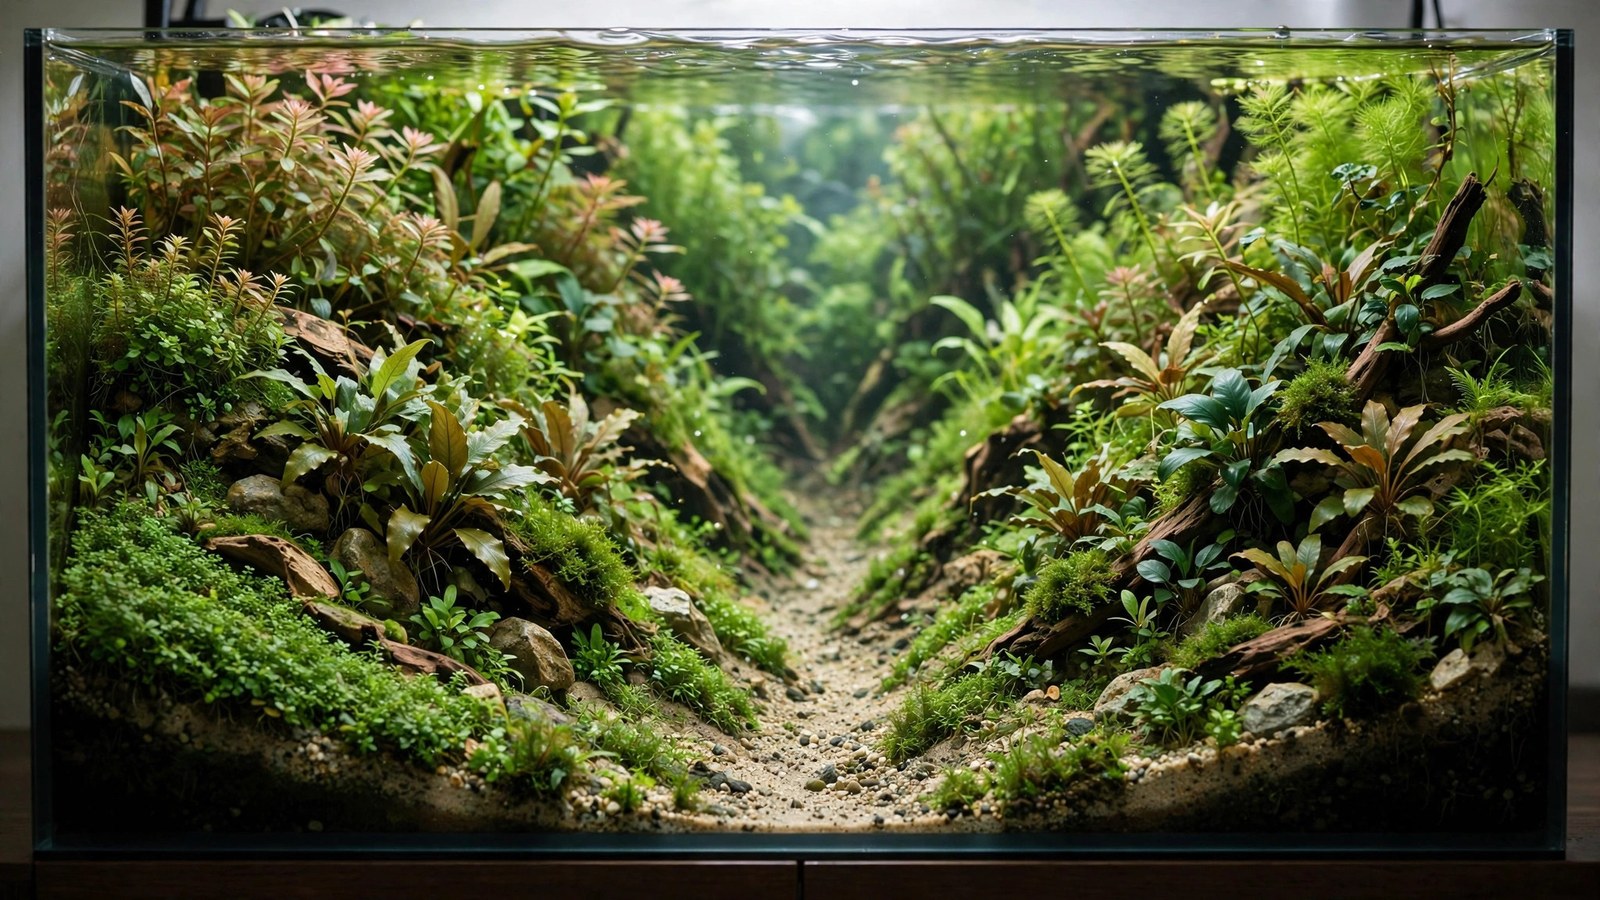
The concave layout is the valley technique — hardscape and planting rise on both sides while the center dips low, creating a sweeping U-shaped composition that pulls the viewer's eye into the middle distance and refuses to let go. It's the most immersive of the classic layout forms: where triangles direct and islands isolate, the concave layout envelops, making the viewer feel like they're standing at the mouth of a valley looking in. Here's how to build one that actually works.
What Makes a Layout Concave
A concave aquascape is defined by its height profile: high on the left, high on the right, low in the center — a valley cross-section. The sides are built from hardscape mounds (stone piles, driftwood masses) planted with midground and background species, while the center holds low carpet, open sand, or a "river" of negative space receding toward the back.
The psychological effect is powerful: the raised sides create framing (like a proscenium arch), the low center creates a sightline into depth, and the symmetry-ish balance feels stable and grand. It's the layout of mountain valleys, amphitheaters, and river gorges — landscapes humans are wired to find beautiful.
Compare with its siblings: triangle composition is directional and dynamic; island style is isolated and self-contained; concave is embracing and deep. Many Nature Aquarium masterworks are concave at heart.
Building the Valley: Hardscape Architecture
The concave layout is hardscape-intensive — the valley walls must be structural, not just planted mounds (planted mounds slump; stone-and-wood walls endure).
The two walls
Build a substantial hardscape mass on each side, each roughly 1/4 to 1/3 of the tank's width, leaving the central third open. Each wall should:
- Rise to 1/2–2/3 of tank height at its peak (usually toward the back of the wall, sloping down toward the front).
- Use one material per wall (stone wall left, wood mass right is fine — mixed materials within a single wall look chaotic).
- Lean slightly inward — the walls should embrace the valley, with their visual weight angled toward the center. Outward-leaning walls feel like they're escaping the composition.
- Be asymmetric: make one wall taller, bulkier, or more complex than the other. Perfect mirror symmetry looks artificial; aim for balanced asymmetry — the smaller wall sits slightly forward, the larger slightly back, or they differ in material.
Structural technique
Valley walls need volume. Use the hidden-support methods from our substrate sloping guide: lava-rock bags as wall cores, capped with aquasoil; stones stacked as retaining faces; driftwood wedged and buried. Build the walls before adding the valley floor substrate, and test-stability check by gently pushing — a wall that shifts dry will collapse wet.
The valley floor: a gentle back-to-front slope is fine, but keep it low and clean — the floor's job is to be the stage, not compete with the walls. Some aquascapers run a sand "river" down the center: pale sand winding between planted walls, suggesting a streambed. It's a cliché because it works — the winding river is the strongest depth cue in the layout vocabulary.
Planting the Valley
The walls: layered density
Plant walls in vertical layers, tallest at the back crest descending toward the valley:
- Crest (top of walls): background stems or tall ferns — Rotala, Ludwigia, Bolbitis on wood. This is the "ridgeline."
- Mid-wall: midground plants — Cryptocoryne, Anubias on stone, Bucephalandra. The "forest slope."
- Wall base (valley edge): low transition plants — Staurogyne, Crypt parva, moss creeping onto the floor. The "foothills" — this transition zone is critical; a hard wall-to-floor line looks constructed, while a planted gradient looks grown.
The floor: restraint
The valley floor gets one carpet species (HC Cuba, Monte Carlo, hairgrass) or clean sand — never busy planting. The floor is negative space with texture; its emptiness is what makes the walls feel tall. Consider the dry start method for the floor carpet — a flawless lawn on day one of flooding.
Color discipline
Concave layouts look best with restrained color: green walls, one red accent group on a single wall's crest (never both — symmetry kills it). Our color theory guide covers accent placement; in a valley, the accent belongs on the dominant wall, drawing the eye up and over.
Creating Maximum Depth
The concave layout's superpower is depth — amplify it deliberately:
- Widen the back: angle the walls so the valley is narrower at the front, wider at the back (forced perspective in reverse reads as distance) — or narrower at the back for a "distant gorge" effect. Either manipulation beats parallel walls.
- Scale plants down toward the back: smaller-leaf species at the back crest read as farther away (aerial perspective trick from landscape painting).
- Light the valley: a slightly brighter zone at the valley's back-center draws the eye through — achieved with a focused LED or just by keeping back-center plants low so light penetrates.
- Mist the background: in photography, a frosted or gradient background behind the valley enhances the illusion of atmospheric distance.
- Fish as scale: a school of small tetras crossing the valley floor gives the landscape its scale — without them, viewers can't tell if the valley is 30cm or 3m. This is why Nature Aquarium valleys always have schooling fish.
Common Concave Mistakes
- Walls too low: timid walls (1/3 height) don't read as valley — they read as two bumps. Commit to height; the valley needs enclosure to work.
- Perfect symmetry: identical walls look like a stage set. Vary height, bulk, material, or planting between sides.
- Cluttered floor: rocks, wood bits, and plant clumps scattered on the valley floor destroy the sightline. The floor is sacred — keep it clean.
- Walls meeting at the back: if the walls touch in the back-center, the valley becomes a dead-end alcove instead of a receding vista. Leave a gap or low saddle at the back-center so the eye escapes into implied distance.
- Ignoring the front: the valley's mouth (front-center) should invite entry — low carpet flowing to the front glass, maybe the river widening. A tall plant blocking the mouth slams the door.
Several of these echo the general pitfalls in our beginner mistakes guide — worth cross-checking before you commit stone.
Stocking the Valley
Fish complete the concave illusion by providing scale. A school of 20–30 small tetras or rasboras (cardinal tetras, harlequin rasboras, green neons) crossing the valley floor tells the viewer exactly how vast the landscape is — without them, the valley's size is ambiguous and the composition feels oddly empty. Keep the school in the open center; fish naturally patrol the sightline, and their movement becomes part of the layout. Avoid large or territorial centerpiece fish that claim one wall and unbalance the composition — the valley is about the school moving through space, not an individual holding ground. Bottom dwellers (a small group of Corydoras or otos) work the floor without disrupting the sightline, and shrimp colonies grazing the walls add micro-life that rewards close viewing.
Frequently Asked Questions
What tank shape suits concave layouts best?
Wider is better — the valley needs lateral room for two walls plus a meaningful center. A 60cm (20-gallon long footprint) is the practical minimum; 90cm+ is where concave layouts become spectacular. Tall narrow tanks compress the valley awkwardly. Our 20-gallon long ideas include concave variants sized for that footprint.
Can I build concave with only driftwood, no stone?
Yes — two wood masses (root tangles or branch clusters) form excellent valley walls, especially for blackwater or biotope valleys. The structural challenge is greater (wood is less stackable than stone), so use buried supports and wedge pieces firmly. Mixed walls (stone one side, wood the other) are also classic.
How do I maintain the walls without collapsing them?
Trim wall plants carefully with long scissors, working top-down; never yank stems out of a wall (it destabilizes the structure — cut at the base and let the stump rot out, or pull very gently). Siphon the valley floor normally. Inspect wall stability monthly; re-wedge anything shifting. See trimming maintenance for wall-shaping technique.
Does concave work in nano tanks?
It's challenging below 45cm — the walls eat the limited width and the valley becomes a slit. In small tanks, a single-wall + open side (half-concave, essentially a triangle) usually works better. Save full concave for 60cm+.
What's the difference between concave and island layouts?
Concave is a valley between two masses, open at the front, drawing the eye inward and back. Island is a single central mass surrounded by open space, drawing the eye to the center. They're compositional opposites — valley vs. mountain. Our island-style guide covers the other pole.
The Valley Awaits
Build two walls with conviction, keep the floor sacred, vary the sides, and leave the back open to implied distance — the concave layout does the rest, pulling every viewer into your valley. It's the most structurally demanding of the classic forms, but also the most rewarding: a well-built concave aquascape doesn't look like a tank at all. It looks like somewhere. For the directional counterpart to valley composition, study diagonal leading lines next — the two techniques combine beautifully when a valley's river runs on the diagonal.
Tissue-culture plants are the exception — they’re grown in sterile gel and adapt with minimal melting, which is part of what you’re paying for. Plants bought submersed from another hobbyist’s tank also transition with little melt, since they’re already in the right form.
Which Plants Melt Most (and Least)
Heavy melters (expect significant leaf loss)
- Cryptocorynes — infamous for “crypt melt,” sometimes dropping every leaf after any disturbance. They almost always recover from the roots within weeks.
- Stem plants grown emersed — rotala, ludwigia, and hygrophila often shed lower emersed leaves while the growing tips transition.
- Amazon swords — emersed-grown swords typically lose their broad oval aerial leaves and replace them with longer submersed ribbon leaves.
Light melters
- Anubias, java fern, bucephalandra — slow-growing rhizome plants transition gradually; occasional old-leaf melt but rarely dramatic.
- Vallisneria — usually transitions well, though it dislikes the move itself and may sulk for a week.
- Floating plants — minimal melt since their leaves were already at the air-water interface.
The Acclimation Protocol
Step 1: Quarantine or dip first
Before acclimating to your tank’s conditions, make sure you’re not acclimating pests along with the plant. Run new arrivals through our quarantine and dip protocol — it adds days upfront but prevents months of regret.
Step 2: Float to temperature-match (30 minutes)
Float the bag or container in your tank for 20–30 minutes to equalize temperature. Plants are less temperature-sensitive than fish, but a 10°F shock on top of transplant stress is an avoidable insult.
Step 3: Trim before planting
Remove any leaves that are already damaged, yellowing, or heavily algae-covered — they won’t recover and they’ll rot in your tank, feeding algae. For stem plants, trim off the bottom inch and any emersed leaves that look unlikely to adapt; the plant wastes energy maintaining leaves it’s going to shed anyway. Keep the healthy growing tips — that’s where recovery starts.
Step 4: Plant correctly the first time
Follow our planting guide — right depth, crown exposed on rosettes, rhizomes unburied on epiphytes. Every uprooting and replanting restarts the acclimation clock, so get placement right on the first attempt. Decide where each plant goes before it goes in the water.
Step 5: Run a gentle first week
For the first 7 days after planting:
- Moderate light — run your normal photoperiod but consider dropping intensity 20–30% if your light is dimmable. Blast-level light on a melting plant grows algae on the dying leaves, not recovery.
- Stable CO2 — if you inject CO2, keep it consistent. Fluctuating CO2 during acclimation is a melt accelerator. If you’re low-tech, this doesn’t apply — see growing without CO2.
- Half-strength fertilizer — new plants with damaged leaves can’t use full dosing, and the excess feeds algae. Ramp to full strength over 2–3 weeks per our fertilizer schedule.
- No disturbance — don’t move, trim, or “check on” new plants for at least two weeks. Every touch resets root establishment. This is especially critical for crypts.
Step 6: Remove melt, keep the base
As emersed leaves melt, remove the mushy material promptly — decaying leaves release ammonia and grow fungus that can spread to healthy tissue. But never discard the plant while the crown, rhizome, or roots are firm and alive. A crypt that’s lost every leaf but has firm roots is a plant that’s about to recover, not a dead plant. Give it 3–4 weeks before judging.
Telling Normal Melt From Real Problems
Normal transition melt:
- Affects oldest/emersed leaves first, newest growth last
- New submersed leaves emerge even as old ones dissolve
- Roots and crown stay firm and white/green
- Timeline: 1–4 weeks, then obvious new growth
Concerning melt (see our full melting diagnosis guide):
- New growth also melts or emerges deformed
- Rhizome or crown turns mushy and brown — this is rot, not transition
- Entire plant dissolves within days with no new growth after 4+ weeks
- Melting spreads to established plants that weren’t recently moved
Buying Tips to Minimize Melt
- Buy submersed-grown when available — hobbyist-grown cuttings transition with almost no melt.
- Choose tissue culture for sensitive species — crypts and delicate stems establish far more reliably from sterile cups.
- Avoid plants already melting in the store tank — some melt is normal, but a plant that’s mostly mush at purchase has less energy for recovery.
- Transport carefully — keep plants damp and out of direct sun/heat. A plant that dries out or cooks in a hot car melts far worse than one transported properly.
The First-Month Timeline: What to Expect Week by Week
Knowing what’s normal when removes most acclimation anxiety. Here’s the typical timeline for a healthy plant adapting to a new tank:
Week 1: The quiet week
Almost nothing visible happens. The plant is growing roots you can’t see and assessing its new environment. Some species (vallisneria, stem plants) may start shedding their lowest leaves. This is normal. Resist the urge to “help” — no moving, no extra fertilizer, no light changes. The most common beginner mistake is intervening during a week when the correct action is nothing.
Week 2: Melt peaks
This is when emersed leaves give up in earnest. Crypts may drop everything; swords shed their broad aerial leaves; stem plants lose lower foliage. It looks catastrophic and it’s usually fine. Keep removing mushy material, keep conditions stable, and watch the crown and growing tips — if those are firm and green, recovery is already underway.
Week 3: The turn
New submersed-adapted leaves emerge — smaller, thinner, often a slightly different shade of green than the emersed foliage. Stem plant tips start growing visibly; crypts push tiny curled leaves from the crown; swords unfurl narrow ribbon leaves. This is the moment most beginners exhale for the first time.
Week 4+: Established
New growth outpaces melt, and the plant is functionally yours. You can resume full-strength fertilizer, normal trimming, and stop treating it as fragile. Some slow growers (anubias, bucephalandra) take 6–8 weeks to show obvious progress — that’s their normal speed, not a problem.
Acclimating Different Plant Formats
Tissue-culture cups
Sterile, pest-free, and already adapted to high-humidity (not emersed) growth — tissue cultures melt the least of any format. Rinse the agar gel off gently (leftover gel rots and feeds fungus), split the portion into small plantlets, and plant per our planting guide. They establish slowly for the first two weeks, then accelerate. No dip needed, minimal acclimation stress — this is the premium experience you’re paying for.
Potted plants
Remove the pot and strip away the rockwool completely — leftover rockwool traps debris and rots. Tease the root mass apart gently; if it’s a dense mat, splitting it into 2–3 smaller portions actually establishes faster than planting one big clump (more growing points, better water flow around roots). Potted plants are usually emersed-grown, so expect the standard 2–4 week melt cycle.
Bare-root / bunched stems
Typically sold as weighted bunches. Remove any bands, foam, or weights, strip the lower leaves, and plant stems individually or in small groups. Bunched stems from the store are often already transitioning — check for new submersed growth at the tips, which tells you the plant is mid-adaptation and will settle quickly.
Hobbyist cuttings
Already submersed-grown and the fastest to establish — often showing new growth within days. The main acclimation factor is water-parameter difference between the two tanks. Float to temperature-match, plant promptly, and they’ll usually take off with minimal melt. This is why experienced hobbyists prefer trading cuttings over buying potted plants.
Frequently Asked Questions
Should I use a “plant starter” or transplant fertilizer?
Products marketed for transplant shock are mostly B-vitamins and mild hormones. They don’t hurt, but there’s no strong evidence they help aquarium plants specifically. Stable conditions and patience outperform any bottle. Save the money for more plants.
My new plant melted completely — bare crown, no leaves. Is it dead?
Probably not, if the crown or rhizome is firm. Crypts and swords routinely lose 100% of their leaves and regrow from the base within a month. The test is firmness: firm and pale/green means alive; mushy and brown/black means rot. Give firm-but-leafless plants a full 4 weeks before declaring them dead.
Can I speed up acclimation with extra light or CO2?
No — and trying usually backfires. A melting plant can’t use extra light; the excess just grows algae on its dying leaves. Keep light moderate and CO2 stable (not boosted) during acclimation. Growth speed comes from the plant’s own adaptation timeline, which you can’t rush, only avoid delaying.
Should new plants go straight into my main display tank?
After quarantine/dipping, yes — there’s no benefit to a separate “growing-in” tank for most plants. They acclimate to your water fastest in the tank they’ll live in. The exception is very delicate species going into a tank with boisterous fish; give those a few weeks in a calm corner or breeder box first.
The Patience Rule
The single most important acclimation skill is restraint: plant it right, set gentle conditions, remove decay, and then leave it alone for a month. The hobbyists with the best plant growth aren’t doing something clever in week one — they’re simply not interfering in weeks two through four while the plants do what they’ve evolved to do. Melt looks like failure and feels like failure, but in most cases it’s the visible part of a plant successfully becoming yours.