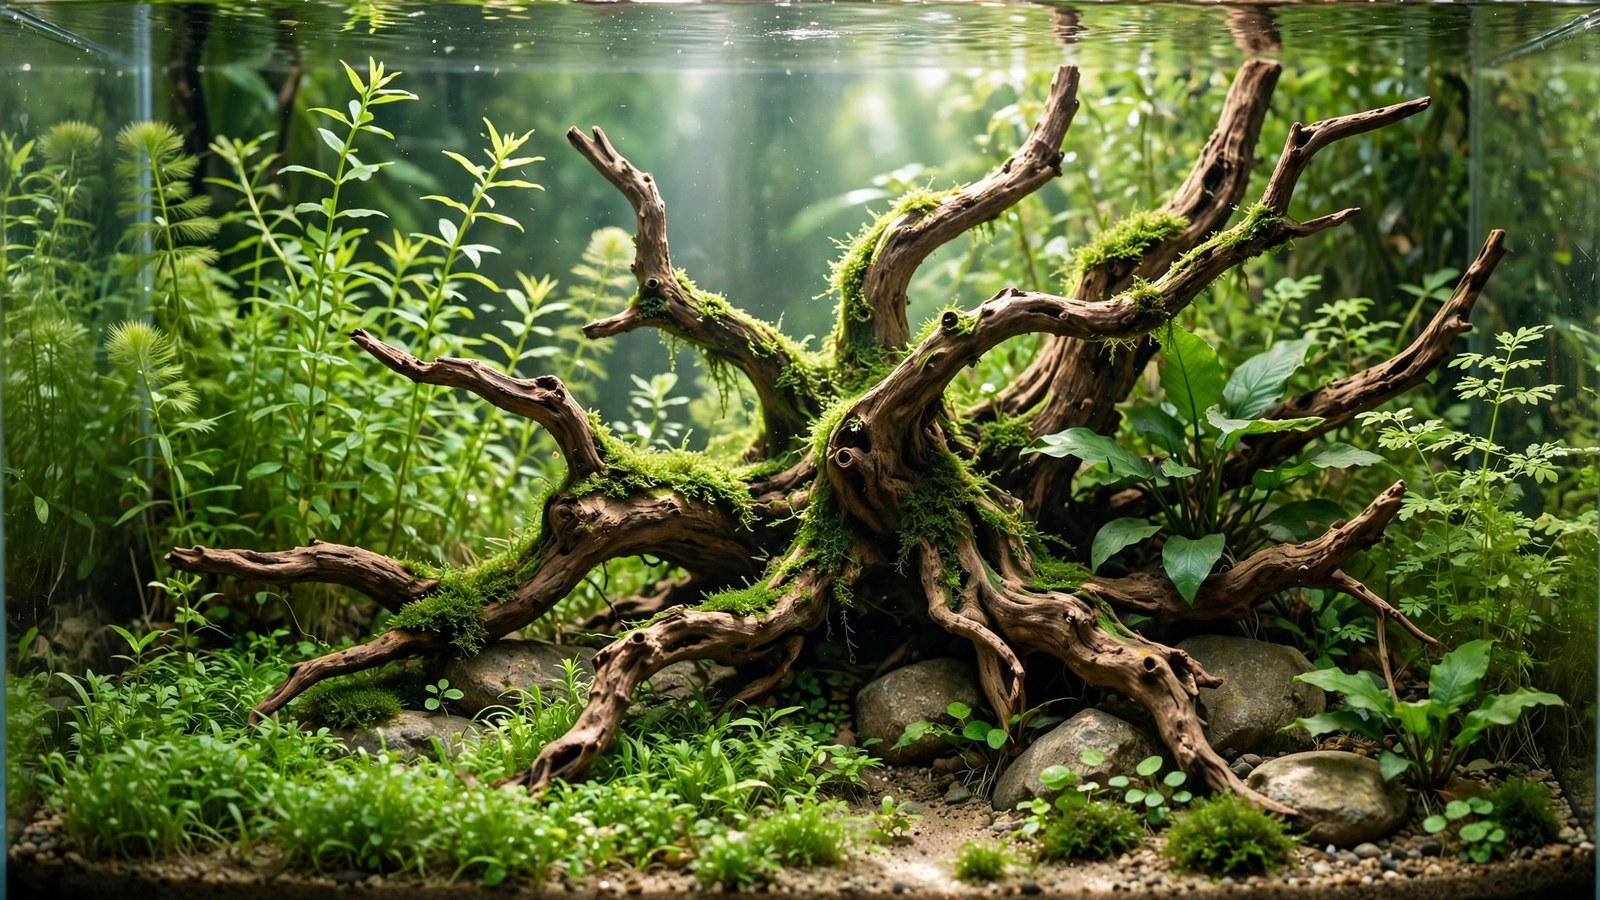
A single piece of driftwood can be a fallen giant, a windswept tree, a riverbank root system — if you choose it well and plant it like you mean it. One-driftwood aquascape layouts apply minimalist discipline to the most expressive hardscape material in the hobby: wood has direction, gesture, and character that stone can't match, and a single spectacular piece eliminates the cluttered "stick collection" look that plagues beginner tanks. Here's how to select, place, and plant one piece of wood into a complete layout.
Why One Piece of Wood
Beginners buy driftwood like they're filling a vase — five interesting sticks that become visual noise. A single piece forces compositional clarity: one gesture, one direction, one story. The wood becomes the layout's protagonist, and everything else — plants, substrate, negative space — plays supporting roles.
Wood also offers something stone doesn't: vertical storytelling. A branchy piece suggests a tree; a root mass suggests a riverbank; a horizontal log suggests a fallen trunk. That narrative quality makes single-wood layouts feel alive in a way single-stone layouts (see our one-rock guide for the stone counterpart) sometimes don't — the wood implies something that grew, not just something that is.
It's also practical: one premium showpiece often costs less than a box of mediocre wood, and a single piece is far easier to position, secure, and plant around than a jigsaw of fragments.
Choosing the Wood: Gesture and Structure
Evaluate wood like a sculptor:
- Gesture: the piece should have a clear directional flow — sweeping branches all leaning one way, roots radiating from a crown, a trunk with a dramatic bend. Hold it up and rotate it; the best pieces reveal a "front" where the gesture reads clearly.
- Branching: for the classic "tree" look (manzanita, spider wood, talawa), you want fine, numerous branches — they read as a canopy skeleton once planted with moss. Sparse, thick branches look skeletal rather than tree-like.
- Scale: the wood should span 1/2 to 2/3 of the tank's length or height (whichever matches its orientation). Undersized wood looks lost; oversized wood crowds the glass.
- Character: knots, hollows, interesting grain — details that reward close viewing. Avoid pieces that are interesting from only one angle; you'll view the tank daily.
- Type honesty: spider wood and manzanita leach fewer tannins and have fine branching (great for bright Nature Aquarium trees); Malaysian driftwood and mopani are dense, dark, and leach heavily (better for blackwater and biotope root scenes); red moor root has wild root-like tangles perfect for riverbank effects.
Buy in person when possible. Wood is three-dimensional; photos lie about depth and gesture. Bring your tank's dimensions and a critical eye. If buying online, order 2–3 pieces and return or repurpose the losers.
Placement and Orientation
- Golden-ratio positioning applies exactly as with stone — the wood's visual center of mass sits at the 1/3 or 2/3 mark, per our focal point placement guide. Never center it.
- Angle for depth: position the wood diagonally in plan view — one end nearer the front glass, the other receding toward the back. A log placed parallel to the front glass looks flat; the same log angled 20–30 degrees creates genuine depth. This is diagonal composition in physical form.
- Bury the base: sink the wood's base into the substrate (or wedge it behind a substrate mound). Wood sitting on top of soil looks placed; wood emerging from a mound looks grown or fallen naturally.
- Secure floaters: new driftwood floats. Pre-soak for 1–2 weeks, or anchor it with slate screwed to the base, wedged stones, or (temporarily) fishing line to suction cups. Don't plant the final layout around floating wood and hope — hope loses.
- Mind the top: branches should stop 5–8 cm below the water surface. Wood breaking the surface looks dramatic in paludariums but awkward in standard aquascapes — and it wicks water up and grows mold above the waterline.
Planting the Wood: The Epiphyte Wardrobe
Single-wood layouts live or die on epiphyte planting — plants attached to the wood itself:
- Mosses (java, Christmas, weeping, peacock): tie or glue to branches for the "foliage" of your tree. Weeping moss on branch tips is the classic Amano canopy. Our driftwood attachment guide covers tie vs. glue technique.
- Anubias 'Petite' / nana: glue into crevices and branch forks — deep green rosettes that read as leaves against the wood.
- Bucephalandra: smaller, often colorful — jewel-like accents on prominent branches.
- Java fern (narrow, 'Trident'): attach mid-wood for layered, ferny mass — the "understory" of the tree.
- Bolbitis heudelotii: the premium wood plant — translucent, feathery fronds that sway. Slow but unmatched for the forest effect.
Attachment discipline: cluster epiphytes at branch junctions and the wood's upper surfaces (where debris and light naturally collect), not evenly spaced like ornaments. Nature clusters; beginners distribute. Leave some bare wood visible — the wood's texture is part of the show, and over-planted wood becomes an unrecognizable green blob.
Planting Around the Wood: The Supporting Cast
- Carpet or sand foreground: a clean foreground (carpet via dry start, or open sand) gives the wood a stage. The wood's shadow falling across open sand is gorgeous.
- Midground mounds at the base: Cryptocoryne, Staurogyne, or Anubias clusters hugging the wood's base sell the "grown here" illusion and hide the burial line.
- Background stems behind: a soft curtain of green (Rotala, Ludwigia) behind the wood gives depth and makes the wood's silhouette pop — especially effective with backlighting.
- One contrasting texture: fine moss on wood against broad crypt leaves below, or feathery Bolbitis against solid stone — our texture contrast guide explains why this pairing works.
Species count: 5–8 total. The wood is the star; the plants are the chorus. Don't let the chorus upstage anyone.
Signature One-Wood Compositions
- The lone tree: branchy vertical wood center-off-center, moss canopy, carpet plain — the iconic Amano image. Demands the finest branching you can find.
- The fallen giant: horizontal log or root mass low in the tank, plants colonizing its top, open water above — riverbank energy, great for shrimp tanks (grazing surface galore).
- The root tangle: red moor or mangrove root mass in a corner, stems behind, dark water — pure blackwater biotope mood.
- The windswept lean: wood leaning hard in one direction, planting weighted to the sheltered side — dynamic, directional, dramatic with diagonal flow.
- Wood + stone duet: one wood piece + 2–3 small stones at its base — the stones ground the wood geologically. Technically two materials, but still minimalist in spirit.
Maintenance Specifics
- Trim the canopy: moss on branches grows outward and eventually obscures the wood's gesture. Thin moss every 4–6 weeks — see trimming maintenance. The goal is foliage on the tree, not a tree inside foliage.
- Watch for algae on wood: bare wood in bright light grows green dust and thread algae. Keep wood partially planted, keep light moderate, and employ algae crew (Amano shrimp, otos) early.
- Biofilm phase: new wood grows white fungal biofilm for 2–6 weeks — harmless, ugly, temporary. Shrimp and snails eat it; it passes. Don't scrub it off aggressively (it returns) — just wait.
- Re-glue check: inspect epiphyte attachments monthly for the first quarter; regrow or re-glue anything detaching before it drifts.
Frequently Asked Questions
How do I stop driftwood from floating?
Pre-soak dense wood 1–2 weeks (it waterlogs faster than you'd think); for stubborn floaters, screw a slate tile to the base and bury it, or wedge the piece under heavy stones. Boiling accelerates waterlogging and kills hitchhikers but also strips tannins — decide based on whether you want the tea-colored water.
Super glue or thread for attaching plants?
Both work. Cyanoacrylate gel (super glue gel) is faster and holds instantly — apply a small dab to the rhizome, press to wood for 10 seconds, done. It's aquarium-safe once cured. Cotton thread or fishing line is gentler for delicate mosses and dissolves/disappears over time. For most epiphytes, glue wins on convenience; see our full driftwood attachment guide.
Will one piece of wood leach enough tannins to matter?
Malaysian driftwood and mopani: yes, noticeably, for months — fine (even desirable) for blackwater aesthetics, annoying if you wanted crystal water (use Purigen or activated carbon). Manzanita and spider wood: minimal leaching. Boil before placing if you want to minimize tint.
Can I use wood I found outdoors?
With caution: use only hardwoods (oak, beech, manzanita-type), never softwoods (pine, cedar — resins are toxic) or unknown wood. Scrub, boil repeatedly, soak for weeks, and avoid anything from pesticide-treated or roadside areas. Honestly, farmed aquarium wood is cheap enough that foraging rarely pays — but properly prepared local hardwood is safe.
How do I keep moss from taking over the whole piece?
Thin it before it mats — every 4–6 weeks, pull or trim moss back to a thin layer on the branches, especially from areas where you want bare wood showing. Once moss forms a thick mat it traps detritus and shades the wood; regular thinning keeps it as foliage rather than a blanket.
One Piece, Well Chosen
The single-driftwood layout is where hardscape shopping becomes an art: you're not buying decoration, you're casting a lead actor. Find the piece with gesture, place it off-center and angled for depth, dress it with clustered epiphytes, support it with a restrained cast of 5–8 species, and maintain the canopy so the wood's character stays visible. Do that, and one piece of wood carries a whole world — no clutter required. When you're ready to add complexity, our concave valley guide shows how wood-framed valleys create the hobby's most immersive compositions.
Tissue-culture plants are the exception — they’re grown in sterile gel and adapt with minimal melting, which is part of what you’re paying for. Plants bought submersed from another hobbyist’s tank also transition with little melt, since they’re already in the right form.
Which Plants Melt Most (and Least)
Heavy melters (expect significant leaf loss)
- Cryptocorynes — infamous for “crypt melt,” sometimes dropping every leaf after any disturbance. They almost always recover from the roots within weeks.
- Stem plants grown emersed — rotala, ludwigia, and hygrophila often shed lower emersed leaves while the growing tips transition.
- Amazon swords — emersed-grown swords typically lose their broad oval aerial leaves and replace them with longer submersed ribbon leaves.
Light melters
- Anubias, java fern, bucephalandra — slow-growing rhizome plants transition gradually; occasional old-leaf melt but rarely dramatic.
- Vallisneria — usually transitions well, though it dislikes the move itself and may sulk for a week.
- Floating plants — minimal melt since their leaves were already at the air-water interface.
The Acclimation Protocol
Step 1: Quarantine or dip first
Before acclimating to your tank’s conditions, make sure you’re not acclimating pests along with the plant. Run new arrivals through our quarantine and dip protocol — it adds days upfront but prevents months of regret.
Step 2: Float to temperature-match (30 minutes)
Float the bag or container in your tank for 20–30 minutes to equalize temperature. Plants are less temperature-sensitive than fish, but a 10°F shock on top of transplant stress is an avoidable insult.
Step 3: Trim before planting
Remove any leaves that are already damaged, yellowing, or heavily algae-covered — they won’t recover and they’ll rot in your tank, feeding algae. For stem plants, trim off the bottom inch and any emersed leaves that look unlikely to adapt; the plant wastes energy maintaining leaves it’s going to shed anyway. Keep the healthy growing tips — that’s where recovery starts.
Step 4: Plant correctly the first time
Follow our planting guide — right depth, crown exposed on rosettes, rhizomes unburied on epiphytes. Every uprooting and replanting restarts the acclimation clock, so get placement right on the first attempt. Decide where each plant goes before it goes in the water.
Step 5: Run a gentle first week
For the first 7 days after planting:
- Moderate light — run your normal photoperiod but consider dropping intensity 20–30% if your light is dimmable. Blast-level light on a melting plant grows algae on the dying leaves, not recovery.
- Stable CO2 — if you inject CO2, keep it consistent. Fluctuating CO2 during acclimation is a melt accelerator. If you’re low-tech, this doesn’t apply — see growing without CO2.
- Half-strength fertilizer — new plants with damaged leaves can’t use full dosing, and the excess feeds algae. Ramp to full strength over 2–3 weeks per our fertilizer schedule.
- No disturbance — don’t move, trim, or “check on” new plants for at least two weeks. Every touch resets root establishment. This is especially critical for crypts.
Step 6: Remove melt, keep the base
As emersed leaves melt, remove the mushy material promptly — decaying leaves release ammonia and grow fungus that can spread to healthy tissue. But never discard the plant while the crown, rhizome, or roots are firm and alive. A crypt that’s lost every leaf but has firm roots is a plant that’s about to recover, not a dead plant. Give it 3–4 weeks before judging.
Telling Normal Melt From Real Problems
Normal transition melt:
- Affects oldest/emersed leaves first, newest growth last
- New submersed leaves emerge even as old ones dissolve
- Roots and crown stay firm and white/green
- Timeline: 1–4 weeks, then obvious new growth
Concerning melt (see our full melting diagnosis guide):
- New growth also melts or emerges deformed
- Rhizome or crown turns mushy and brown — this is rot, not transition
- Entire plant dissolves within days with no new growth after 4+ weeks
- Melting spreads to established plants that weren’t recently moved
Buying Tips to Minimize Melt
- Buy submersed-grown when available — hobbyist-grown cuttings transition with almost no melt.
- Choose tissue culture for sensitive species — crypts and delicate stems establish far more reliably from sterile cups.
- Avoid plants already melting in the store tank — some melt is normal, but a plant that’s mostly mush at purchase has less energy for recovery.
- Transport carefully — keep plants damp and out of direct sun/heat. A plant that dries out or cooks in a hot car melts far worse than one transported properly.
The First-Month Timeline: What to Expect Week by Week
Knowing what’s normal when removes most acclimation anxiety. Here’s the typical timeline for a healthy plant adapting to a new tank:
Week 1: The quiet week
Almost nothing visible happens. The plant is growing roots you can’t see and assessing its new environment. Some species (vallisneria, stem plants) may start shedding their lowest leaves. This is normal. Resist the urge to “help” — no moving, no extra fertilizer, no light changes. The most common beginner mistake is intervening during a week when the correct action is nothing.
Week 2: Melt peaks
This is when emersed leaves give up in earnest. Crypts may drop everything; swords shed their broad aerial leaves; stem plants lose lower foliage. It looks catastrophic and it’s usually fine. Keep removing mushy material, keep conditions stable, and watch the crown and growing tips — if those are firm and green, recovery is already underway.
Week 3: The turn
New submersed-adapted leaves emerge — smaller, thinner, often a slightly different shade of green than the emersed foliage. Stem plant tips start growing visibly; crypts push tiny curled leaves from the crown; swords unfurl narrow ribbon leaves. This is the moment most beginners exhale for the first time.
Week 4+: Established
New growth outpaces melt, and the plant is functionally yours. You can resume full-strength fertilizer, normal trimming, and stop treating it as fragile. Some slow growers (anubias, bucephalandra) take 6–8 weeks to show obvious progress — that’s their normal speed, not a problem.
Acclimating Different Plant Formats
Tissue-culture cups
Sterile, pest-free, and already adapted to high-humidity (not emersed) growth — tissue cultures melt the least of any format. Rinse the agar gel off gently (leftover gel rots and feeds fungus), split the portion into small plantlets, and plant per our planting guide. They establish slowly for the first two weeks, then accelerate. No dip needed, minimal acclimation stress — this is the premium experience you’re paying for.
Potted plants
Remove the pot and strip away the rockwool completely — leftover rockwool traps debris and rots. Tease the root mass apart gently; if it’s a dense mat, splitting it into 2–3 smaller portions actually establishes faster than planting one big clump (more growing points, better water flow around roots). Potted plants are usually emersed-grown, so expect the standard 2–4 week melt cycle.
Bare-root / bunched stems
Typically sold as weighted bunches. Remove any bands, foam, or weights, strip the lower leaves, and plant stems individually or in small groups. Bunched stems from the store are often already transitioning — check for new submersed growth at the tips, which tells you the plant is mid-adaptation and will settle quickly.
Hobbyist cuttings
Already submersed-grown and the fastest to establish — often showing new growth within days. The main acclimation factor is water-parameter difference between the two tanks. Float to temperature-match, plant promptly, and they’ll usually take off with minimal melt. This is why experienced hobbyists prefer trading cuttings over buying potted plants.
Frequently Asked Questions
Should I use a “plant starter” or transplant fertilizer?
Products marketed for transplant shock are mostly B-vitamins and mild hormones. They don’t hurt, but there’s no strong evidence they help aquarium plants specifically. Stable conditions and patience outperform any bottle. Save the money for more plants.
My new plant melted completely — bare crown, no leaves. Is it dead?
Probably not, if the crown or rhizome is firm. Crypts and swords routinely lose 100% of their leaves and regrow from the base within a month. The test is firmness: firm and pale/green means alive; mushy and brown/black means rot. Give firm-but-leafless plants a full 4 weeks before declaring them dead.
Can I speed up acclimation with extra light or CO2?
No — and trying usually backfires. A melting plant can’t use extra light; the excess just grows algae on its dying leaves. Keep light moderate and CO2 stable (not boosted) during acclimation. Growth speed comes from the plant’s own adaptation timeline, which you can’t rush, only avoid delaying.
Should new plants go straight into my main display tank?
After quarantine/dipping, yes — there’s no benefit to a separate “growing-in” tank for most plants. They acclimate to your water fastest in the tank they’ll live in. The exception is very delicate species going into a tank with boisterous fish; give those a few weeks in a calm corner or breeder box first.
The Patience Rule
The single most important acclimation skill is restraint: plant it right, set gentle conditions, remove decay, and then leave it alone for a month. The hobbyists with the best plant growth aren’t doing something clever in week one — they’re simply not interfering in weeks two through four while the plants do what they’ve evolved to do. Melt looks like failure and feels like failure, but in most cases it’s the visible part of a plant successfully becoming yours.