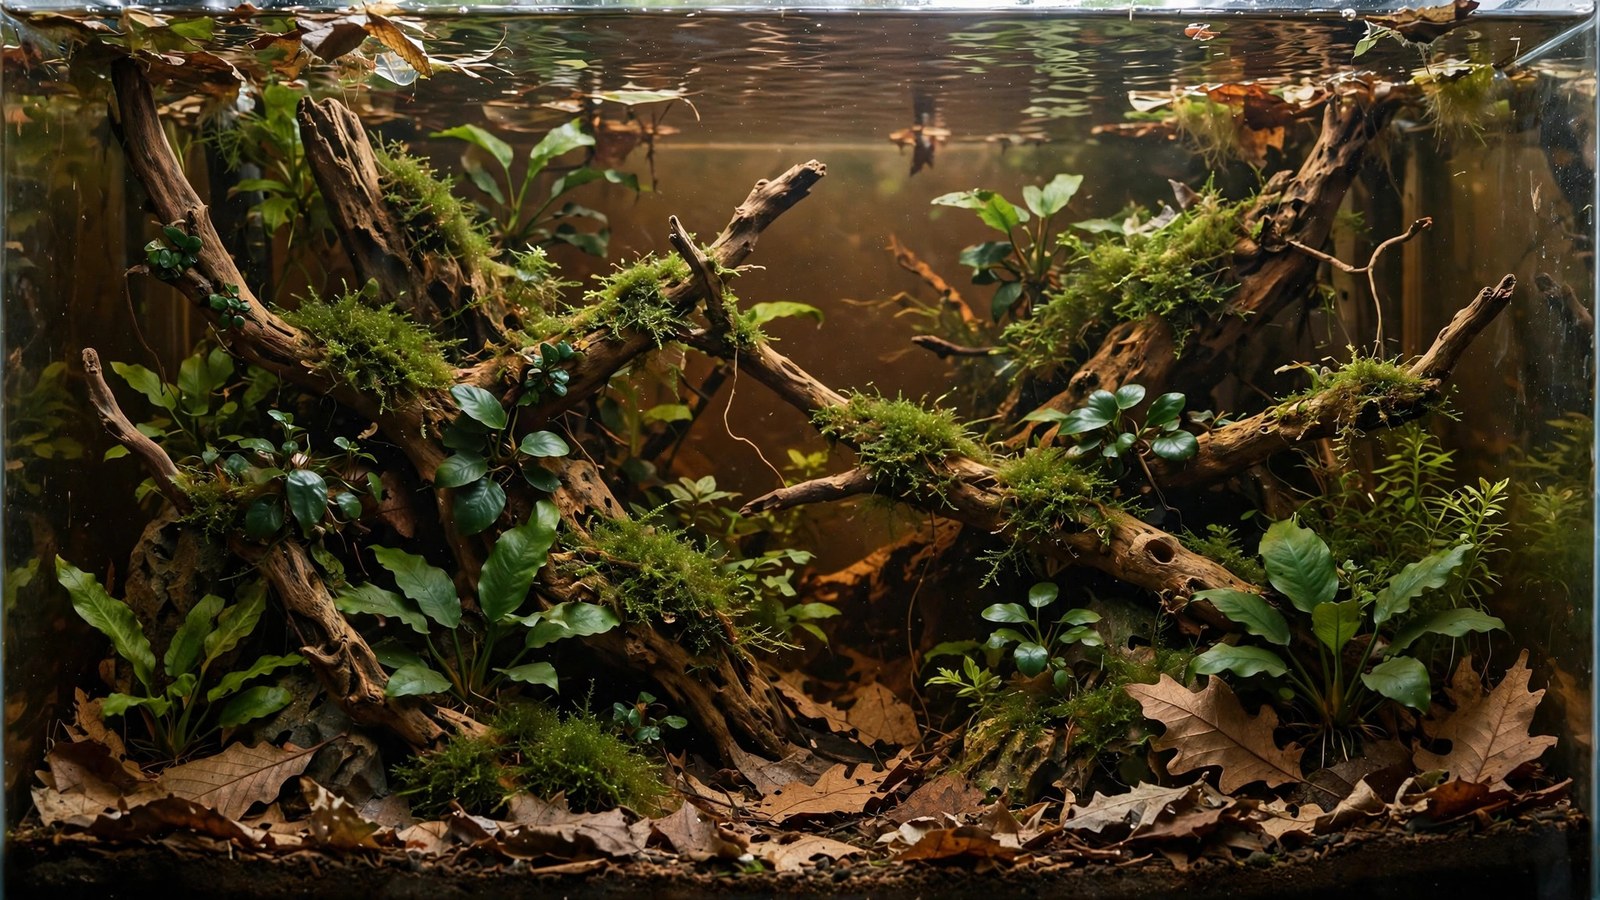
A blackwater aquascape setup trades the bright, manicured look of conventional planted tanks for something older and moodier: tea-stained water, drifting leaves, shafts of dim light, and fish glowing like embers in the gloom. Done right, it's the most atmospheric style in the hobby — a slice of flooded Amazon forest floor that makes neon tetras look like they were designed for it (they were). Done wrong, it's murky water hiding a mess. This guide covers the tannins, botanicals, plants, and water chemistry that separate the two.
What Blackwater Actually Is
Blackwater rivers — the Rio Negro is the famous example, but they occur across the Amazon, Congo, and Southeast Asia — get their color from tannins and humic substances leaching out of decomposing leaves, wood, and peat in the surrounding forest. The water is stained brown like tea, acidic (pH 4.0–6.0), extremely soft (near-zero KH/GH), and low in dissolved minerals but rich in dissolved organic carbon. Visibility is low, light penetration is poor, and the whole ecosystem runs on leaf litter.
For the aquascaper, this means three things: the water itself is a design element (the tint is the look), the hardscape should be wood and leaves rather than stone, and plant selection must favor species that tolerate — or genuinely come from — dim, acidic, soft water. Many classic "aquascaping" plants will struggle; the ones that thrive will look more at home than they ever could in a bright Dutch tank.
Tannins: The Color Engine
The brown tint comes from botanicals, and you have several sources, each with different character:
- Indian almond leaves (catappa): the standard. Release strong tannins for 2–4 weeks, tint water amber-brown, and provide grazing surfaces and shelter as they break down. Use 1–2 large leaves per 10 gallons to start; add more for darker water.
- Oak and beech leaves: milder tint, slower breakdown, excellent long-lasting leaf litter. Collect from pesticide-free areas, dried and brown — never green.
- Alder cones: potent tannin bombs; a handful tints a nano tank significantly. Also prized for mild antifungal properties.
- Driftwood: mopani and Malaysian driftwood leach tannins for months. Boiling reduces (but doesn't eliminate) leaching — decide whether you want the wood to contribute color or not.
- Peat moss / peat granules: in a filter media bag, peat softens water and adds humic tint steadily. The most controllable long-term tannin source.
- Commercial blackwater extracts: concentrated tannin liquids for precise tint control. Useful for topping up color after water changes without adding more leaves.
Preparation matters: rinse or briefly boil leaves and cones to remove dust and hitchhikers, but don't over-boil — you'll extract the very tannins you want. Leaves will float for a day or two before waterlogging and sinking; weigh them down or just wait. As leaves decompose over 4–8 weeks, push new ones in on top — the layered, multi-stage litter bed is both authentic and functional, sheltering fry and feeding biofilm.
Water Chemistry: Soft, Acidic, Stable
Blackwater chemistry is the technical heart of the setup. Target parameters for an Amazonian blackwater tank:
| Parameter | Target range | Notes |
|---|---|---|
| pH | 5.0–6.5 | Tannins + low KH drive this down naturally |
| KH | 0–3 dKH | Low KH lets botanicals acidify the water |
| GH | 1–6 dGH | Soft water; most blackwater fish are soft-water species |
| Temperature | 76–82°F (24–28°C) | Match your specific fish |
| TDS | 30–120 ppm | Very low dissolved solids is the signature |
Most tap water is too hard and alkaline for genuine blackwater. The reliable approach: RO (reverse osmosis) water remineralized lightly, or RO cut with tap to hit your targets. With near-zero KH, tannins from your botanicals will pull pH down on their own — this is why KH control comes first. Trying to acidify hard, high-KH tap water with leaves is futile; the buffer wins.
Stability warning: near-zero KH means near-zero buffering, so pH can crash if organic load spikes. Prevent this with sensible stocking, regular small water changes (10–15% weekly with matching RO-based water, pre-tinted if you want consistent color), and not overloading botanicals all at once. A pH controller isn't necessary, but a liquid test kit used weekly in the first two months is.
Hardscape: Wood, Leaves, and Restraint
Blackwater hardscape is almost entirely driftwood and botanicals. Think submerged tree roots, fallen branches, and the forest floor — not rock gardens. A single dramatic root structure or a tangle of branches (see our single-driftwood layout guide for composition) over a sand bed scattered with leaves is the entire formula. Stone, if used at all, should be minimal and dark — a few smooth river stones half-buried, never a bright Seiryu centerpiece that screams "different continent."
Substrate is fine sand — white, tan, or dark depending on the specific habitat. Rio Negro biotopes use pale sand that glows amber through the tinted water; many hobbyists prefer dark sand for contrast with fish colors. Either is defensible; pick one and commit. Depth: 3–5 cm, flat or gently sloped — blackwater rivers don't have dramatic aquasoil hills. Our substrate sloping guide still applies for gentle depth cues, but keep it subtle here.
Leaf litter placement is an art: scatter leaves naturally (toss, don't arrange), concentrate them in drifts where "current" would deposit them, and let some land on wood. The litter bed should look accumulated, not decorated.
Plants for Blackwater: What Actually Thrives
Forget the high-light carpet species. Blackwater plants are low-light, acid-tolerant species, many of them slow growers:
- Anubias (barteri, nana, 'Petite'): the blackwater workhorse. Attach to wood, tolerates deep shade and pH 5, nearly indestructible. Our driftwood attachment guide covers the technique.
- Java fern and Bolbitis: epiphytes for wood, thriving in dim acidic water where they'd be algae magnets in bright tanks.
- Bucephalandra: slow, shade-loving, and the deep greens look spectacular against tannin-tinted water.
- Cryptocoryne wendtii, beckettii, spiralis: root in the sand, tolerate soft acidic water beautifully, and form the "understory" colonies.
- Echinodorus (Amazon swords): the authentic Amazon centerpiece. E. bleheri and E. amazonicus in a blackwater tank is biotope-correct and dramatic.
- Floating plants (frogbit, Salvinia, red root floaters): essential — they complete the dim canopy effect, and their roots dangle into the water column like the real thing. Keep a clear feeding/corner area so they don't cover 100% of the surface.
- Mosses: Taxiphyllum species on wood for the aged, soft look.
Lighting should be dim to moderate — 20–30 PAR at substrate is plenty. Bright light in a blackwater tank grows algae on every leaf and destroys the mood. A dimmable LED run at 50–60%, possibly with a warmer color temperature (6000–7000K still fine; avoid harsh 8000K+ daylight), plus floating plants diffusing it further. The goal is "light filtering through forest canopy," not "operating theatre."
CO2 is optional and often skipped — these plants don't need it, and the low-energy aesthetic doesn't demand fast growth. If you do inject, keep it modest; pH is already low, so monitor with a drop checker and go by livestock behavior.
Fish: The Glowing School Effect
Blackwater is where small characins become spectacular. Against dark water and dim light, their colors fluoresce:
- Cardinal and neon tetras: the iconic choice — their red/blue iridescence evolved for exactly this water.
- Rummy-nose tetras: tight schoolers whose red faces glow in tannin water; also excellent "canary" fish for water quality.
- Ember tetras, green neon tetras: smaller options for nano blackwater builds.
- Dwarf cichlids (Apistogramma cacatuoides, borellii): leaf-litter territory holders — the behavioral centerpiece.
- Hatchetfish: surface dwellers for the open top zone under floaters.
- Corydoras (sterbai, duplicareus): sand-sifters that belong on the litter bed.
Stock lightly and in real schools (12–20+ of each schooling species). A blackwater tank with six neons looks empty; with twenty-five, it looks like the river. If you're building a strict habitat replica, our biotope aquascaping guide covers species-fidelity discipline.
Filtration and Maintenance
Use gentle filtration — a sponge filter or a canister with the outflow baffled. Blackwater habitats are slow-moving; strong current stresses the fish and scatters your leaf litter. Filter media can include peat granules or catappa leaves in a media bag for steady tannin release.
Maintenance rhythm:
- Weekly 10–15% water changes with pre-matched, pre-tinted water (mix your blackwater extract into the change water so the tint doesn't yo-yo).
- Replenish leaf litter monthly — add new leaves as old ones disintegrate; siphon only the fully-mulched sludge, never the intact leaves.
- Glass cleaning as needed — tannin water still grows biofilm on glass; magnetic cleaners handle it.
- Trim sparingly — these are slow growers; see our trimming maintenance guide and apply it with a light hand.
- Top off evaporation with RO water only — minerals don't evaporate, and topping with hard tap water creeps your GH/KH upward over time.
Frequently Asked Questions
Will tannins harm my fish or plants?
No — tannins and humic substances are beneficial. They have mild antibacterial and antifungal properties, reduce stress in soft-water fish, and many blackwater species show better color and breeding behavior in tinted water. The plants listed above evolved in these conditions. Problems only arise if pH crashes from zero buffering combined with heavy organic load — preventable with sensible stocking and water changes.
How dark should the water be?
Aim for the color of weak to medium tea — you should clearly see the back of the tank, just tinted. If you can't see your fish at the back glass, it's too dark. Start with fewer botanicals than you think; you can always add more. Remember that the tint deepens over the first week as leaves release their initial load, then stabilizes.
Can I do blackwater with hard tap water?
Not genuinely. Tannins can't overcome high KH — the buffer neutralizes the acids as fast as leaves release them, so you get stained water that stays alkaline, which suits neither the aesthetic's fish nor its chemistry. Use RO water (or RO/tap blend) to get KH near zero first, then let botanicals do their work. An RO unit is the single best investment for this style.
Do I need to replace leaves, or can I leave them forever?
Replace on rotation. Leaves release most tannins in the first 2–4 weeks, then become primarily shelter and grazing surface as they slowly decompose over 2–3 months. Add a few new leaves monthly and remove only fully disintegrated mush. Never swap the entire litter bed at once — that spikes organics and strips the biofilm your livestock grazes on.
Will blackwater stain my silicone and equipment?
Tannins can lightly stain silicone over months, but it's cosmetic and largely reversible if you ever tear the tank down. Filter housings and heaters may discolor slightly. It won't damage anything functionally. If resale pristine-silicone matters to you, blackwater isn't your style — embrace the patina.
Can shrimp live in blackwater tanks?
Neocaridina (cherry shrimp) prefer harder, alkaline water and will struggle to molt in true blackwater parameters — skip them. Caridina species (crystal shrimp, Taiwan bees) love soft acidic water and are the correct choice, though they're pricier and more sensitive. Our shrimp tank aquascaping guide covers Caridina-focused setups that pair beautifully with blackwater aesthetics.
The Mood Is the Point
A blackwater aquascape succeeds when someone walks past and stops — not because it's colorful, but because it's atmospheric. The dim light, the drifting leaves, the school of cardinals igniting in the gloom: it's the closest most of us get to diving the Rio Negro. Keep the water genuinely soft and acidic, the botanicals rotating, the planting shade-tolerant, and the fish in real schools, and the style practically maintains its own magic. When it's mature and you want to show it off, our aquascape photography guide has specific tips for shooting tinted water without it looking muddy.
Tissue-culture plants are the exception — they’re grown in sterile gel and adapt with minimal melting, which is part of what you’re paying for. Plants bought submersed from another hobbyist’s tank also transition with little melt, since they’re already in the right form.
Which Plants Melt Most (and Least)
Heavy melters (expect significant leaf loss)
- Cryptocorynes — infamous for “crypt melt,” sometimes dropping every leaf after any disturbance. They almost always recover from the roots within weeks.
- Stem plants grown emersed — rotala, ludwigia, and hygrophila often shed lower emersed leaves while the growing tips transition.
- Amazon swords — emersed-grown swords typically lose their broad oval aerial leaves and replace them with longer submersed ribbon leaves.
Light melters
- Anubias, java fern, bucephalandra — slow-growing rhizome plants transition gradually; occasional old-leaf melt but rarely dramatic.
- Vallisneria — usually transitions well, though it dislikes the move itself and may sulk for a week.
- Floating plants — minimal melt since their leaves were already at the air-water interface.
The Acclimation Protocol
Step 1: Quarantine or dip first
Before acclimating to your tank’s conditions, make sure you’re not acclimating pests along with the plant. Run new arrivals through our quarantine and dip protocol — it adds days upfront but prevents months of regret.
Step 2: Float to temperature-match (30 minutes)
Float the bag or container in your tank for 20–30 minutes to equalize temperature. Plants are less temperature-sensitive than fish, but a 10°F shock on top of transplant stress is an avoidable insult.
Step 3: Trim before planting
Remove any leaves that are already damaged, yellowing, or heavily algae-covered — they won’t recover and they’ll rot in your tank, feeding algae. For stem plants, trim off the bottom inch and any emersed leaves that look unlikely to adapt; the plant wastes energy maintaining leaves it’s going to shed anyway. Keep the healthy growing tips — that’s where recovery starts.
Step 4: Plant correctly the first time
Follow our planting guide — right depth, crown exposed on rosettes, rhizomes unburied on epiphytes. Every uprooting and replanting restarts the acclimation clock, so get placement right on the first attempt. Decide where each plant goes before it goes in the water.
Step 5: Run a gentle first week
For the first 7 days after planting:
- Moderate light — run your normal photoperiod but consider dropping intensity 20–30% if your light is dimmable. Blast-level light on a melting plant grows algae on the dying leaves, not recovery.
- Stable CO2 — if you inject CO2, keep it consistent. Fluctuating CO2 during acclimation is a melt accelerator. If you’re low-tech, this doesn’t apply — see growing without CO2.
- Half-strength fertilizer — new plants with damaged leaves can’t use full dosing, and the excess feeds algae. Ramp to full strength over 2–3 weeks per our fertilizer schedule.
- No disturbance — don’t move, trim, or “check on” new plants for at least two weeks. Every touch resets root establishment. This is especially critical for crypts.
Step 6: Remove melt, keep the base
As emersed leaves melt, remove the mushy material promptly — decaying leaves release ammonia and grow fungus that can spread to healthy tissue. But never discard the plant while the crown, rhizome, or roots are firm and alive. A crypt that’s lost every leaf but has firm roots is a plant that’s about to recover, not a dead plant. Give it 3–4 weeks before judging.
Telling Normal Melt From Real Problems
Normal transition melt:
- Affects oldest/emersed leaves first, newest growth last
- New submersed leaves emerge even as old ones dissolve
- Roots and crown stay firm and white/green
- Timeline: 1–4 weeks, then obvious new growth
Concerning melt (see our full melting diagnosis guide):
- New growth also melts or emerges deformed
- Rhizome or crown turns mushy and brown — this is rot, not transition
- Entire plant dissolves within days with no new growth after 4+ weeks
- Melting spreads to established plants that weren’t recently moved
Buying Tips to Minimize Melt
- Buy submersed-grown when available — hobbyist-grown cuttings transition with almost no melt.
- Choose tissue culture for sensitive species — crypts and delicate stems establish far more reliably from sterile cups.
- Avoid plants already melting in the store tank — some melt is normal, but a plant that’s mostly mush at purchase has less energy for recovery.
- Transport carefully — keep plants damp and out of direct sun/heat. A plant that dries out or cooks in a hot car melts far worse than one transported properly.
The First-Month Timeline: What to Expect Week by Week
Knowing what’s normal when removes most acclimation anxiety. Here’s the typical timeline for a healthy plant adapting to a new tank:
Week 1: The quiet week
Almost nothing visible happens. The plant is growing roots you can’t see and assessing its new environment. Some species (vallisneria, stem plants) may start shedding their lowest leaves. This is normal. Resist the urge to “help” — no moving, no extra fertilizer, no light changes. The most common beginner mistake is intervening during a week when the correct action is nothing.
Week 2: Melt peaks
This is when emersed leaves give up in earnest. Crypts may drop everything; swords shed their broad aerial leaves; stem plants lose lower foliage. It looks catastrophic and it’s usually fine. Keep removing mushy material, keep conditions stable, and watch the crown and growing tips — if those are firm and green, recovery is already underway.
Week 3: The turn
New submersed-adapted leaves emerge — smaller, thinner, often a slightly different shade of green than the emersed foliage. Stem plant tips start growing visibly; crypts push tiny curled leaves from the crown; swords unfurl narrow ribbon leaves. This is the moment most beginners exhale for the first time.
Week 4+: Established
New growth outpaces melt, and the plant is functionally yours. You can resume full-strength fertilizer, normal trimming, and stop treating it as fragile. Some slow growers (anubias, bucephalandra) take 6–8 weeks to show obvious progress — that’s their normal speed, not a problem.
Acclimating Different Plant Formats
Tissue-culture cups
Sterile, pest-free, and already adapted to high-humidity (not emersed) growth — tissue cultures melt the least of any format. Rinse the agar gel off gently (leftover gel rots and feeds fungus), split the portion into small plantlets, and plant per our planting guide. They establish slowly for the first two weeks, then accelerate. No dip needed, minimal acclimation stress — this is the premium experience you’re paying for.
Potted plants
Remove the pot and strip away the rockwool completely — leftover rockwool traps debris and rots. Tease the root mass apart gently; if it’s a dense mat, splitting it into 2–3 smaller portions actually establishes faster than planting one big clump (more growing points, better water flow around roots). Potted plants are usually emersed-grown, so expect the standard 2–4 week melt cycle.
Bare-root / bunched stems
Typically sold as weighted bunches. Remove any bands, foam, or weights, strip the lower leaves, and plant stems individually or in small groups. Bunched stems from the store are often already transitioning — check for new submersed growth at the tips, which tells you the plant is mid-adaptation and will settle quickly.
Hobbyist cuttings
Already submersed-grown and the fastest to establish — often showing new growth within days. The main acclimation factor is water-parameter difference between the two tanks. Float to temperature-match, plant promptly, and they’ll usually take off with minimal melt. This is why experienced hobbyists prefer trading cuttings over buying potted plants.
Frequently Asked Questions
Should I use a “plant starter” or transplant fertilizer?
Products marketed for transplant shock are mostly B-vitamins and mild hormones. They don’t hurt, but there’s no strong evidence they help aquarium plants specifically. Stable conditions and patience outperform any bottle. Save the money for more plants.
My new plant melted completely — bare crown, no leaves. Is it dead?
Probably not, if the crown or rhizome is firm. Crypts and swords routinely lose 100% of their leaves and regrow from the base within a month. The test is firmness: firm and pale/green means alive; mushy and brown/black means rot. Give firm-but-leafless plants a full 4 weeks before declaring them dead.
Can I speed up acclimation with extra light or CO2?
No — and trying usually backfires. A melting plant can’t use extra light; the excess just grows algae on its dying leaves. Keep light moderate and CO2 stable (not boosted) during acclimation. Growth speed comes from the plant’s own adaptation timeline, which you can’t rush, only avoid delaying.
Should new plants go straight into my main display tank?
After quarantine/dipping, yes — there’s no benefit to a separate “growing-in” tank for most plants. They acclimate to your water fastest in the tank they’ll live in. The exception is very delicate species going into a tank with boisterous fish; give those a few weeks in a calm corner or breeder box first.
The Patience Rule
The single most important acclimation skill is restraint: plant it right, set gentle conditions, remove decay, and then leave it alone for a month. The hobbyists with the best plant growth aren’t doing something clever in week one — they’re simply not interfering in weeks two through four while the plants do what they’ve evolved to do. Melt looks like failure and feels like failure, but in most cases it’s the visible part of a plant successfully becoming yours.