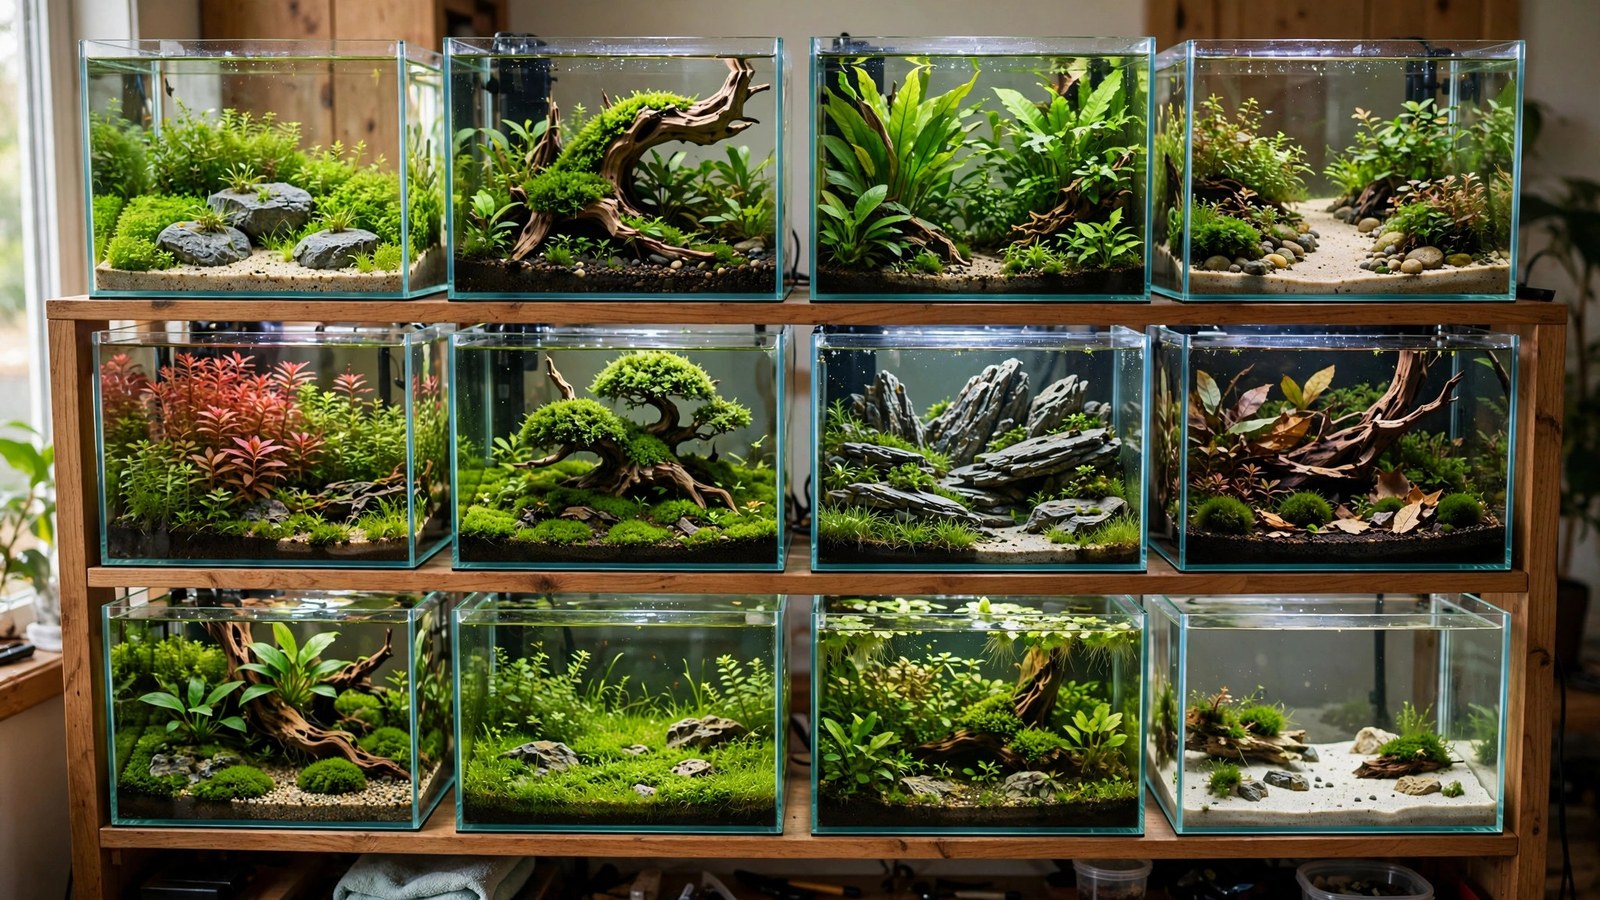
The 10-gallon (20"×10"×12") is where most aquascapers are born — affordable, apartment-friendly, and just big enough for real compositions. It's also where most aquascaping mistakes happen, because beginners try to cram 20-gallon ideas into half the space. These 12 layout ideas are designed specifically for the 10-gallon's proportions: every one respects its limits while exploiting its surprising versatility.
The 10-Gallon's Rules
Before the ideas, the constraints that shape all of them:
- 3–5 plant species maximum. The #1 10-gallon mistake is species soup. Restraint reads as design; variety reads as clutter at this scale.
- One hardscape material dominant. Stone or wood as the lead; the other only as a minor accent if at all.
- Small-scale everything: nano stones, twiggy wood, small-leaf plants. Full-size Amazon swords and dinner-plate Anubias overwhelm 10 gallons.
- Negative space is mandatory: at least 30% open — carpet, sand, or water. A packed 10-gallon looks like a storage box.
- Equipment hides or minimizes: nano HOB or sponge filter, slim heater, clip-on or 20" LED. Bulky gear eats the composition.
12 Layouts for 10 Gallons
1. Nano Iwagumi
Three small stones (5–9 cm), one carpet (Monte Carlo or Marsilea), nothing else. Our Iwagumi guide's discipline in miniature — the purest 10-gallon layout and a rite of passage. The dry start method gives the carpet its best shot.
2. The moss tree
One twiggy spider-wood piece (single-wood), weeping moss canopy, Anubias 'Petite' in the forks, carpet below. The iconic desktop aquascape — looks like a bonsai park and fits anywhere.
3. Jungle corner (low-tech)
Crypt wendtii + java fern + Anubias massed in one back corner per our low-tech jungle guide, open swimming space elsewhere. No CO2, forgiving, lush — the beginner's best friend.
4. Betta palace
Floating plants, Anubias, gentle wood, leaf litter — a 10-gallon gives a betta genuine territory. See our betta layout ideas for the full treatment including the biotope variant.
5. Shrimp metropolis
Dragon stone + moss everywhere + cholla wood + leaf litter — our shrimp scaping guide's moss-mountain template. A 10-gallon breeds hundreds of Neocaridina once the biofilm matures.
6. Diagonal ridge
A substrate ridge running front-left to back-right (diagonal composition), planted with Staurogyne and crypts, carpet on the low side. Maximum depth illusion in minimum space.
7. Dutch nano-streets
Four stem species in tight rows with narrow streets — Dutch discipline at 10 gallons. Demanding trimmer's tank (see trimming maintenance), spectacular payoff.
8. Blackwater cube-ish
Twisted roots, leaf litter, tannin tint, ember tetras — our blackwater guide compressed. The 10-gallon's small water volume makes the tint easy to control with a few catappa leaves.
9. The single stone
One 12–15 cm character stone off-center (one-rock principles), hairgrass or Monte Carlo carpet, one crypt cluster at the base. Minimalist, photogenic, cheap.
10. Wabi-kusa island
A planted wabi-kusa ball as a central island in shallow water — emersed dome, shrimp or a betta around it. The most unusual 10-gallon on this list; the island's flowering top is the focal point.
11. Concave micro-valley
Two low stone/wood walls, carpeted center — our valley technique at the smallest viable scale. Keep walls modest (1/3 height); the valley reads as a grotto. Nano fish (chili rasboras) for scale.
12. The breeder's jungle
Wall-to-wall easy plants (guppy grass, hornwort, java moss, floaters), sponge filter, no pretense of composition — a functional layout optimized for fry survival. Honest, lush, and the most biologically productive tank on this list.
Equipment That Fits
- Filter: nano HOB (with pre-filter sponge) or sponge filter. Gentle flow; 10 gallons forgive little in the way of dead spots or blasting current.
- Light: 18–20" LED or quality clip-on. The 12" height means moderate lights grow most plants; reserve high-PAR fixtures for demanding carpets.
- Heater: 50W slim/flat heater, hidden behind hardscape. In small volumes, heater accuracy matters more — cheap heaters swing temperatures in 10 gallons.
- CO2 (optional): paintball or nano CO2 kits suit 10 gallons; one small diffuser suffices. Or skip it — half the layouts above are low-tech by design.
- Lid: yes, always — evaporation swings parameters fast in 10 gallons, and jumpers (bettas, killifish, shrimp) exploit open tops.
Stocking: Less Is More
- One school (8–12): ember tetras, chili rasboras, green neons, celestial pearl danios — nano species that suit the scale.
- OR one centerpiece: a betta, a pair of honey gouramis, a pair of Apistogramma (borderline — needs the jungle layouts' cover).
- Cleanup: 3–4 otos or a handful of Neocaridina shrimp; one nerite snail.
- Avoid: anything over 2" adult size, anything hyperactive (zebra danios pace miserably), and overstocking — 10 gallons punish bioload mistakes fast.
Week by Week: The First Two Months
Knowing what's normal prevents panic. Week 1: everything looks sparse and the water may be hazy — normal. Run lights 6 hours, do a 30% water change mid-week, don't touch the plants. Week 2: diatoms (brown dusty algae) likely coat glass and leaves — normal in new tanks; otos and snails handle it, and it fades as silicates deplete. Wipe the front glass, leave the rest. Week 3: first real growth — stem tips extend, carpet sends runners, crypts may melt old leaves (they recover; don't uproot them). Test water: ammonia/nitrite should hit zero — now you can add your cleanup crew. Week 4: add your main livestock (school or centerpiece) — drip-acclimate, feed lightly. Increase light to 7–8 hours. Weeks 5–6: the "ugly middle" — some algae on slow growers, plants looking gangly. Stay the course: weekly water changes, remove algae manually, resist rescaping. Weeks 7–8: the turn — carpet knits together, stems bush out from the first trim (cut tops, replant them), the tank starts looking like the picture in your head. From here it's refinement: trim every 1–2 weeks per our trimming guide, and by month three you have a mature aquascape. The hobby's hardest skill isn't planting — it's leaving a week-3 tank alone.
What Transfers When You Upgrade
Almost everything you learn on a 10-gallon scales up: the trimming skills, the compositional eye, the maintenance discipline, the plant knowledge. Physically, hardscape transfers — good stone and wood work in bigger tanks (supplemented with larger pieces), and filters, heaters, and lights can seed a quarantine or second tank. What doesn't transfer is the layout itself: compositions are designed for specific proportions, so expect to rescape rather than transplant. Many aquascapers keep their first 10-gallon running as a shrimp or quarantine tank long after upgrading — it's the most useful spare tank size in the hobby. And the plants? Trimmed stems from your 10-gallon become the free planting stock for the 20-long. The hobby compounds.
Frequently Asked Questions
Is 10 gallons too small for a "real" aquascape?
No — it's the most popular aquascaping size in the world for good reason. Iwagumi, nano jungle, shrimp metropolis, and Dutch nano-streets all win contests at this size. What's too small is trying to fit big-tank ideas (valleys, forests, schools of 30) into it. Respect the scale and 10 gallons is a complete canvas.
How much does it cost to scape a 10-gallon?
$80–$200 depending on ambition: tank ($15–50), light ($25–60), filter ($15–30), substrate ($20–30), hardscape ($15–40), plants ($20–40). Our budget aquascaping guide squeezes this under $100 without sacrificing the result. CO2 adds $60–150 if you go high-tech.
Can I keep a betta with shrimp in 10 gallons?
Sometimes — heavily planted 10-gallons (layouts 3, 5, 8) give shrimp enough cover to sustain a colony alongside a chill betta. But betta temperament varies; some hunt shrimp relentlessly. Start with cheap ghost shrimp as a temperament test before adding a $50 Caridina colony. Always have a backup tank.
How often do water changes in a 10-gallon?
25–30% weekly — small volumes accumulate nitrates and swing parameters faster than big tanks, so the weekly change is non-negotiable. Top off evaporation mid-week with plain dechlorinated (or RO) water. The whole routine takes 15 minutes; see trimming maintenance for the full weekly checklist.
What's the easiest 10-gallon layout for a total beginner?
Layout 3, the jungle corner: crypts + Anubias + java fern, sponge filter, moderate light, no CO2. It's nearly unkillable, looks lush within two months, teaches planting and maintenance fundamentals, and forgives every beginner mistake except total neglect. Start there; attempt Iwagumi second.
Should I use aquasoil or gravel in a 10-gallon?
Aquasoil if you're planting heavily (it feeds plants and buffers pH); inert sand/gravel with root tabs if you're doing hardscape-focused or budget layouts. In 10 gallons the cost difference is one bag — $20–30 — so most scapers choose aquasoil. Rinse nothing; aquasoil goes in unrinsed and unwashed.
Small Tank, Complete Art
The 10-gallon rewards the aquascaper who edits: fewer species, one material, protected negative space, and equipment that disappears. Pick the layout that matches your ambition and patience — jungle corner for beginners, Iwagumi for minimalists, Dutch streets for trimmers, shrimp metropolis for breeders — and give it the same four-month maturation any scape deserves. Photograph it with our aquascape photography guide when it's grown in; small tanks photograph beautifully because every detail is within reach. And when you're ready for more water, our 20-gallon long ideas await.
Tissue-culture plants are the exception — they’re grown in sterile gel and adapt with minimal melting, which is part of what you’re paying for. Plants bought submersed from another hobbyist’s tank also transition with little melt, since they’re already in the right form.
Which Plants Melt Most (and Least)
Heavy melters (expect significant leaf loss)
- Cryptocorynes — infamous for “crypt melt,” sometimes dropping every leaf after any disturbance. They almost always recover from the roots within weeks.
- Stem plants grown emersed — rotala, ludwigia, and hygrophila often shed lower emersed leaves while the growing tips transition.
- Amazon swords — emersed-grown swords typically lose their broad oval aerial leaves and replace them with longer submersed ribbon leaves.
Light melters
- Anubias, java fern, bucephalandra — slow-growing rhizome plants transition gradually; occasional old-leaf melt but rarely dramatic.
- Vallisneria — usually transitions well, though it dislikes the move itself and may sulk for a week.
- Floating plants — minimal melt since their leaves were already at the air-water interface.
The Acclimation Protocol
Step 1: Quarantine or dip first
Before acclimating to your tank’s conditions, make sure you’re not acclimating pests along with the plant. Run new arrivals through our quarantine and dip protocol — it adds days upfront but prevents months of regret.
Step 2: Float to temperature-match (30 minutes)
Float the bag or container in your tank for 20–30 minutes to equalize temperature. Plants are less temperature-sensitive than fish, but a 10°F shock on top of transplant stress is an avoidable insult.
Step 3: Trim before planting
Remove any leaves that are already damaged, yellowing, or heavily algae-covered — they won’t recover and they’ll rot in your tank, feeding algae. For stem plants, trim off the bottom inch and any emersed leaves that look unlikely to adapt; the plant wastes energy maintaining leaves it’s going to shed anyway. Keep the healthy growing tips — that’s where recovery starts.
Step 4: Plant correctly the first time
Follow our planting guide — right depth, crown exposed on rosettes, rhizomes unburied on epiphytes. Every uprooting and replanting restarts the acclimation clock, so get placement right on the first attempt. Decide where each plant goes before it goes in the water.
Step 5: Run a gentle first week
For the first 7 days after planting:
- Moderate light — run your normal photoperiod but consider dropping intensity 20–30% if your light is dimmable. Blast-level light on a melting plant grows algae on the dying leaves, not recovery.
- Stable CO2 — if you inject CO2, keep it consistent. Fluctuating CO2 during acclimation is a melt accelerator. If you’re low-tech, this doesn’t apply — see growing without CO2.
- Half-strength fertilizer — new plants with damaged leaves can’t use full dosing, and the excess feeds algae. Ramp to full strength over 2–3 weeks per our fertilizer schedule.
- No disturbance — don’t move, trim, or “check on” new plants for at least two weeks. Every touch resets root establishment. This is especially critical for crypts.
Step 6: Remove melt, keep the base
As emersed leaves melt, remove the mushy material promptly — decaying leaves release ammonia and grow fungus that can spread to healthy tissue. But never discard the plant while the crown, rhizome, or roots are firm and alive. A crypt that’s lost every leaf but has firm roots is a plant that’s about to recover, not a dead plant. Give it 3–4 weeks before judging.
Telling Normal Melt From Real Problems
Normal transition melt:
- Affects oldest/emersed leaves first, newest growth last
- New submersed leaves emerge even as old ones dissolve
- Roots and crown stay firm and white/green
- Timeline: 1–4 weeks, then obvious new growth
Concerning melt (see our full melting diagnosis guide):
- New growth also melts or emerges deformed
- Rhizome or crown turns mushy and brown — this is rot, not transition
- Entire plant dissolves within days with no new growth after 4+ weeks
- Melting spreads to established plants that weren’t recently moved
Buying Tips to Minimize Melt
- Buy submersed-grown when available — hobbyist-grown cuttings transition with almost no melt.
- Choose tissue culture for sensitive species — crypts and delicate stems establish far more reliably from sterile cups.
- Avoid plants already melting in the store tank — some melt is normal, but a plant that’s mostly mush at purchase has less energy for recovery.
- Transport carefully — keep plants damp and out of direct sun/heat. A plant that dries out or cooks in a hot car melts far worse than one transported properly.
The First-Month Timeline: What to Expect Week by Week
Knowing what’s normal when removes most acclimation anxiety. Here’s the typical timeline for a healthy plant adapting to a new tank:
Week 1: The quiet week
Almost nothing visible happens. The plant is growing roots you can’t see and assessing its new environment. Some species (vallisneria, stem plants) may start shedding their lowest leaves. This is normal. Resist the urge to “help” — no moving, no extra fertilizer, no light changes. The most common beginner mistake is intervening during a week when the correct action is nothing.
Week 2: Melt peaks
This is when emersed leaves give up in earnest. Crypts may drop everything; swords shed their broad aerial leaves; stem plants lose lower foliage. It looks catastrophic and it’s usually fine. Keep removing mushy material, keep conditions stable, and watch the crown and growing tips — if those are firm and green, recovery is already underway.
Week 3: The turn
New submersed-adapted leaves emerge — smaller, thinner, often a slightly different shade of green than the emersed foliage. Stem plant tips start growing visibly; crypts push tiny curled leaves from the crown; swords unfurl narrow ribbon leaves. This is the moment most beginners exhale for the first time.
Week 4+: Established
New growth outpaces melt, and the plant is functionally yours. You can resume full-strength fertilizer, normal trimming, and stop treating it as fragile. Some slow growers (anubias, bucephalandra) take 6–8 weeks to show obvious progress — that’s their normal speed, not a problem.
Acclimating Different Plant Formats
Tissue-culture cups
Sterile, pest-free, and already adapted to high-humidity (not emersed) growth — tissue cultures melt the least of any format. Rinse the agar gel off gently (leftover gel rots and feeds fungus), split the portion into small plantlets, and plant per our planting guide. They establish slowly for the first two weeks, then accelerate. No dip needed, minimal acclimation stress — this is the premium experience you’re paying for.
Potted plants
Remove the pot and strip away the rockwool completely — leftover rockwool traps debris and rots. Tease the root mass apart gently; if it’s a dense mat, splitting it into 2–3 smaller portions actually establishes faster than planting one big clump (more growing points, better water flow around roots). Potted plants are usually emersed-grown, so expect the standard 2–4 week melt cycle.
Bare-root / bunched stems
Typically sold as weighted bunches. Remove any bands, foam, or weights, strip the lower leaves, and plant stems individually or in small groups. Bunched stems from the store are often already transitioning — check for new submersed growth at the tips, which tells you the plant is mid-adaptation and will settle quickly.
Hobbyist cuttings
Already submersed-grown and the fastest to establish — often showing new growth within days. The main acclimation factor is water-parameter difference between the two tanks. Float to temperature-match, plant promptly, and they’ll usually take off with minimal melt. This is why experienced hobbyists prefer trading cuttings over buying potted plants.
Frequently Asked Questions
Should I use a “plant starter” or transplant fertilizer?
Products marketed for transplant shock are mostly B-vitamins and mild hormones. They don’t hurt, but there’s no strong evidence they help aquarium plants specifically. Stable conditions and patience outperform any bottle. Save the money for more plants.
My new plant melted completely — bare crown, no leaves. Is it dead?
Probably not, if the crown or rhizome is firm. Crypts and swords routinely lose 100% of their leaves and regrow from the base within a month. The test is firmness: firm and pale/green means alive; mushy and brown/black means rot. Give firm-but-leafless plants a full 4 weeks before declaring them dead.
Can I speed up acclimation with extra light or CO2?
No — and trying usually backfires. A melting plant can’t use extra light; the excess just grows algae on its dying leaves. Keep light moderate and CO2 stable (not boosted) during acclimation. Growth speed comes from the plant’s own adaptation timeline, which you can’t rush, only avoid delaying.
Should new plants go straight into my main display tank?
After quarantine/dipping, yes — there’s no benefit to a separate “growing-in” tank for most plants. They acclimate to your water fastest in the tank they’ll live in. The exception is very delicate species going into a tank with boisterous fish; give those a few weeks in a calm corner or breeder box first.
The Patience Rule
The single most important acclimation skill is restraint: plant it right, set gentle conditions, remove decay, and then leave it alone for a month. The hobbyists with the best plant growth aren’t doing something clever in week one — they’re simply not interfering in weeks two through four while the plants do what they’ve evolved to do. Melt looks like failure and feels like failure, but in most cases it’s the visible part of a plant successfully becoming yours.