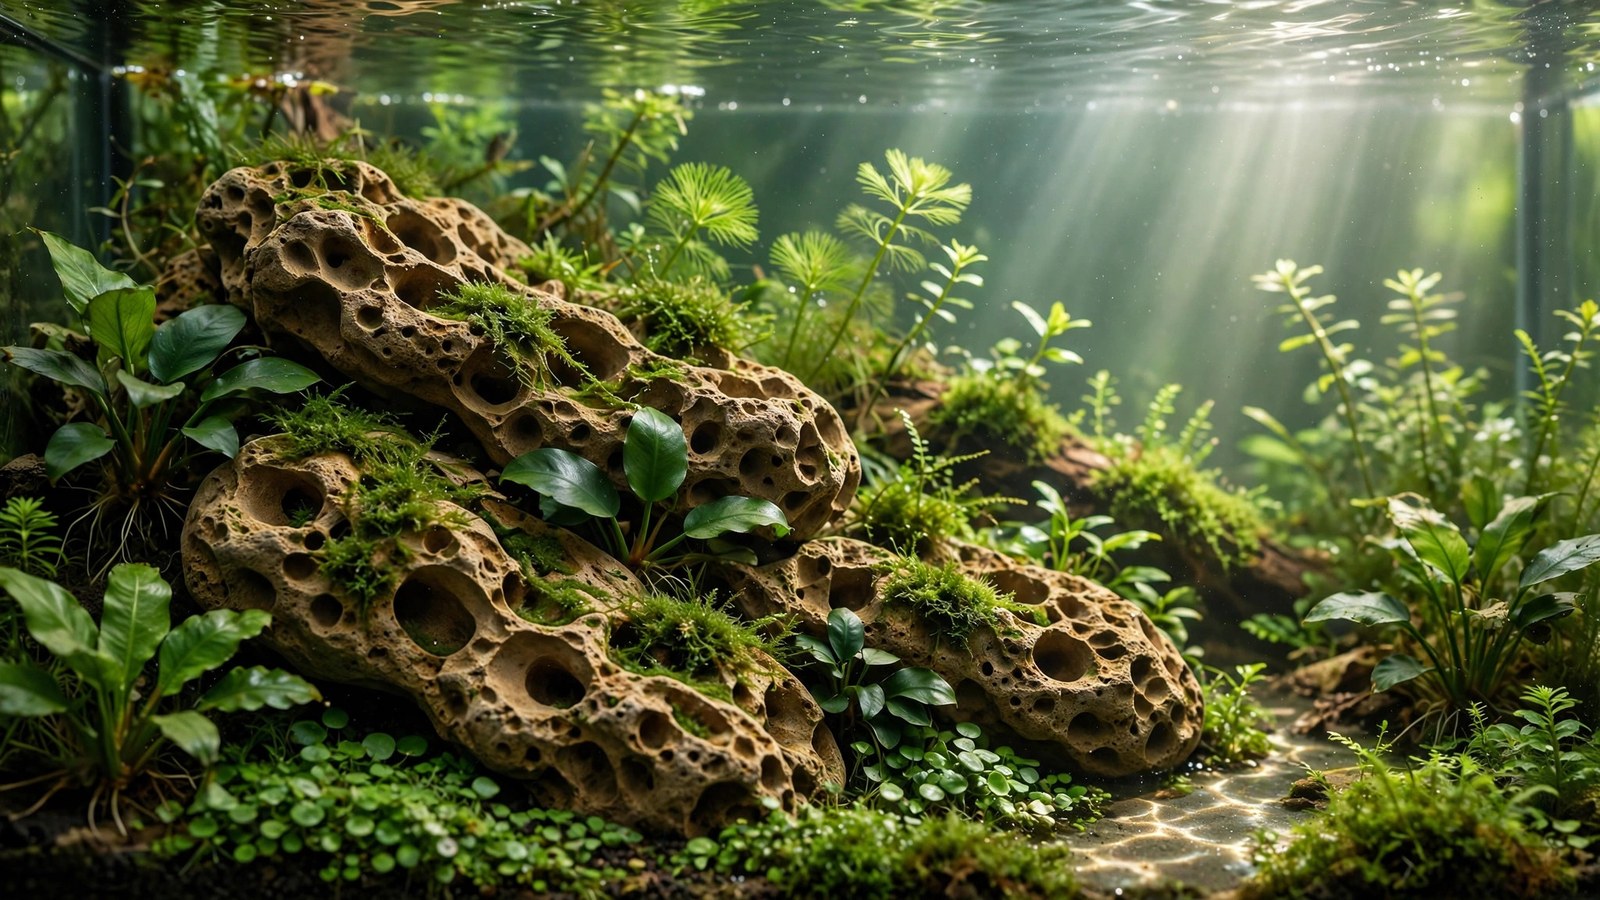
Few hardscape materials have shaped modern aquascaping like dragon stone — the pitted, clay-brown rock whose creviced surface seems designed for moss, epiphytes, and dramatic nature-style layouts. Sold as "Ohko stone," it's beloved for three reasons: it looks spectacular, it's effectively inert, and plants colonize its texture like it was made for them. This guide covers selecting, preparing, aquascaping with, and maintaining dragon stone.
What Dragon Stone Is
Dragon stone (Ohko stone) is a clay-based sedimentary rock — hardened clay/mudstone with a deeply pitted, honeycombed surface in warm brown, tan, rust, and ochre tones. The "dragon scale" texture that gives it its name comes from differential weathering of the clay layers. Key properties:
- Effectively inert — it doesn't meaningfully alter pH, KH, or GH. (Minute clay particles may cloud water initially, but that's sediment, not chemistry.) This makes it the go-to stone for shrimp tanks and soft-water setups where Seiryu's carbonate leaching would be a problem.
- Lightweight for its size — clay stone is less dense than granite or basalt, so large dramatic pieces are manageable. Still heavy — support the tank accordingly.
- Soft enough to shape — you can chip, carve, and break dragon stone with hand tools, customizing pieces to your scape. Few aquascaping stones allow this.
- Plant-colonizing texture — moss, anubias roots, and even carpeting plants grip the pitted surface eagerly. It's the best common stone for the "ancient planted ruin" look.
Selecting Good Pieces
Dragon stone varies enormously piece to piece. Shop in person when possible and look for:
- Deep pitting and crevices — the texture is the point. Smooth, bland pieces are just brown rocks; heavily textured ones are dragon stone.
- Interesting silhouettes — look for pieces with a clear "front" and dramatic profile. Photograph candidates from multiple angles; the camera reveals what the eye misses.
- Color consistency — pieces range from pale tan to deep rust. For a coherent scape, select stones in a similar color family. Mixed pale-and-dark pieces in one tank usually clash.
- Structural integrity — tap the piece; it should ring solid, not crumble. Reject pieces with deep cracks that will split under their own weight (or in your tank).
- Size planning — buy 2–3× more stone than you think you need. Aquascaping is subtractive: you arrange many, remove most. The leftovers become future nano-scape material (see our nano hardscape guide).
Preparation: The Clay-Dust Problem
Dragon stone's one real annoyance: clay dust and loose sediment packed into every crevice. Unprepared stone clouds tanks and coats everything in fine brown silt. Preparation is thorough but simple:
- Pressure-wash or hose-blast every crevice — this removes 90% of the loose material. A garden hose with a jet nozzle works; a pressure washer is better.
- Scrub with a stiff brush — toothbrush for deep pits. You'll be amazed how much keeps coming out.
- Soak 24–48 hours, then scrub again — soaking loosens deep sediment the first wash missed.
- Final rinse until runoff is clear. When you can blast a crevice and get clean water, it's ready.
- Test a piece — drop your cleaned stones in a bucket of water for a day. If the water's clear and pH/KH unchanged, you're good. (They will be — dragon stone is famously inert — but the test builds confidence.)
Even well-prepped dragon stone may shed a little dust when first placed — normal water changes and filtration clear it in days.
Aquascaping With Dragon Stone
The nature-style language
Dragon stone speaks nature style: weathered, ancient, organic. It pairs with driftwood (especially spider wood's chaos against the stone's solidity), moss, ferns, and anubias. The classic composition: a dominant stone group forming a mountain or cliff, wood weaving through, plants softening everything.
Planting on the stone
This is dragon stone's superpower. Techniques:
- Moss: press moss into crevices or glue small portions into pits — it anchors in days and spreads across the texture. Java moss, Christmas moss, and peacock moss all thrive on it.
- Epiphytes: wedge anubias and bucephalandra rhizomes into crevices — the pits hold them without glue, and roots colonize the stone.
- Terrestrial-style accents: in open-top or paludarium setups, the porous stone wicks moisture — mosses and even small ferns grow emersed on damp dragon stone above the waterline.
- Carpet integration: let Monte Carlo or hairgrass grow up against and slightly onto low stone edges — the "plants reclaiming ruins" effect.
Composition principles
- Odd numbers, one dominant — the Iwagumi-derived rule works for dragon stone groupings too.
- Bury one-third — stones sit in the landscape, not on it. Deep burial also stabilizes tall pieces.
- Consistent orientation — align the stone's strata/texture direction across pieces for geological coherence.
- Leave negative space — dragon stone's texture is visually busy; give it room to breathe against open sand or water.
Dragon Stone vs Seiryu: The Big Decision
These are the two defining aquascaping stones, and the choice comes down to chemistry + aesthetics:
- Choose dragon stone for shrimp tanks, soft-water setups, nature-style scapes, warm color palettes, and plant-colonized "ancient" looks. Inert and worry-free.
- Choose Seiryu for Iwagumi layouts, cool blue-gray palettes, dramatic jagged minimalism, and tanks where slightly harder water is fine or welcome. See our Seiryu guide for managing its KH effect.
Many scapers eventually own both and choose per-project. They're different instruments, not competitors.
Maintenance
- Algae in pits: dragon stone's texture collects algae like it collects moss — a toothbrush during water changes is the essential tool. Nerite snails help significantly.
- Deep cleaning: for removed stones, a diluted bleach soak (then thorough dechlorinated rinsing and drying) resets badly algae-coated pieces. Don't boil — thermal shock can crack clay stone.
- Stability checks: the stone is soft enough that stacked arrangements can shift as pieces settle — check tall stacks monthly and re-seat as needed. For permanent stacks, aquascaping glue + tissue bonds dragon stone well.
- Color over time: submerged dragon stone darkens slightly and biofilm gives it a rich patina — most keepers find it looks better at year two than day one.
Building With Dragon Stone: Structural Techniques
Dragon stone's workability makes it the best common stone for built structures, not just placed rocks:
- Dry-stacking: the pitted texture gives stacked stones surprising grip — dry-stack your formation outside the tank first, photograph it, then rebuild in the tank. Gravity + friction holds modest stacks; anything tall gets glued.
- Glue + tissue method: cyanoacrylate glue with cigarette-filter tissue or paper towel as a binder creates strong, natural-looking bonds between dragon stone pieces (see our glue guide). The bond is rock-strong and the tissue disappears under a dusting of stone powder.
- Carving custom pieces: need a flat base for stability? A notch for wood to slot into? A cave entrance? Chisel and masonry bit shape dragon stone easily — it's the only popular aquascaping stone you can genuinely sculpt.
- Caves and overhangs: flat-ish pieces make natural cave roofs for apistos and catfish; the pitted undersides grow biofilm that fry graze. Build caves with the entrance facing the front glass for viewing.
- Terracing with stone: flat dragon stone slabs make excellent retaining walls — their texture looks far more natural than slate for the purpose, though slate's flat layers stack more precisely.
Frequently Asked Questions
Is dragon stone really pH-neutral?
For practical purposes, yes. It's clay-based, not carbonate-based, so it doesn't leach KH or raise pH the way Seiryu or limestone does. You may see a tiny initial pH dip from residual organic matter in the pits (removed by proper cleaning), but no lasting chemistry shift. It's the standard stone for caridina shrimp tanks for exactly this reason.
Why is my water brown after adding dragon stone?
Clay dust and sediment from unprepared crevices — not tannins, not chemistry. It means the prep was insufficient: pull the worst pieces, hose-blast the crevices again, and let filtration clear the rest. Properly prepared dragon stone doesn't discolor water.
Can I break dragon stone to shape it?
Yes — it's one of the few aquascaping stones soft enough to shape with hand tools. Score with a chisel and tap to split along natural planes; the fresh faces weather in and look natural within weeks underwater. Wear eye protection and a dust mask — clay dust is unpleasant to breathe.
How much dragon stone do I need?
More than you think. A good rule: buy 1–1.5 lbs per gallon for a stone-dominant scape, then use the best 60% and save the rest. Stone is the cheapest part of a scape to over-buy and the most annoying to run short on mid-composition.
Dragon stone vs lava rock — which for a moss wall?
Both work, but differently: lava rock's extreme porosity grips moss slightly better and it's cheaper; dragon stone looks far more natural and refined. For a visible feature, dragon stone; for a background utility wall, lava rock saves money. Many tanks use both — dragon stone in front, lava rock behind.
The People's Stone
Dragon stone earned its ubiquity the honest way: it's beautiful, it's inert, it's workable, and it makes plants look good. It doesn't demand chemistry management like Seiryu or preparation marathons like Mopani — just a good hose-down and an eye for composition. For nature-style planted tanks, especially shrimp tanks, it's the default choice for good reason. Buy more than you need, clean it well, bury it deep, and let the moss do the rest.
Tissue-culture plants are the exception — they’re grown in sterile gel and adapt with minimal melting, which is part of what you’re paying for. Plants bought submersed from another hobbyist’s tank also transition with little melt, since they’re already in the right form.
Which Plants Melt Most (and Least)
Heavy melters (expect significant leaf loss)
- Cryptocorynes — infamous for “crypt melt,” sometimes dropping every leaf after any disturbance. They almost always recover from the roots within weeks.
- Stem plants grown emersed — rotala, ludwigia, and hygrophila often shed lower emersed leaves while the growing tips transition.
- Amazon swords — emersed-grown swords typically lose their broad oval aerial leaves and replace them with longer submersed ribbon leaves.
Light melters
- Anubias, java fern, bucephalandra — slow-growing rhizome plants transition gradually; occasional old-leaf melt but rarely dramatic.
- Vallisneria — usually transitions well, though it dislikes the move itself and may sulk for a week.
- Floating plants — minimal melt since their leaves were already at the air-water interface.
The Acclimation Protocol
Step 1: Quarantine or dip first
Before acclimating to your tank’s conditions, make sure you’re not acclimating pests along with the plant. Run new arrivals through our quarantine and dip protocol — it adds days upfront but prevents months of regret.
Step 2: Float to temperature-match (30 minutes)
Float the bag or container in your tank for 20–30 minutes to equalize temperature. Plants are less temperature-sensitive than fish, but a 10°F shock on top of transplant stress is an avoidable insult.
Step 3: Trim before planting
Remove any leaves that are already damaged, yellowing, or heavily algae-covered — they won’t recover and they’ll rot in your tank, feeding algae. For stem plants, trim off the bottom inch and any emersed leaves that look unlikely to adapt; the plant wastes energy maintaining leaves it’s going to shed anyway. Keep the healthy growing tips — that’s where recovery starts.
Step 4: Plant correctly the first time
Follow our planting guide — right depth, crown exposed on rosettes, rhizomes unburied on epiphytes. Every uprooting and replanting restarts the acclimation clock, so get placement right on the first attempt. Decide where each plant goes before it goes in the water.
Step 5: Run a gentle first week
For the first 7 days after planting:
- Moderate light — run your normal photoperiod but consider dropping intensity 20–30% if your light is dimmable. Blast-level light on a melting plant grows algae on the dying leaves, not recovery.
- Stable CO2 — if you inject CO2, keep it consistent. Fluctuating CO2 during acclimation is a melt accelerator. If you’re low-tech, this doesn’t apply — see growing without CO2.
- Half-strength fertilizer — new plants with damaged leaves can’t use full dosing, and the excess feeds algae. Ramp to full strength over 2–3 weeks per our fertilizer schedule.
- No disturbance — don’t move, trim, or “check on” new plants for at least two weeks. Every touch resets root establishment. This is especially critical for crypts.
Step 6: Remove melt, keep the base
As emersed leaves melt, remove the mushy material promptly — decaying leaves release ammonia and grow fungus that can spread to healthy tissue. But never discard the plant while the crown, rhizome, or roots are firm and alive. A crypt that’s lost every leaf but has firm roots is a plant that’s about to recover, not a dead plant. Give it 3–4 weeks before judging.
Telling Normal Melt From Real Problems
Normal transition melt:
- Affects oldest/emersed leaves first, newest growth last
- New submersed leaves emerge even as old ones dissolve
- Roots and crown stay firm and white/green
- Timeline: 1–4 weeks, then obvious new growth
Concerning melt (see our full melting diagnosis guide):
- New growth also melts or emerges deformed
- Rhizome or crown turns mushy and brown — this is rot, not transition
- Entire plant dissolves within days with no new growth after 4+ weeks
- Melting spreads to established plants that weren’t recently moved
Buying Tips to Minimize Melt
- Buy submersed-grown when available — hobbyist-grown cuttings transition with almost no melt.
- Choose tissue culture for sensitive species — crypts and delicate stems establish far more reliably from sterile cups.
- Avoid plants already melting in the store tank — some melt is normal, but a plant that’s mostly mush at purchase has less energy for recovery.
- Transport carefully — keep plants damp and out of direct sun/heat. A plant that dries out or cooks in a hot car melts far worse than one transported properly.
The First-Month Timeline: What to Expect Week by Week
Knowing what’s normal when removes most acclimation anxiety. Here’s the typical timeline for a healthy plant adapting to a new tank:
Week 1: The quiet week
Almost nothing visible happens. The plant is growing roots you can’t see and assessing its new environment. Some species (vallisneria, stem plants) may start shedding their lowest leaves. This is normal. Resist the urge to “help” — no moving, no extra fertilizer, no light changes. The most common beginner mistake is intervening during a week when the correct action is nothing.
Week 2: Melt peaks
This is when emersed leaves give up in earnest. Crypts may drop everything; swords shed their broad aerial leaves; stem plants lose lower foliage. It looks catastrophic and it’s usually fine. Keep removing mushy material, keep conditions stable, and watch the crown and growing tips — if those are firm and green, recovery is already underway.
Week 3: The turn
New submersed-adapted leaves emerge — smaller, thinner, often a slightly different shade of green than the emersed foliage. Stem plant tips start growing visibly; crypts push tiny curled leaves from the crown; swords unfurl narrow ribbon leaves. This is the moment most beginners exhale for the first time.
Week 4+: Established
New growth outpaces melt, and the plant is functionally yours. You can resume full-strength fertilizer, normal trimming, and stop treating it as fragile. Some slow growers (anubias, bucephalandra) take 6–8 weeks to show obvious progress — that’s their normal speed, not a problem.
Acclimating Different Plant Formats
Tissue-culture cups
Sterile, pest-free, and already adapted to high-humidity (not emersed) growth — tissue cultures melt the least of any format. Rinse the agar gel off gently (leftover gel rots and feeds fungus), split the portion into small plantlets, and plant per our planting guide. They establish slowly for the first two weeks, then accelerate. No dip needed, minimal acclimation stress — this is the premium experience you’re paying for.
Potted plants
Remove the pot and strip away the rockwool completely — leftover rockwool traps debris and rots. Tease the root mass apart gently; if it’s a dense mat, splitting it into 2–3 smaller portions actually establishes faster than planting one big clump (more growing points, better water flow around roots). Potted plants are usually emersed-grown, so expect the standard 2–4 week melt cycle.
Bare-root / bunched stems
Typically sold as weighted bunches. Remove any bands, foam, or weights, strip the lower leaves, and plant stems individually or in small groups. Bunched stems from the store are often already transitioning — check for new submersed growth at the tips, which tells you the plant is mid-adaptation and will settle quickly.
Hobbyist cuttings
Already submersed-grown and the fastest to establish — often showing new growth within days. The main acclimation factor is water-parameter difference between the two tanks. Float to temperature-match, plant promptly, and they’ll usually take off with minimal melt. This is why experienced hobbyists prefer trading cuttings over buying potted plants.
Frequently Asked Questions
Should I use a “plant starter” or transplant fertilizer?
Products marketed for transplant shock are mostly B-vitamins and mild hormones. They don’t hurt, but there’s no strong evidence they help aquarium plants specifically. Stable conditions and patience outperform any bottle. Save the money for more plants.
My new plant melted completely — bare crown, no leaves. Is it dead?
Probably not, if the crown or rhizome is firm. Crypts and swords routinely lose 100% of their leaves and regrow from the base within a month. The test is firmness: firm and pale/green means alive; mushy and brown/black means rot. Give firm-but-leafless plants a full 4 weeks before declaring them dead.
Can I speed up acclimation with extra light or CO2?
No — and trying usually backfires. A melting plant can’t use extra light; the excess just grows algae on its dying leaves. Keep light moderate and CO2 stable (not boosted) during acclimation. Growth speed comes from the plant’s own adaptation timeline, which you can’t rush, only avoid delaying.
Should new plants go straight into my main display tank?
After quarantine/dipping, yes — there’s no benefit to a separate “growing-in” tank for most plants. They acclimate to your water fastest in the tank they’ll live in. The exception is very delicate species going into a tank with boisterous fish; give those a few weeks in a calm corner or breeder box first.
The Patience Rule
The single most important acclimation skill is restraint: plant it right, set gentle conditions, remove decay, and then leave it alone for a month. The hobbyists with the best plant growth aren’t doing something clever in week one — they’re simply not interfering in weeks two through four while the plants do what they’ve evolved to do. Melt looks like failure and feels like failure, but in most cases it’s the visible part of a plant successfully becoming yours.