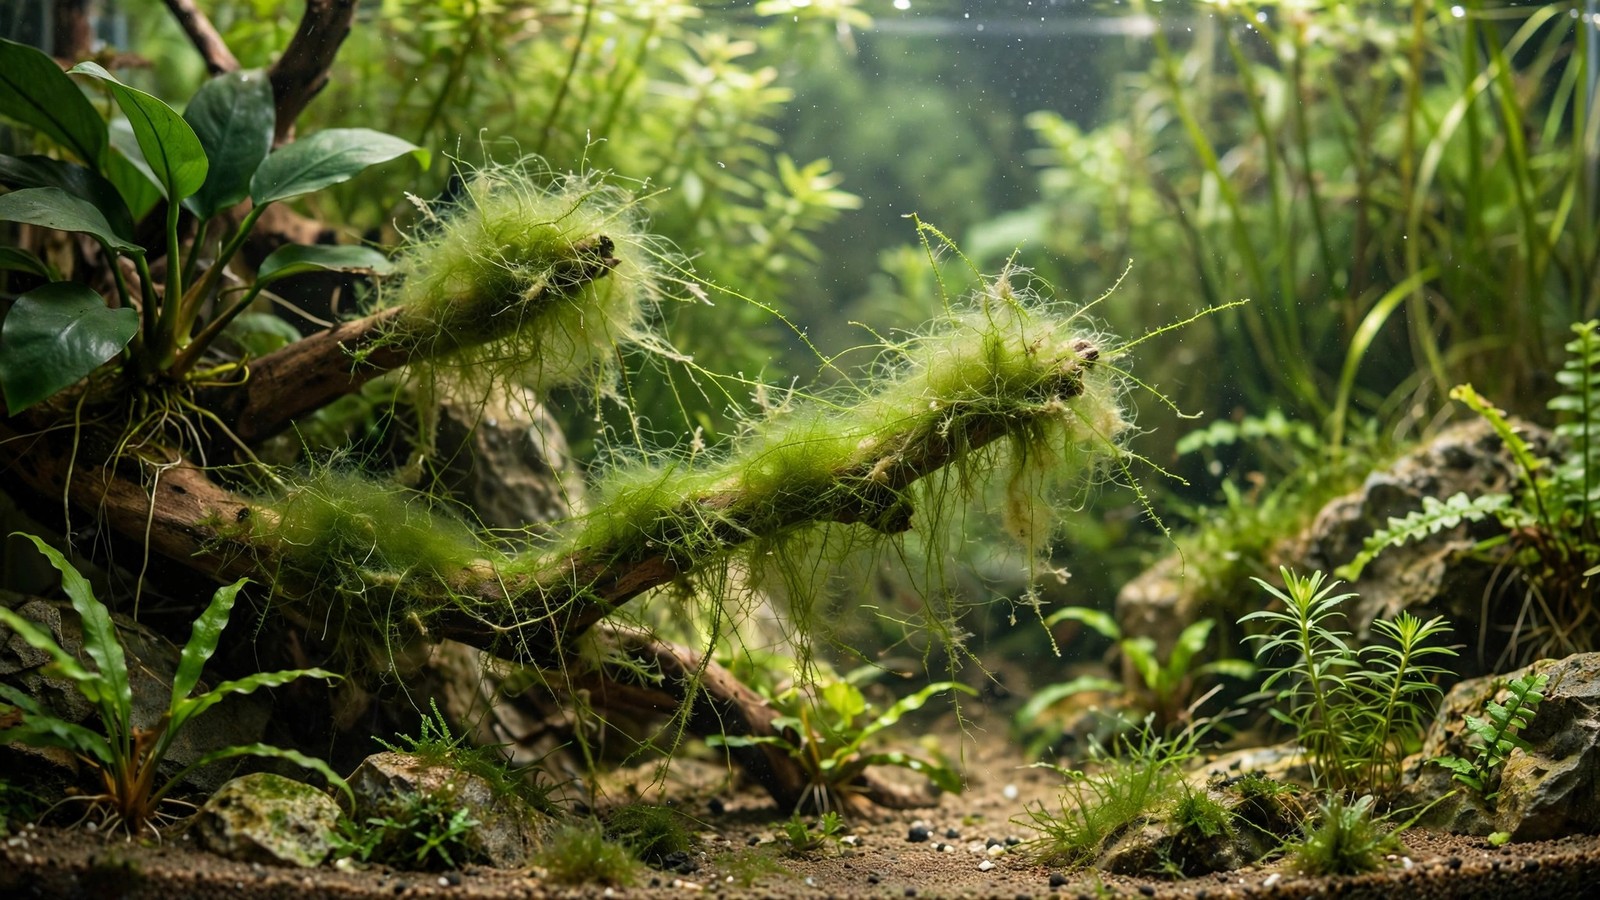
You bought a "moss ball" and it started growing wiry green beards. Or your java moss developed tough, branching tufts that won't pull out cleanly. Meet cladophora — the algae that impersonates moss so convincingly that it's sold in stores as a plant. Unlike the soft filamentous algae that surrender to a toothbrush, cladophora is wiry, stubborn, and genuinely hard to kill. But it can be beaten with identification certainty, relentless manual removal, and fixing the low-flow, high-organic conditions it loves.
What Cladophora Is (and Isn't)
Cladophora is a genus of branching green algae with a distinctive wiry structure. Under magnification it looks like tiny branching trees; to the naked eye it forms:
- Dense, wiry tufts on hardscape, slow-growing plants, and equipment
- Round "moss balls" — the marimo balls sold in the trade are literally a cladophora species (Aegagropila linnaei) rolled into spheres by water motion
- Branching beards growing from moss, where it's hardest to distinguish from the host plant
The touch test (definitive ID)
Cladophora feels coarse, wiry, and springy — like wet wool or horsehair. It resists breaking; pull a strand and it stretches rather than snapping. Compare:
- Hair algae — soft, slimy, breaks apart easily. See our hair algae removal guide.
- Thread algae — soft single strands, easily crushed. Covered in our thread algae treatment guide.
- Java moss — soft, feathery, delicate branching. If it feels soft, it's moss; if it feels like wire, it's cladophora.
This distinction matters because treatments that kill soft algae often fail on cladophora. Hydrogen peroxide spot-dosing that melts hair algae may barely faze it — the same limitation applies to staghorn algae treatments, which target a similarly tough organism. Misidentification is the number-one reason cladophora "treatments" fail. When in doubt between wiry algae types, compare against our green spot algae guide (hard spots, not wiry tufts) and remember that true fuzz algae feels soft, never wiry.
How Cladophora Gets In
- Hitchhiking on plants and moss — the most common vector. A few invisible filaments in a moss portion or on a potted plant establish a colony in weeks.
- Marimo moss balls — sold as ornamentals, they're cladophora colonies. Fragments break off, drift, and anchor elsewhere. Many infestations trace back to a single moss ball.
- Contaminated equipment — nets, tweezers, and filter media moved between tanks carry fragments.
Why It's So Hard to Kill
- Thick cell walls — resist chemical treatments that destroy soft algae.
- Fragmentation reproduction — every broken piece is a new colony. Rough handling spreads it.
- Low requirements — tolerates low light, low nutrients, and neglect. It persists in tanks where other algae starve.
- Anchors deeply — rhizoid-like holdfasts grip textured surfaces, wood grain, and moss matrices tenaciously.
The Eradication Protocol
Step 1: Quarantine the mindset — contain first
Before removing anything, stop moving things between tanks. Sterilize nets and tools (bleach dip, then dechlorinate). Cladophora spreads through fragments, so every careless water change seeds new colonies. Turn off filters during removal sessions so dislodged fragments don't get blasted around the tank.
Step 2: Manual removal (the core of the treatment)
- Tweezers, not toothbrushes — grip tufts at the base and pull slowly with steady pressure. The wiry structure usually comes out in satisfying clumps.
- For moss infestations: remove the entire moss portion. Pick through it in a bucket of tank water under good light, removing every wiry strand. If the moss is more cladophora than moss, discard and replace it — this is the pragmatic call experienced keepers make. Moss is cheap; eradication months aren't.
- For hardscape: remove the rock or wood, scrub with a stiff brush, and pour boiling water over it (for rocks) or soak in a bleach solution (1:20, then dechlorinate thoroughly) for wood.
- Siphon aggressively during and after each session — catch every drifting fragment.
- Repeat twice weekly. You're hunting fragments; consistency is everything.
Step 3: Fix the conditions it loves
- Increase flow — cladophora thrives in still, detritus-collecting corners. Reposition outlets, add circulation, eliminate dead spots.
- Reduce organics — vacuum detritus, remove decaying leaves promptly, don't overfeed. Cladophora loves the dissolved organics that accumulate in neglected tanks.
- Moderate the light — drop to 6–7 hours during eradication. It tolerates low light, but every disadvantage helps.
- Keep plants growing — healthy, fast-growing plants compete for the same nutrients. Don't starve the tank; a hungry tank favors the toughest algae, which is cladophora.
Step 4: Targeted chemical assistance
- Hydrogen peroxide — less effective than on soft algae, but repeated spot-dosing (filter off, syringe onto tufts, 2 ml per 10 gallons, 15 min) weakens it over multiple applications. Expect 3–4 sessions, not one.
- Glutaraldehyde-based liquid carbon — spot-dosed at label strength can damage cladophora, but use cautiously near shrimp and vallisneria.
- Bleach dips for removed hardscape — 1:20 bleach soak for 5 minutes kills it completely; dechlorinate thoroughly before returning.
- Never whole-tank algaecide — ineffective at safe doses against cladophora's thick walls, and harmful to everything else.
Step 5: The nuclear option (for severe cases)
If cladophora has thoroughly infested moss, carpet, and hardscape across the tank:
- Remove and discard all moss — it's the primary reservoir and nearly impossible to fully clean.
- Remove hardscape for bleach treatment.
- Trim carpeting plants hard — they regrow from runners faster than cladophora re-establishes from fragments.
- Consider this a rescape opportunity rather than a defeat. Many keepers report the post-cladophora rescape becomes their best tank.
Prevention: Never Again
- Quarantine all new plants and moss — inspect moss portions under bright light before adding; pick out anything wiry.
- Think twice about marimo balls — they're attractive, but they're cladophora colonies in your tank. If you keep them, isolate them and never let fragments drift.
- Sterilize tools between tanks — a quick bleach dip prevents cross-contamination.
- Maintain flow and cleanliness — cladophora establishes easiest in neglected, still tanks. Regular maintenance is prevention.
The Marimo Ball Dilemma
Marimo "moss" balls deserve special discussion because they're the only cladophora product sold deliberately — and the most common infestation source. In their native lakes, wave action rolls cladophora into velvet spheres; in your tank, they sit still, slowly shedding fragments that colonize everything downstream.
If you love the look and want to keep them, quarantine them permanently: keep marimo in their own container or a dedicated tank, never in the main display. Roll them in your palms during water changes — this maintains the spherical shape and lets you inspect for loose fragments. Rinse them in old tank water regularly, squeezing gently like a sponge to expel trapped detritus (which otherwise rots inside the ball). And never, ever toss a deteriorating marimo into the main tank "to recover" — a falling-apart ball is a fragment bomb.
Be aware that many mass-market "moss balls" aren't even true marimo — they're java moss wrapped around foam, or worse, cladophora species far more aggressive than Aegagropila linnaei. If a store-bought ball starts growing wiry beards within weeks, treat it as an infestation source: remove it, inspect the tank for fragments, and don't buy replacements from the same supplier.
Frequently Asked Questions
Is cladophora harmful to fish or plants?
Not directly toxic, but it smothers. Dense tufts block light from leaves, trap detritus that rots against plant tissue, and outcompete moss for surface area. Fish and shrimp ignore it — few grazers touch the wiry strands, which is part of why it's so persistent. Amano shrimp may pick at young growth but won't control an established colony.
Can I just leave cladophora if it looks like moss?
Some keepers intentionally cultivate it on hardscape for a "mossy" look, and marimo balls are deliberately kept. The risk is spread: "controlled" cladophora fragments constantly, and today's accent tuft becomes next month's infestation in your moss and carpet. If you keep it deliberately, isolate it and remove fragments religiously. Most keepers who tried the decorative route eventually eradicated it.
Why didn't hydrogen peroxide kill my cladophora?
Because cladophora's thick cell walls resist single chemical hits that melt soft algae. Peroxide weakens it but rarely kills established tufts outright — it takes repeated applications plus manual removal. If you treated once and declared failure, you under-treated. Combine 3–4 spot-dosing sessions with aggressive tweezer removal for real results.
How do I know I've fully eradicated it?
You don't, for about two months. Cladophora regrows from microscopic fragments, so eight clean weeks with no new tufts is the all-clear threshold. Keep inspecting moss and hardscape crevices weekly during this period — catching a regrowing tuft at 5 mm takes seconds; catching it at 5 cm takes a session.
Should I throw away infested moss or try to clean it?
Clean it once, thoroughly, in a bucket. If after that session the moss still shows wiry strands woven through it, discard and replace. Moss is inexpensive and regrows fast; months of fighting cladophora hidden in a moss mat costs more in frustration than a new portion costs in money. This is the voice of collective hobby experience speaking.
Respect the Wire
Cladophora demands more patience than any soft algae — tweezers over toothbrushes, weeks over days, and the humility to throw away a beloved moss mat when it's the reservoir. But it's beatable: fragment by fragment, with clean flow, low organics, and quarantined new arrivals, even bad infestations end. The keepers who win are the ones who identify it correctly on day one and never let a fragment drift.
Tissue-culture plants are the exception — they’re grown in sterile gel and adapt with minimal melting, which is part of what you’re paying for. Plants bought submersed from another hobbyist’s tank also transition with little melt, since they’re already in the right form.
Which Plants Melt Most (and Least)
Heavy melters (expect significant leaf loss)
- Cryptocorynes — infamous for “crypt melt,” sometimes dropping every leaf after any disturbance. They almost always recover from the roots within weeks.
- Stem plants grown emersed — rotala, ludwigia, and hygrophila often shed lower emersed leaves while the growing tips transition.
- Amazon swords — emersed-grown swords typically lose their broad oval aerial leaves and replace them with longer submersed ribbon leaves.
Light melters
- Anubias, java fern, bucephalandra — slow-growing rhizome plants transition gradually; occasional old-leaf melt but rarely dramatic.
- Vallisneria — usually transitions well, though it dislikes the move itself and may sulk for a week.
- Floating plants — minimal melt since their leaves were already at the air-water interface.
The Acclimation Protocol
Step 1: Quarantine or dip first
Before acclimating to your tank’s conditions, make sure you’re not acclimating pests along with the plant. Run new arrivals through our quarantine and dip protocol — it adds days upfront but prevents months of regret.
Step 2: Float to temperature-match (30 minutes)
Float the bag or container in your tank for 20–30 minutes to equalize temperature. Plants are less temperature-sensitive than fish, but a 10°F shock on top of transplant stress is an avoidable insult.
Step 3: Trim before planting
Remove any leaves that are already damaged, yellowing, or heavily algae-covered — they won’t recover and they’ll rot in your tank, feeding algae. For stem plants, trim off the bottom inch and any emersed leaves that look unlikely to adapt; the plant wastes energy maintaining leaves it’s going to shed anyway. Keep the healthy growing tips — that’s where recovery starts.
Step 4: Plant correctly the first time
Follow our planting guide — right depth, crown exposed on rosettes, rhizomes unburied on epiphytes. Every uprooting and replanting restarts the acclimation clock, so get placement right on the first attempt. Decide where each plant goes before it goes in the water.
Step 5: Run a gentle first week
For the first 7 days after planting:
- Moderate light — run your normal photoperiod but consider dropping intensity 20–30% if your light is dimmable. Blast-level light on a melting plant grows algae on the dying leaves, not recovery.
- Stable CO2 — if you inject CO2, keep it consistent. Fluctuating CO2 during acclimation is a melt accelerator. If you’re low-tech, this doesn’t apply — see growing without CO2.
- Half-strength fertilizer — new plants with damaged leaves can’t use full dosing, and the excess feeds algae. Ramp to full strength over 2–3 weeks per our fertilizer schedule.
- No disturbance — don’t move, trim, or “check on” new plants for at least two weeks. Every touch resets root establishment. This is especially critical for crypts.
Step 6: Remove melt, keep the base
As emersed leaves melt, remove the mushy material promptly — decaying leaves release ammonia and grow fungus that can spread to healthy tissue. But never discard the plant while the crown, rhizome, or roots are firm and alive. A crypt that’s lost every leaf but has firm roots is a plant that’s about to recover, not a dead plant. Give it 3–4 weeks before judging.
Telling Normal Melt From Real Problems
Normal transition melt:
- Affects oldest/emersed leaves first, newest growth last
- New submersed leaves emerge even as old ones dissolve
- Roots and crown stay firm and white/green
- Timeline: 1–4 weeks, then obvious new growth
Concerning melt (see our full melting diagnosis guide):
- New growth also melts or emerges deformed
- Rhizome or crown turns mushy and brown — this is rot, not transition
- Entire plant dissolves within days with no new growth after 4+ weeks
- Melting spreads to established plants that weren’t recently moved
Buying Tips to Minimize Melt
- Buy submersed-grown when available — hobbyist-grown cuttings transition with almost no melt.
- Choose tissue culture for sensitive species — crypts and delicate stems establish far more reliably from sterile cups.
- Avoid plants already melting in the store tank — some melt is normal, but a plant that’s mostly mush at purchase has less energy for recovery.
- Transport carefully — keep plants damp and out of direct sun/heat. A plant that dries out or cooks in a hot car melts far worse than one transported properly.
The First-Month Timeline: What to Expect Week by Week
Knowing what’s normal when removes most acclimation anxiety. Here’s the typical timeline for a healthy plant adapting to a new tank:
Week 1: The quiet week
Almost nothing visible happens. The plant is growing roots you can’t see and assessing its new environment. Some species (vallisneria, stem plants) may start shedding their lowest leaves. This is normal. Resist the urge to “help” — no moving, no extra fertilizer, no light changes. The most common beginner mistake is intervening during a week when the correct action is nothing.
Week 2: Melt peaks
This is when emersed leaves give up in earnest. Crypts may drop everything; swords shed their broad aerial leaves; stem plants lose lower foliage. It looks catastrophic and it’s usually fine. Keep removing mushy material, keep conditions stable, and watch the crown and growing tips — if those are firm and green, recovery is already underway.
Week 3: The turn
New submersed-adapted leaves emerge — smaller, thinner, often a slightly different shade of green than the emersed foliage. Stem plant tips start growing visibly; crypts push tiny curled leaves from the crown; swords unfurl narrow ribbon leaves. This is the moment most beginners exhale for the first time.
Week 4+: Established
New growth outpaces melt, and the plant is functionally yours. You can resume full-strength fertilizer, normal trimming, and stop treating it as fragile. Some slow growers (anubias, bucephalandra) take 6–8 weeks to show obvious progress — that’s their normal speed, not a problem.
Acclimating Different Plant Formats
Tissue-culture cups
Sterile, pest-free, and already adapted to high-humidity (not emersed) growth — tissue cultures melt the least of any format. Rinse the agar gel off gently (leftover gel rots and feeds fungus), split the portion into small plantlets, and plant per our planting guide. They establish slowly for the first two weeks, then accelerate. No dip needed, minimal acclimation stress — this is the premium experience you’re paying for.
Potted plants
Remove the pot and strip away the rockwool completely — leftover rockwool traps debris and rots. Tease the root mass apart gently; if it’s a dense mat, splitting it into 2–3 smaller portions actually establishes faster than planting one big clump (more growing points, better water flow around roots). Potted plants are usually emersed-grown, so expect the standard 2–4 week melt cycle.
Bare-root / bunched stems
Typically sold as weighted bunches. Remove any bands, foam, or weights, strip the lower leaves, and plant stems individually or in small groups. Bunched stems from the store are often already transitioning — check for new submersed growth at the tips, which tells you the plant is mid-adaptation and will settle quickly.
Hobbyist cuttings
Already submersed-grown and the fastest to establish — often showing new growth within days. The main acclimation factor is water-parameter difference between the two tanks. Float to temperature-match, plant promptly, and they’ll usually take off with minimal melt. This is why experienced hobbyists prefer trading cuttings over buying potted plants.
Frequently Asked Questions
Should I use a “plant starter” or transplant fertilizer?
Products marketed for transplant shock are mostly B-vitamins and mild hormones. They don’t hurt, but there’s no strong evidence they help aquarium plants specifically. Stable conditions and patience outperform any bottle. Save the money for more plants.
My new plant melted completely — bare crown, no leaves. Is it dead?
Probably not, if the crown or rhizome is firm. Crypts and swords routinely lose 100% of their leaves and regrow from the base within a month. The test is firmness: firm and pale/green means alive; mushy and brown/black means rot. Give firm-but-leafless plants a full 4 weeks before declaring them dead.
Can I speed up acclimation with extra light or CO2?
No — and trying usually backfires. A melting plant can’t use extra light; the excess just grows algae on its dying leaves. Keep light moderate and CO2 stable (not boosted) during acclimation. Growth speed comes from the plant’s own adaptation timeline, which you can’t rush, only avoid delaying.
Should new plants go straight into my main display tank?
After quarantine/dipping, yes — there’s no benefit to a separate “growing-in” tank for most plants. They acclimate to your water fastest in the tank they’ll live in. The exception is very delicate species going into a tank with boisterous fish; give those a few weeks in a calm corner or breeder box first.
The Patience Rule
The single most important acclimation skill is restraint: plant it right, set gentle conditions, remove decay, and then leave it alone for a month. The hobbyists with the best plant growth aren’t doing something clever in week one — they’re simply not interfering in weeks two through four while the plants do what they’ve evolved to do. Melt looks like failure and feels like failure, but in most cases it’s the visible part of a plant successfully becoming yours.