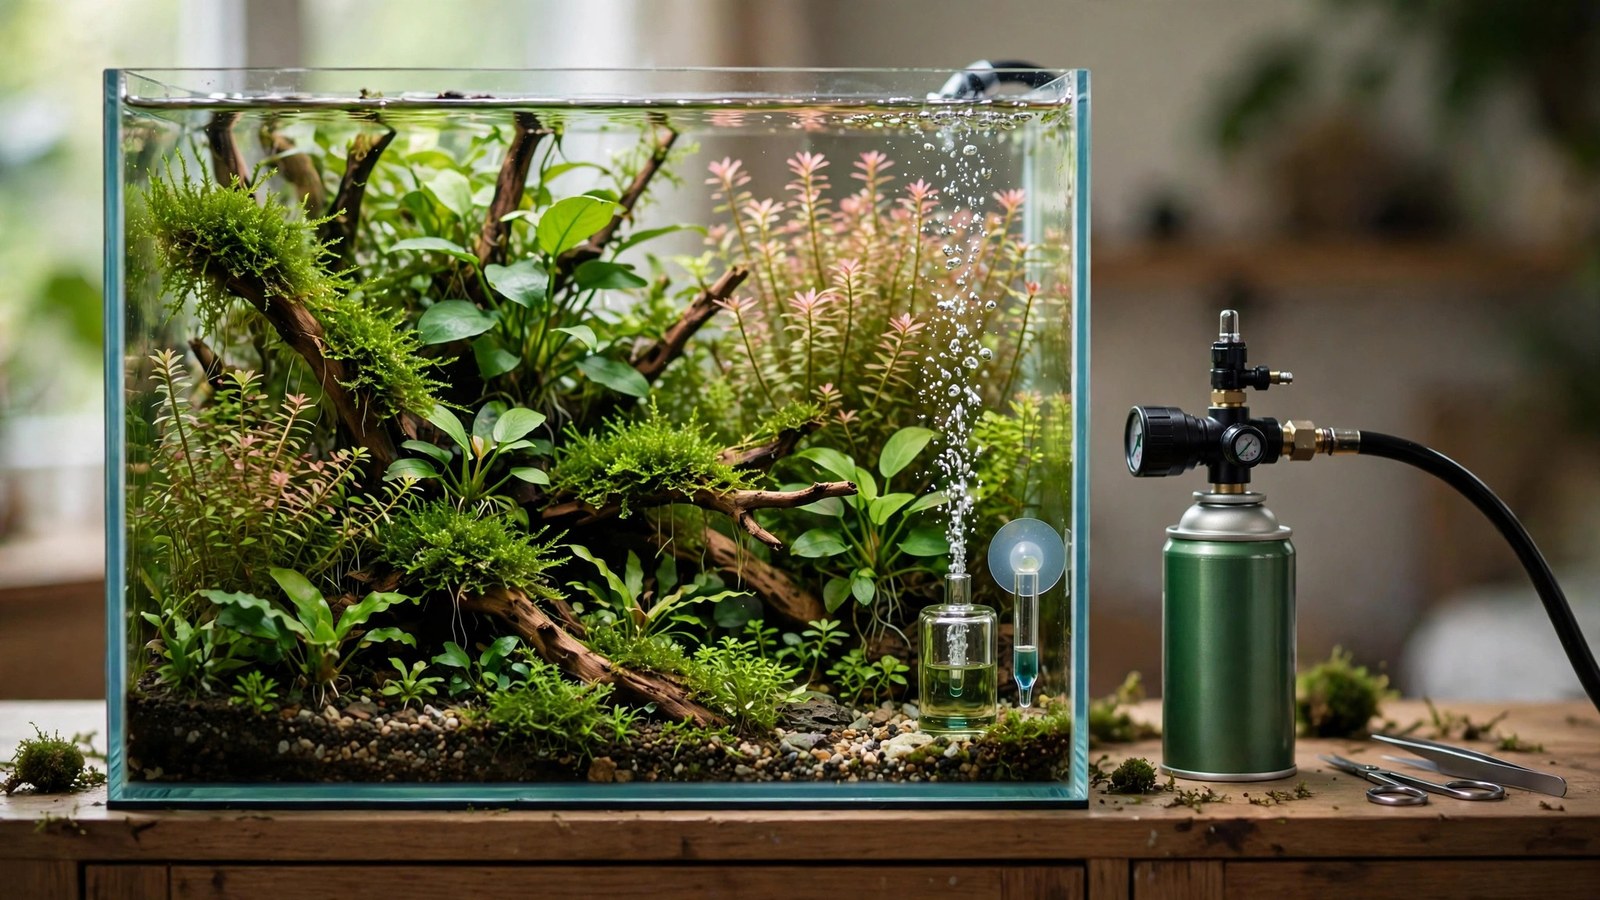
A full-size 5 lb CO2 cylinder next to a 5-gallon desktop nano looks ridiculous — and it's overkill when the tank sips gas. Paintball CO2 setups solve the proportion problem: compact 20 oz (or smaller) paintball tanks, a dedicated compact regulator, and months of gas for nano planted tanks. This guide covers the complete paintball CO2 system for nano tanks: parts, setup, costs, and how long the gas actually lasts.
Why Paintball CO2 Fits Nano Tanks
- Right-sized gas supply. A nano tank at a bubble every 2–3 seconds uses so little CO2 that a 20 oz paintball tank lasts 5–7 weeks — a practical refill interval, not a decade of gas gathering dust.
- Compact footprint. A 20 oz tank is about 10 inches tall — it hides inside or behind a nano stand, on a desk shelf, anywhere a 5 lb cylinder can't go.
- Easy refills. Paintball fields, paintball shops, and many sporting-goods stores refill 20 oz tanks cheaply (often $4–8) while you wait. No welding-supply shop needed.
- Lower upfront cost. A complete paintball CO2 setup typically runs well under half the cost of a full-size pressurized system.
The tradeoff: more frequent refills than a big cylinder (unavoidable physics — less gas stored), and the paintball thread standard means dedicated or adapted hardware. For tanks under ~15 gallons, the tradeoffs favor paintball decisively.
The Parts List
1. The paintball tank (20 oz standard)
The 20 oz tank is the sweet spot — widely refillable, good capacity-to-size ratio. Smaller options exist (9 oz, 12 oz) for pico tanks but need refilling every couple of weeks, which gets old. Larger 24 oz tanks are fine if your refill source handles them. Buy new or check the hydrotest date on used tanks — paintball tanks need testing every 5 years, and fields won't fill out-of-date tanks.
Note: paintball tanks use a different thread (paintball/ASA standard) than CGA-320 cylinders. Your regulator must match. The philosophy — a small disposable cartridge with precise regulation, sized for nano tanks rather than scaled down from big-cylinder hardware — mirrors Tropica's own nano CO2 system, which takes the same right-sized approach for small aquariums.
2. The regulator: paintball-specific or adapted
Two routes:
- Paintball-specific CO2 regulator (e.g., compact units from aquarium/paintball crossover brands, or the UNS-style mini regulators with paintball adapters) — threads directly onto the paintball tank. Cleanest option.
- Standard CGA-320 regulator + paintball adapter — a brass adapter converts the paintball thread to CGA-320, letting you use any normal aquarium regulator. More flexible (the regulator transfers to a big cylinder later), but adds a joint and some bulk.
Either way, you want the same features as a full-size setup: needle valve precise enough for very low rates (nano tanks run ~1 bubble per 2–3 seconds — a twitchy valve makes this maddening), and ideally a solenoid for timer control. See our regulator guide for what "good" looks like — the criteria don't change with size, but low-rate precision matters more.
3. The rest of the chain (same as any CO2 system)
- Bubble counter — essential at nano rates, where "a little more" is a big relative change. See bubble counter setup.
- Check valve — non-negotiable; nano tanks back-siphon just as effectively as big ones.
- CO2-resistant tubing — short runs on nanos, so buy quality; there's no reason to economize on three feet of tubing.
- Diffuser — a small glass/ceramic in-tank diffuser is ideal at nano scale (see diffusion methods). Reactors are overkill; a tiny diffuser in the filter outflow path works beautifully.
- Drop checker (nano size) — the same drop checker principles apply; small checkers suit the scale aesthetically.
- Timer + solenoid — nighttime shutoff matters even more on nanos, where small water volumes swing chemistry fast.
Setup Walkthrough
- Secure the tank. Even a small paintball tank should stand upright and secured — a simple stand, strap, or bracket. Upright matters: tipped tanks can feed liquid CO2 into the regulator, which it's not designed for.
- Attach the regulator to the paintball tank (or via adapter). Snug with a wrench — paintball threads seal on an O-ring, so don't overtighten and crush it; inspect the O-ring at every tank swap.
- Build the chain: regulator → solenoid → needle valve → bubble counter → check valve → diffuser. Keep tubing runs short and kink-free.
- Leak-test everything with the soapy water test — small systems lose a larger fraction of their gas to a given leak, so this step is proportionally more important on nanos.
- Start very low. Begin at ~1 bubble per 3 seconds. Nano water volumes reach target CO2 quickly and overshoot fast — creep up over several days, verifying with the drop checker. Patience here prevents the classic nano disaster: gassing the tank on day one.
- Program the timer: CO2 on 45–60 minutes before lights (nanos saturate faster than big tanks), off 30 minutes before lights-off.
How Long Does a 20 oz Tank Last?
On a typical nano (5–10 gallons) at ~1 bubble per 2–3 seconds, 8–9 hours of injection daily: roughly 5–8 weeks. Variables that shift this: higher light demanding higher rates, inefficient diffusion, leaks (the usual suspect when life is mysteriously short), and longer photoperiods. Keep a spare filled tank if your refill source isn't next door — running out mid-week with no backup means days of CO2 fluctuation, which is an algae invitation.
Refill economics: at $4–8 per fill every ~6 weeks, annual gas cost is roughly $35–70 — trivial. The paintball route stays cheap indefinitely, unlike liquid carbon where daily dosing costs accumulate.
Nano-Specific CO2 Cautions
- Small volumes swing fast. Everything about CO2 — buildup, overshoot, pH movement — happens quicker in 5 gallons than in 50. Adjust in smaller increments and wait longer between changes.
- Surface agitation still applies. Don't seal the surface to "save" nano-scale gas amounts — the savings are pennies and the oxygen risk is real. See balancing agitation and CO2.
- Shrimp + CO2 + nano = triple caution. Nano tanks are the most popular shrimp tanks and the twitchiest CO2 systems. Target 20–25 ppm max, prioritize agitation, and read our fish safety guide — shrimp show stress first.
- Temperature matters more. Nanos swing temperature with the room; gas flow through the needle valve shifts with temperature. If your nano sits near a window or in a room with big day/night swings, expect to nudge the rate seasonally.
- Diffuser placement is critical. In a nano, there's nowhere for dead spots to hide — but also nowhere for a badly placed diffuser's mist to go except straight up. Put the diffuser low, directly in the filter outflow path.
Paintball vs Alternatives for Nanos
| Option | Pros | Cons |
|---|---|---|
| Paintball CO2 | Compact, cheap refills, right-sized | Refill every 5–8 weeks; dedicated hardware |
| 2.5 lb cylinder | 2–3 month fills; standard CGA-320 hardware | Bulky for desktop nanos; fewer refill spots than paintball |
| DIY yeast | Cheapest startup | Unstable output, weekly maintenance, can't shut off at night |
| Liquid carbon | No hardware at all | Daily dosing forever; modest effect; ongoing cost |
| No CO2 (low-tech) | Zero cost/complexity | Slower growth, fewer plant choices |
Frequently Asked Questions
Can I use a regular aquarium regulator on a paintball tank?
Yes, with a paintball-to-CGA-320 adapter — a small brass fitting that converts the threads. This is a popular route because the regulator can later move to a full-size cylinder if you upgrade tanks. Just add the adapter joint to your leak-test routine, and confirm the adapter's pressure rating suits CO2 service.
Where do I refill paintball CO2 tanks?
Paintball fields and pro shops are the primary source — most fill while you wait for a few dollars. Some sporting-goods stores with paintball sections also fill. Welding supply shops generally don't handle paintball threads, so don't count on them. Call ahead to confirm any new source fills 20 oz tanks (some only do smaller).
Is a solenoid necessary on a nano paintball setup?
Strongly recommended. Nanos are the worst tanks for 24/7 CO2 because tiny volumes accumulate gas fast overnight — and DIY-style continuous flow is exactly what you're upgrading away from. A compact inline solenoid plus a timer plug completes the system properly. Manual on/off twice daily is a recipe for a forgotten evening.
How do I know the paintball tank is empty?
Same as big cylinders: the high-pressure gauge holds ~800 PSI while liquid CO2 remains, then drops sharply when only gas is left — you have days at that point, not weeks. With no gauge (some mini regulators omit it), the signal is the drop checker fading from green despite unchanged settings. Keep a spare filled tank so swaps are instant.
Can paintball CO2 run two nano tanks?
Yes, with a manifold and a needle valve per line — but do the math first: two nanos roughly halve the 5–8 week refill interval. For two or more tanks, a 2.5 lb or 5 lb cylinder often becomes more practical. Paintball shines for single nano setups.
Are used paintball tanks safe to buy?
Yes, if the hydrotest date is current (stamped on the tank, valid 5 years) and the tank isn't visibly damaged (dents, deep scratches, corroded threads). An out-of-date tank is a paperweight until retested — factor the test cost into the price. When in doubt, new 20 oz tanks are inexpensive enough that used savings are often marginal.
Small Tank, Proper System
Paintball CO2 isn't a compromise — it's the right-sized tool for nano planted tanks: real pressurized gas with timer control, precise low-rate dosing, and refill costs measured in pocket change. Build it with the same care as a big system (leak-test, drop checker, nighttime shutoff), respect the nano's faster chemistry, and your desktop tank gets the full high-tech growth experience in miniature.
Tissue-culture plants are the exception — they’re grown in sterile gel and adapt with minimal melting, which is part of what you’re paying for. Plants bought submersed from another hobbyist’s tank also transition with little melt, since they’re already in the right form.
Which Plants Melt Most (and Least)
Heavy melters (expect significant leaf loss)
- Cryptocorynes — infamous for “crypt melt,” sometimes dropping every leaf after any disturbance. They almost always recover from the roots within weeks.
- Stem plants grown emersed — rotala, ludwigia, and hygrophila often shed lower emersed leaves while the growing tips transition.
- Amazon swords — emersed-grown swords typically lose their broad oval aerial leaves and replace them with longer submersed ribbon leaves.
Light melters
- Anubias, java fern, bucephalandra — slow-growing rhizome plants transition gradually; occasional old-leaf melt but rarely dramatic.
- Vallisneria — usually transitions well, though it dislikes the move itself and may sulk for a week.
- Floating plants — minimal melt since their leaves were already at the air-water interface.
The Acclimation Protocol
Step 1: Quarantine or dip first
Before acclimating to your tank’s conditions, make sure you’re not acclimating pests along with the plant. Run new arrivals through our quarantine and dip protocol — it adds days upfront but prevents months of regret.
Step 2: Float to temperature-match (30 minutes)
Float the bag or container in your tank for 20–30 minutes to equalize temperature. Plants are less temperature-sensitive than fish, but a 10°F shock on top of transplant stress is an avoidable insult.
Step 3: Trim before planting
Remove any leaves that are already damaged, yellowing, or heavily algae-covered — they won’t recover and they’ll rot in your tank, feeding algae. For stem plants, trim off the bottom inch and any emersed leaves that look unlikely to adapt; the plant wastes energy maintaining leaves it’s going to shed anyway. Keep the healthy growing tips — that’s where recovery starts.
Step 4: Plant correctly the first time
Follow our planting guide — right depth, crown exposed on rosettes, rhizomes unburied on epiphytes. Every uprooting and replanting restarts the acclimation clock, so get placement right on the first attempt. Decide where each plant goes before it goes in the water.
Step 5: Run a gentle first week
For the first 7 days after planting:
- Moderate light — run your normal photoperiod but consider dropping intensity 20–30% if your light is dimmable. Blast-level light on a melting plant grows algae on the dying leaves, not recovery.
- Stable CO2 — if you inject CO2, keep it consistent. Fluctuating CO2 during acclimation is a melt accelerator. If you’re low-tech, this doesn’t apply — see growing without CO2.
- Half-strength fertilizer — new plants with damaged leaves can’t use full dosing, and the excess feeds algae. Ramp to full strength over 2–3 weeks per our fertilizer schedule.
- No disturbance — don’t move, trim, or “check on” new plants for at least two weeks. Every touch resets root establishment. This is especially critical for crypts.
Step 6: Remove melt, keep the base
As emersed leaves melt, remove the mushy material promptly — decaying leaves release ammonia and grow fungus that can spread to healthy tissue. But never discard the plant while the crown, rhizome, or roots are firm and alive. A crypt that’s lost every leaf but has firm roots is a plant that’s about to recover, not a dead plant. Give it 3–4 weeks before judging.
Telling Normal Melt From Real Problems
Normal transition melt:
- Affects oldest/emersed leaves first, newest growth last
- New submersed leaves emerge even as old ones dissolve
- Roots and crown stay firm and white/green
- Timeline: 1–4 weeks, then obvious new growth
Concerning melt (see our full melting diagnosis guide):
- New growth also melts or emerges deformed
- Rhizome or crown turns mushy and brown — this is rot, not transition
- Entire plant dissolves within days with no new growth after 4+ weeks
- Melting spreads to established plants that weren’t recently moved
Buying Tips to Minimize Melt
- Buy submersed-grown when available — hobbyist-grown cuttings transition with almost no melt.
- Choose tissue culture for sensitive species — crypts and delicate stems establish far more reliably from sterile cups.
- Avoid plants already melting in the store tank — some melt is normal, but a plant that’s mostly mush at purchase has less energy for recovery.
- Transport carefully — keep plants damp and out of direct sun/heat. A plant that dries out or cooks in a hot car melts far worse than one transported properly.
The First-Month Timeline: What to Expect Week by Week
Knowing what’s normal when removes most acclimation anxiety. Here’s the typical timeline for a healthy plant adapting to a new tank:
Week 1: The quiet week
Almost nothing visible happens. The plant is growing roots you can’t see and assessing its new environment. Some species (vallisneria, stem plants) may start shedding their lowest leaves. This is normal. Resist the urge to “help” — no moving, no extra fertilizer, no light changes. The most common beginner mistake is intervening during a week when the correct action is nothing.
Week 2: Melt peaks
This is when emersed leaves give up in earnest. Crypts may drop everything; swords shed their broad aerial leaves; stem plants lose lower foliage. It looks catastrophic and it’s usually fine. Keep removing mushy material, keep conditions stable, and watch the crown and growing tips — if those are firm and green, recovery is already underway.
Week 3: The turn
New submersed-adapted leaves emerge — smaller, thinner, often a slightly different shade of green than the emersed foliage. Stem plant tips start growing visibly; crypts push tiny curled leaves from the crown; swords unfurl narrow ribbon leaves. This is the moment most beginners exhale for the first time.
Week 4+: Established
New growth outpaces melt, and the plant is functionally yours. You can resume full-strength fertilizer, normal trimming, and stop treating it as fragile. Some slow growers (anubias, bucephalandra) take 6–8 weeks to show obvious progress — that’s their normal speed, not a problem.
Acclimating Different Plant Formats
Tissue-culture cups
Sterile, pest-free, and already adapted to high-humidity (not emersed) growth — tissue cultures melt the least of any format. Rinse the agar gel off gently (leftover gel rots and feeds fungus), split the portion into small plantlets, and plant per our planting guide. They establish slowly for the first two weeks, then accelerate. No dip needed, minimal acclimation stress — this is the premium experience you’re paying for.
Potted plants
Remove the pot and strip away the rockwool completely — leftover rockwool traps debris and rots. Tease the root mass apart gently; if it’s a dense mat, splitting it into 2–3 smaller portions actually establishes faster than planting one big clump (more growing points, better water flow around roots). Potted plants are usually emersed-grown, so expect the standard 2–4 week melt cycle.
Bare-root / bunched stems
Typically sold as weighted bunches. Remove any bands, foam, or weights, strip the lower leaves, and plant stems individually or in small groups. Bunched stems from the store are often already transitioning — check for new submersed growth at the tips, which tells you the plant is mid-adaptation and will settle quickly.
Hobbyist cuttings
Already submersed-grown and the fastest to establish — often showing new growth within days. The main acclimation factor is water-parameter difference between the two tanks. Float to temperature-match, plant promptly, and they’ll usually take off with minimal melt. This is why experienced hobbyists prefer trading cuttings over buying potted plants.
Frequently Asked Questions
Should I use a “plant starter” or transplant fertilizer?
Products marketed for transplant shock are mostly B-vitamins and mild hormones. They don’t hurt, but there’s no strong evidence they help aquarium plants specifically. Stable conditions and patience outperform any bottle. Save the money for more plants.
My new plant melted completely — bare crown, no leaves. Is it dead?
Probably not, if the crown or rhizome is firm. Crypts and swords routinely lose 100% of their leaves and regrow from the base within a month. The test is firmness: firm and pale/green means alive; mushy and brown/black means rot. Give firm-but-leafless plants a full 4 weeks before declaring them dead.
Can I speed up acclimation with extra light or CO2?
No — and trying usually backfires. A melting plant can’t use extra light; the excess just grows algae on its dying leaves. Keep light moderate and CO2 stable (not boosted) during acclimation. Growth speed comes from the plant’s own adaptation timeline, which you can’t rush, only avoid delaying.
Should new plants go straight into my main display tank?
After quarantine/dipping, yes — there’s no benefit to a separate “growing-in” tank for most plants. They acclimate to your water fastest in the tank they’ll live in. The exception is very delicate species going into a tank with boisterous fish; give those a few weeks in a calm corner or breeder box first.
The Patience Rule
The single most important acclimation skill is restraint: plant it right, set gentle conditions, remove decay, and then leave it alone for a month. The hobbyists with the best plant growth aren’t doing something clever in week one — they’re simply not interfering in weeks two through four while the plants do what they’ve evolved to do. Melt looks like failure and feels like failure, but in most cases it’s the visible part of a plant successfully becoming yours.