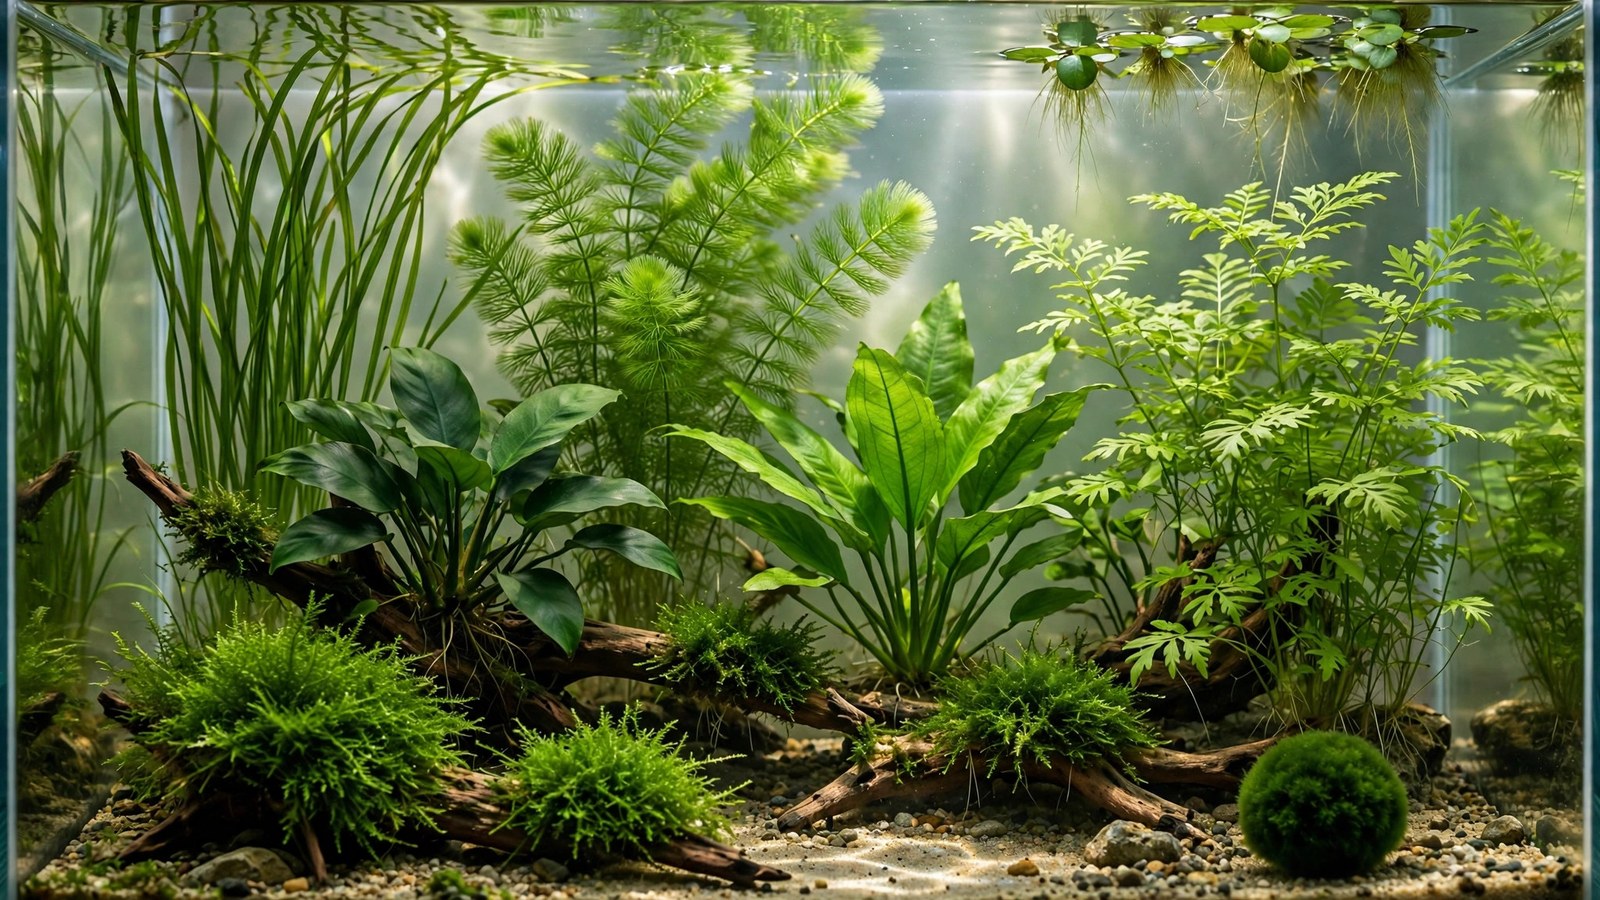
Axolotls break most aquarium-plant rules: they need cold water (60–68°F), dim lighting, gentle flow, and a bare or sand-only bottom — conditions that rule out half the plants in the hobby. But axolotl tanks desperately need plants: they absorb nitrates, provide hiding spots that reduce stress, and give females somewhere to attach eggs. These 8 plants thrive in the cold, dim, low-flow world axolotls require.
Understanding Axolotl Tank Conditions
Axolotls are cold-water amphibians with specific needs that shape every plant choice. Temperature 60–68°F (16–20°C) — tropical plants melt; temperate and cold-tolerant species thrive. Dim lighting — axolotls have no eyelids and are stressed by bright light, so tanks run low light with hides and shade. Gentle flow — strong currents stress axolotls, so filtration is gentle and plants can't depend on high flow for nutrient delivery. Sand or bare bottom — gravel is an impaction risk if swallowed, so plants must work in sand, attached to hardscape, or floating.
The good news: many of the hobby's toughest plants are cold-tolerant shade-lovers. Axolotl tanks grow beautiful planted setups — just different plants than a tropical show tank. Our cold-water plant guide covers the broader temperate palette.
The 8 Best Axolotl-Tank Plants
1. Anubias barteri var. nana — the perfect axolotl plant
Anubias might have been designed for axolotl tanks: thrives in cold water, loves low light, attaches to hardscape (no substrate needed), and has tough leaves axolotls rest on without damage. Axolotls frequently perch on broad anubias leaves — it's enrichment and decoration in one. Glue to driftwood or rocks; it asks for nothing and gives everything.
2. Java Fern — the cold-water workhorse
Java fern tolerates temperatures down to the 60s happily, grows in dim light, and attaches to wood and rock. Its broad leaves provide cover and egg-laying surfaces — female axolotls preferentially attach eggs to broad-leafed plants. The 'Windelov' variety's split tips add texture. Like anubias, never bury the rhizome; see our epiphyte guide for attachment.
3. Java Moss — the egg-laying essential
If you breed axolotls (or might), java moss is close to mandatory — females lay eggs preferentially in fine-leaved plants, and moss catches and protects them. Even without breeding, moss provides hiding spots for juveniles and infusoria grazing. It grows slowly in cold water but steadily; tie it to hardscape in shaded spots. Compare moss options in our aquarium moss comparison — several work in cold water.
Bonus: Floating Plants for Shade
While not a single species, a colony of beginner floating plants like frogbit or dwarf water lettuce is worth adding to any axolotl tank: they diffuse the bright light axolotls hate, absorb nitrates aggressively, and need zero planting. Thin weekly so they don't cover the entire surface — axolotls still need open water to surface for air. For species hardy enough for unheated setups, cross-reference our cold-water plant picks, and check growth requirements against Tropica's plant database when shopping.
4. Anacharis (Egeria densa) — the cold-water nutrient sponge
Anacharis is a temperate plant that genuinely prefers cooler water — it grows better at 65°F than at 78°F. It absorbs nitrates aggressively (valuable in messy axolotl tanks), provides cover, and can be floated or planted in sand. The fastest-growing cold-water plant available, and cheap enough to replace whenever.
5. Hornwort — the floating filter
Another temperate native that loves cold water. Hornwort floats at the surface, diffusing light (axolotls appreciate the shade), absorbing nitrates, and providing cover — all with zero planting and zero substrate needs. It grows well in the gentle flow of axolotl tanks. Net out shed needles; otherwise ignore it.
6. Marimo Moss Balls — the axolotl toy
Axolotls nudge moss balls around, rest against them, and generally interact with them — they're enrichment as much as decoration. Moss balls tolerate cold water perfectly, need only occasional rolling and rinsing, and add a soft organic element to the hardscape. Get large ones; axolotls will rearrange small ones into corners.
7. Cryptocoryne wendtii — the cold-tolerant rosette
One of the few rosette plants that handles cold water well. Crypt wendtii grows slowly in the 60s but steadily, forming low colonies in sand (with root tabs) that give the tank a planted foreground without gravel. It tolerates the dim lighting axolotls need. Expect the usual crypt melt on introduction; it recovers.
8. Water Sprite (Ceratopteris thalictroides) — the versatile floater
Water sprite grows floating or planted, tolerates cooler temperatures, and provides the fine-leaved cover axolotls and their eggs love. As a floater it shades the tank (reducing axolotl light stress) and absorbs nitrates rapidly. Thin it regularly — it multiplies fast even in cold water.
Setting Up a Planted Axolotl Tank
Substrate strategy
Fine sand (or bare bottom) is the axolotl-safe choice. Plants in sand need root tabs (crypts) or should be epiphytes/floaters that don't care about substrate. Slope sand deeper at the back for planted pockets. Never use gravel with axolotls — impaction risk is real and often fatal.
Lighting for plants without stressing axolotls
Run a dimmable LED at low intensity for 6–8 hours, and provide hides (caves, PVC pipes, dense plant thickets) where the axolotl can escape light entirely. Floating plants (hornwort, water sprite, duckweed) create natural shade — the single best light-management tool. The plants on this list all grow in low light, so there's no conflict.
Hardscape as plant infrastructure
Since substrate planting is limited, hardscape carries the aquascape: driftwood and smooth rocks (no sharp edges — axolotl skin tears easily) with anubias, java fern, and moss attached. Build caves and overhangs that serve as both hides and plant mounts. Every structure should do double duty.
What to Avoid
Skip tropical plants that need warmth (most stem plants, red species, HC Cuba), anything needing strong light or CO2, and sharp or rough hardscape. Avoid fertilizers with copper (toxic to amphibians) — in practice, axolotl tanks need minimal fertilization anyway since bioload provides nutrients. If you dose, use shrimp-safe, copper-free products at half strength.
Seasonal Care for Cold-Water Planted Tanks
Cold-water planted tanks follow the seasons even indoors. In summer, room temperatures creep up — watch that the tank stays under 68°F, increase surface agitation for oxygen (cold water holds more oxygen, but warm spikes deplete it fast), and expect a growth spurt from your plants as temperatures rise into the mid-60s. In winter, growth slows to a crawl; reduce fertilizer dosing accordingly, since plants can't use nutrients they aren't metabolizing, and excess just feeds algae. Anacharis and hornwort may shed more in the coldest months — normal seasonal behavior, not a crisis. The annual rhythm is gentle, but acknowledging it keeps the tank stable: feed the growth in summer, rest the system in winter, and your axolotl-plant ecosystem will hum along for years with minimal intervention.
Frequently Asked Questions
Can axolotls live with any plant, or are some toxic?
All eight plants on this list are safe. The main toxicity concern isn't plants but chemicals — copper-based algaecides, many medications, and some fertilizers are dangerous to axolotls. Stick to plain, untreated aquarium plants from reputable sources and avoid wild-collected plants that may carry pesticides.
Will my axolotl uproot or eat the plants?
Axolotls don't eat plants, but they bulldoze — a large axolotl charging across the tank uproots light plantings. That's why epiphytes glued to heavy hardscape and floaters dominate this list: nothing to uproot. If you plant in sand, use deep pockets and heavy root tabs, and accept occasional rearrangement.
Do I need a chiller for a planted axolotl tank?
If your room exceeds 70°F in summer, yes — axolotls stress above 68°F and plants won't save them. A chiller is the reliable solution; fans and frozen water bottles are stopgaps. The plants on this list handle the full 60–68°F range, so temperature management is about the axolotl, with plants as willing passengers.
Can I keep shrimp or snails with axolotls and plants?
Snails (mystery, nerite) work as cleanup crews; shrimp become expensive axolotl snacks — ghost shrimp as occasional live food is fine, but don't expect a colony to survive. The plants provide enough grazing surface and cover that a snail crew keeps algae in check without shrimp.
How do plants help with axolotl egg-laying?
Female axolotls attach eggs individually to surfaces, strongly preferring fine-leaved plants and broad leaves. Dense java moss and java fern give her ideal laying sites and protect eggs from being eaten (including by the parents — remove adults after laying). A breeding tank should be packed with moss and fern.
My cold-water plants are growing very slowly — is something wrong?
No — cold water means slow metabolism for plants too. Growth at 64°F runs at roughly half tropical speed. That's normal and fine; it also means less trimming and fewer nutrient demands. Judge health by color and new growth (even slow), not by speed. If growth stalls entirely and leaves pale, add gentle liquid fertilizer at half dose.
Can I use a hang-on-back filter with plants in an axolotl tank?
Yes, with modifications — baffle the outflow with a sponge to keep current gentle, since strong flow stresses axolotls and uproots delicate plantings. A baffled HOB works fine alongside floaters and attached epiphytes; just keep the intake sponge-covered so curious axolotls and plant fragments don't get sucked in. Canister filters with spray bars aimed at the glass are the gentler alternative.
Cold, Dim, and Beautiful
Axolotl tanks won't win high-tech aquascaping contests, but a well-planted cold-water setup — anubias-covered driftwood, java fern thickets, floating hornwort diffusing the light, moss softening every edge — is genuinely beautiful in its own right. More importantly, it's a healthier, less stressful home for one of the hobby's most charismatic animals. Plant for the axolotl's needs, and the aesthetics follow.
Tissue-culture plants are the exception — they’re grown in sterile gel and adapt with minimal melting, which is part of what you’re paying for. Plants bought submersed from another hobbyist’s tank also transition with little melt, since they’re already in the right form.
Which Plants Melt Most (and Least)
Heavy melters (expect significant leaf loss)
- Cryptocorynes — infamous for “crypt melt,” sometimes dropping every leaf after any disturbance. They almost always recover from the roots within weeks.
- Stem plants grown emersed — rotala, ludwigia, and hygrophila often shed lower emersed leaves while the growing tips transition.
- Amazon swords — emersed-grown swords typically lose their broad oval aerial leaves and replace them with longer submersed ribbon leaves.
Light melters
- Anubias, java fern, bucephalandra — slow-growing rhizome plants transition gradually; occasional old-leaf melt but rarely dramatic.
- Vallisneria — usually transitions well, though it dislikes the move itself and may sulk for a week.
- Floating plants — minimal melt since their leaves were already at the air-water interface.
The Acclimation Protocol
Step 1: Quarantine or dip first
Before acclimating to your tank’s conditions, make sure you’re not acclimating pests along with the plant. Run new arrivals through our quarantine and dip protocol — it adds days upfront but prevents months of regret.
Step 2: Float to temperature-match (30 minutes)
Float the bag or container in your tank for 20–30 minutes to equalize temperature. Plants are less temperature-sensitive than fish, but a 10°F shock on top of transplant stress is an avoidable insult.
Step 3: Trim before planting
Remove any leaves that are already damaged, yellowing, or heavily algae-covered — they won’t recover and they’ll rot in your tank, feeding algae. For stem plants, trim off the bottom inch and any emersed leaves that look unlikely to adapt; the plant wastes energy maintaining leaves it’s going to shed anyway. Keep the healthy growing tips — that’s where recovery starts.
Step 4: Plant correctly the first time
Follow our planting guide — right depth, crown exposed on rosettes, rhizomes unburied on epiphytes. Every uprooting and replanting restarts the acclimation clock, so get placement right on the first attempt. Decide where each plant goes before it goes in the water.
Step 5: Run a gentle first week
For the first 7 days after planting:
- Moderate light — run your normal photoperiod but consider dropping intensity 20–30% if your light is dimmable. Blast-level light on a melting plant grows algae on the dying leaves, not recovery.
- Stable CO2 — if you inject CO2, keep it consistent. Fluctuating CO2 during acclimation is a melt accelerator. If you’re low-tech, this doesn’t apply — see growing without CO2.
- Half-strength fertilizer — new plants with damaged leaves can’t use full dosing, and the excess feeds algae. Ramp to full strength over 2–3 weeks per our fertilizer schedule.
- No disturbance — don’t move, trim, or “check on” new plants for at least two weeks. Every touch resets root establishment. This is especially critical for crypts.
Step 6: Remove melt, keep the base
As emersed leaves melt, remove the mushy material promptly — decaying leaves release ammonia and grow fungus that can spread to healthy tissue. But never discard the plant while the crown, rhizome, or roots are firm and alive. A crypt that’s lost every leaf but has firm roots is a plant that’s about to recover, not a dead plant. Give it 3–4 weeks before judging.
Telling Normal Melt From Real Problems
Normal transition melt:
- Affects oldest/emersed leaves first, newest growth last
- New submersed leaves emerge even as old ones dissolve
- Roots and crown stay firm and white/green
- Timeline: 1–4 weeks, then obvious new growth
Concerning melt (see our full melting diagnosis guide):
- New growth also melts or emerges deformed
- Rhizome or crown turns mushy and brown — this is rot, not transition
- Entire plant dissolves within days with no new growth after 4+ weeks
- Melting spreads to established plants that weren’t recently moved
Buying Tips to Minimize Melt
- Buy submersed-grown when available — hobbyist-grown cuttings transition with almost no melt.
- Choose tissue culture for sensitive species — crypts and delicate stems establish far more reliably from sterile cups.
- Avoid plants already melting in the store tank — some melt is normal, but a plant that’s mostly mush at purchase has less energy for recovery.
- Transport carefully — keep plants damp and out of direct sun/heat. A plant that dries out or cooks in a hot car melts far worse than one transported properly.
The First-Month Timeline: What to Expect Week by Week
Knowing what’s normal when removes most acclimation anxiety. Here’s the typical timeline for a healthy plant adapting to a new tank:
Week 1: The quiet week
Almost nothing visible happens. The plant is growing roots you can’t see and assessing its new environment. Some species (vallisneria, stem plants) may start shedding their lowest leaves. This is normal. Resist the urge to “help” — no moving, no extra fertilizer, no light changes. The most common beginner mistake is intervening during a week when the correct action is nothing.
Week 2: Melt peaks
This is when emersed leaves give up in earnest. Crypts may drop everything; swords shed their broad aerial leaves; stem plants lose lower foliage. It looks catastrophic and it’s usually fine. Keep removing mushy material, keep conditions stable, and watch the crown and growing tips — if those are firm and green, recovery is already underway.
Week 3: The turn
New submersed-adapted leaves emerge — smaller, thinner, often a slightly different shade of green than the emersed foliage. Stem plant tips start growing visibly; crypts push tiny curled leaves from the crown; swords unfurl narrow ribbon leaves. This is the moment most beginners exhale for the first time.
Week 4+: Established
New growth outpaces melt, and the plant is functionally yours. You can resume full-strength fertilizer, normal trimming, and stop treating it as fragile. Some slow growers (anubias, bucephalandra) take 6–8 weeks to show obvious progress — that’s their normal speed, not a problem.
Acclimating Different Plant Formats
Tissue-culture cups
Sterile, pest-free, and already adapted to high-humidity (not emersed) growth — tissue cultures melt the least of any format. Rinse the agar gel off gently (leftover gel rots and feeds fungus), split the portion into small plantlets, and plant per our planting guide. They establish slowly for the first two weeks, then accelerate. No dip needed, minimal acclimation stress — this is the premium experience you’re paying for.
Potted plants
Remove the pot and strip away the rockwool completely — leftover rockwool traps debris and rots. Tease the root mass apart gently; if it’s a dense mat, splitting it into 2–3 smaller portions actually establishes faster than planting one big clump (more growing points, better water flow around roots). Potted plants are usually emersed-grown, so expect the standard 2–4 week melt cycle.
Bare-root / bunched stems
Typically sold as weighted bunches. Remove any bands, foam, or weights, strip the lower leaves, and plant stems individually or in small groups. Bunched stems from the store are often already transitioning — check for new submersed growth at the tips, which tells you the plant is mid-adaptation and will settle quickly.
Hobbyist cuttings
Already submersed-grown and the fastest to establish — often showing new growth within days. The main acclimation factor is water-parameter difference between the two tanks. Float to temperature-match, plant promptly, and they’ll usually take off with minimal melt. This is why experienced hobbyists prefer trading cuttings over buying potted plants.
Frequently Asked Questions
Should I use a “plant starter” or transplant fertilizer?
Products marketed for transplant shock are mostly B-vitamins and mild hormones. They don’t hurt, but there’s no strong evidence they help aquarium plants specifically. Stable conditions and patience outperform any bottle. Save the money for more plants.
My new plant melted completely — bare crown, no leaves. Is it dead?
Probably not, if the crown or rhizome is firm. Crypts and swords routinely lose 100% of their leaves and regrow from the base within a month. The test is firmness: firm and pale/green means alive; mushy and brown/black means rot. Give firm-but-leafless plants a full 4 weeks before declaring them dead.
Can I speed up acclimation with extra light or CO2?
No — and trying usually backfires. A melting plant can’t use extra light; the excess just grows algae on its dying leaves. Keep light moderate and CO2 stable (not boosted) during acclimation. Growth speed comes from the plant’s own adaptation timeline, which you can’t rush, only avoid delaying.
Should new plants go straight into my main display tank?
After quarantine/dipping, yes — there’s no benefit to a separate “growing-in” tank for most plants. They acclimate to your water fastest in the tank they’ll live in. The exception is very delicate species going into a tank with boisterous fish; give those a few weeks in a calm corner or breeder box first.
The Patience Rule
The single most important acclimation skill is restraint: plant it right, set gentle conditions, remove decay, and then leave it alone for a month. The hobbyists with the best plant growth aren’t doing something clever in week one — they’re simply not interfering in weeks two through four while the plants do what they’ve evolved to do. Melt looks like failure and feels like failure, but in most cases it’s the visible part of a plant successfully becoming yours.