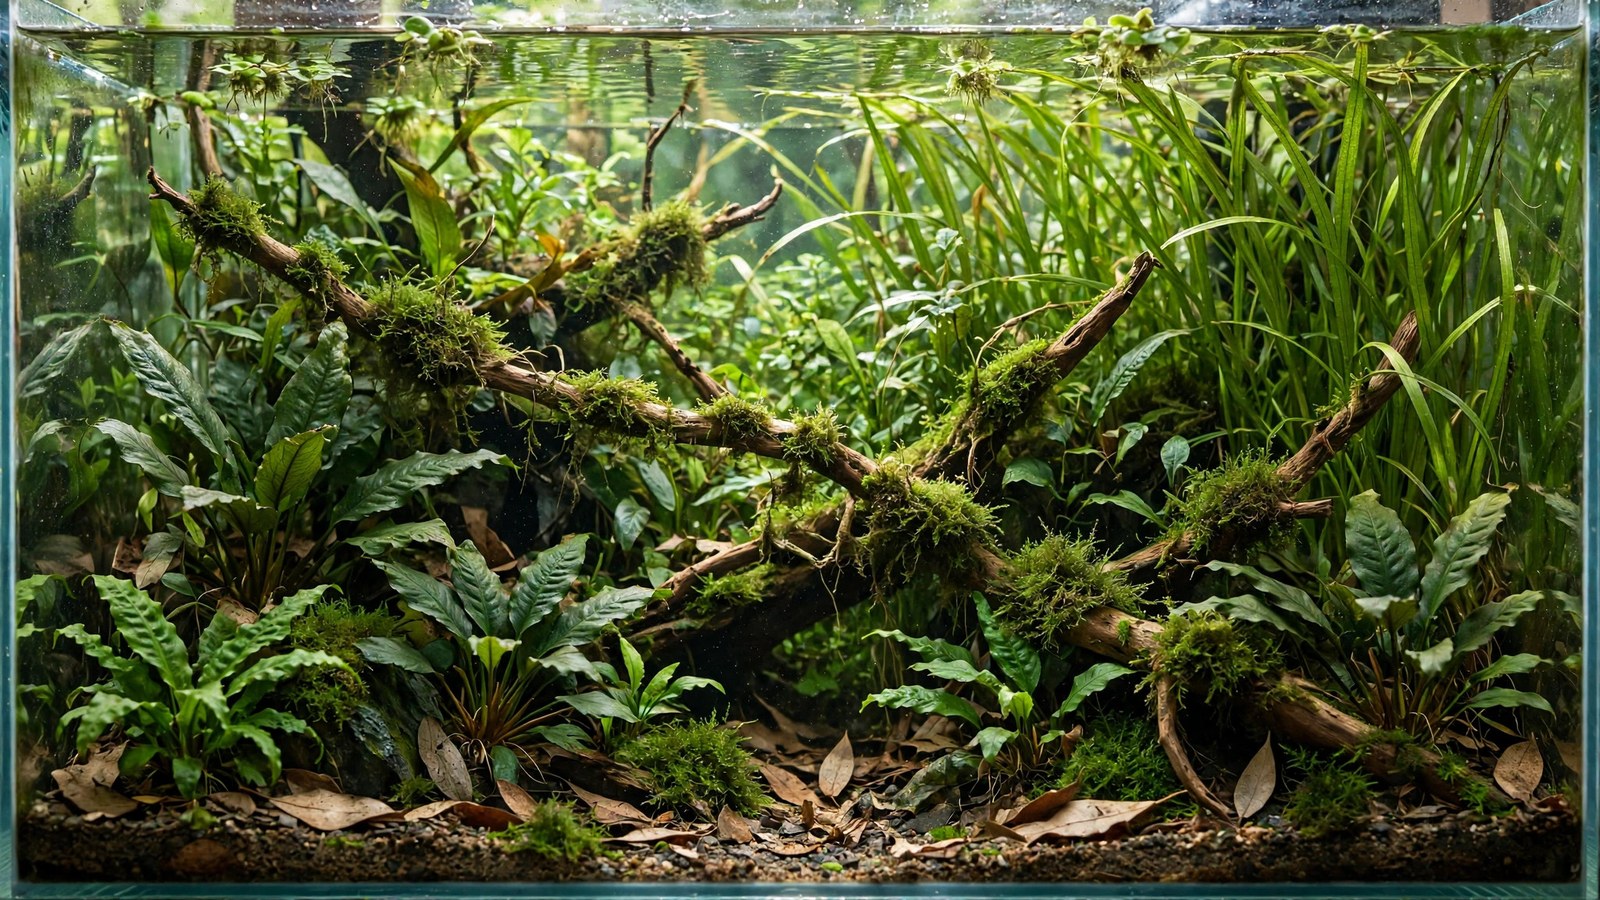
The jungle tank is aquascaping's wild heart — a deliberate embrace of overgrowth where plants compete, intertwine, and create a living thicket that looks like a flooded rainforest floor. Where Dutch style is a formal garden and iwagumi is a haiku, the jungle tank is a novel: layered, chaotic, full of discovery. It's also the most forgiving style for beginners, because "overgrown" is the goal, not the failure mode.
Jungle Philosophy: Controlled Chaos
Jungle style isn't neglect — it's curated wildness. The principles:
- Density over design: 80–90% planted, layers overlapping, sightlines broken everywhere
- Mixed planting: unlike Dutch streets, jungle mixes species freely — the interplay is the point
- Vertical layering: foreground, midground, background, and surface all occupied simultaneously
- Natural processes visible: runners spreading, floaters multiplying, moss creeping — growth is the aesthetic
- Minimal hardscape: wood and rock exist but disappear under vegetation; plants are the architecture
The skill in jungle tanks is knowing what to leave alone. Every other style rewards intervention; jungle rewards restraint. You plant heavily, establish balance, then trim only to prevent collapse — the tank does the designing.
Tank and Equipment: Big and Simple
Jungle tanks want volume — the layered look needs depth:
- Tank: 40 gallons minimum; 55–75 gallons ideal. Tall tanks suit jungle particularly well — vertical layering needs height. Our 75-gallon planted tank build is the dream jungle platform.
- Lighting: moderate LED, 7–8 hours. Jungle plants are mostly undemanding; strong light just accelerates the trimming burden.
- CO2: optional. Jungle style works beautifully low-tech — our low-tech planted tank setup is the natural equipment basis. CO2 speeds growth but also speeds the jungle toward unmanageable.
- Substrate: 2–3 inches of aquasoil or dirted substrate with cap — jungle tanks are hungry. Root tabs for the heavy feeders.
- Filtration: canister rated 2x volume; in dense jungle, circulation matters — dead spots behind plant walls grow algae and detritus.
The Jungle Plant Palette: Fast, Big, Lush
Choose vigorous growers that compete well and layer naturally:
Background giants
- Amazon swords (bleheri, ozelot) — broad leaves, massive presence; the jungle's anchor trees
- Vallisneria (jungle val) — tall ribbons reaching the surface; plant along the back in drifts
- Giant hygrophila — fast, tall, fills the back in weeks
- Water sprite (planted) — feathery giant that softens everything behind it
Midground mass
- Cryptocoryne (wendtii, balansae, usteriana) — the jungle's understory; bronze and green mounds filling the middle layers
- Java fern (large varieties) — attach to wood; broad textured leaves at mid-height
- Anubias (barteri, coffeefolia) — indestructible midground anchors on hardscape
- Red tiger lotus — red lily pads rising through green; the color exclamation point
- Stem plants (ludwigia, rotala, bacopa) — mixed freely for texture variety; let them grow tall and bushy
Foreground and surface
- Dwarf sagittaria — spreads into a meadow; jungle-appropriate low cover
- Chain swords — runner-spread foreground that looks naturally wild
- Floating plants — frogbit, salvinia, water lettuce: the canopy layer. Essential for the dappled-light jungle feel. See our floating plant guide.
- Mosses on wood — java moss, Christmas moss aging the hardscape into the scene
Planting the Jungle: Layers, Not Streets
- Start with hardscape bones — a few wood pieces angled naturally, some stones. They'll mostly vanish; that's fine.
- Plant background giants first — swords and vals along the back in loose drifts, not rows.
- Fill the midground thickly — crypts, ferns, anubias in overlapping groups. Overlap deliberately; gaps fill with time.
- Scatter stems through the midground — mixed species, irregular spacing. This is anti-Dutch planting: no streets, no rows.
- Foreground meadow — dwarf sag or chain swords across the front.
- Float the canopy — add floaters last; they'll multiply to cover 30–50% of the surface.
Plant at 80%+ density from day one. Jungle tanks establish fast because the plant mass immediately dominates — algae rarely gets a foothold when 80% of the substrate is planted on day one. Our planting quantity guide gives baselines; jungle wants the heavy end.
The First Two Months: Let It Run
Unlike Dutch or iwagumi, jungle establishment needs minimal intervention:
- Weeks 1–4: weekly 30–40% water changes; remove melting leaves; otherwise hands off. Watch the layers establish.
- Weeks 5–8: fast growers hit the surface; trim only what's blocking light to lower layers or escaping the tank. Let everything else run.
The jungle reveals its character around week 6–8, when layers interlock and the tank starts looking like an ecosystem rather than a planting. Resist the urge to "organize" it — the emerging chaos is the design maturing.
Maintenance: Preventing Collapse
Jungle maintenance is about preventing the three collapses: light starvation below, flow death behind walls, and nutrient exhaustion.
- Monthly structural trim: cut back the fastest growers before they shade out everything below. Remove whole stems at the base rather than topping — topping creates ugly stubble in jungle's natural look.
- Thin the canopy: floaters double fast; keep 30–50% surface coverage so light reaches below.
- Clear circulation paths: ensure filter flow reaches behind plant walls; add a small circulation pump if dead spots develop.
- 40% water change every 1–2 weeks: jungle tanks are nutrient-hungry; replenish and reset.
- Root tabs quarterly: heavy root feeders exhaust substrate; replenish on schedule.
- Remove dead lower leaves: shaded lower foliage rots and fouls water; prune it during trims.
Livestock: The Jungle's Inhabitants
Jungle tanks suit fish that evolved in vegetation — they use every layer:
- Angelfish: the classic jungle fish — tall, dramatic, weaving through vertical plants. Our planted angelfish tank setup is essentially a structured jungle.
- Gouramis (pearl, honey): labyrinth fish that haunt the upper layers among floaters
- Schooling tetras: cardinals, rummy-nose — flashes of color through green. See our schooling fish guide.
- Apistogramma / rams: dwarf cichlids that claim territories in the understory
- Corydoras, loaches: bottom patrol in the meadow layer
- Shrimp colonies: cherry shrimp explode in jungle tanks — endless grazing and cover. Our planted shrimp tank setup applies.
Stock moderately — jungle tanks look best with fish visible in the vegetation, not hidden by overcrowding. The fish should accent the jungle, not fill it.
Three Jungle Variations Worth Trying
The basic jungle formula adapts to several distinct flavors. The blackwater jungle adds tannins (catappa leaves, alder cones, driftwood) and dim lighting for an Amazon flooded-forest feel — pair it with cardinal tetras and angelfish for the authentic biotope, following the soft-water principles in our planted neon tetra tank guide. The riverbank jungle uses a riparium-style twist: let pothos and peace lily roots trail into the water from above while the submerged jungle fills below, doubling the layering — see our riparium build guide for the emersed technique. The high-tech jungle adds CO2 and stronger light for explosive growth and red-plant accents (ludwigia super red, alternanthera) woven through the green — spectacular, but budget double the trimming time.
Whichever variation you choose, the core discipline stays the same: plant in layers, let the tank grow wild within its structure, and intervene monthly to prevent the fast growers from winning outright. The variation just changes the flavor of the wilderness.
Frequently Asked Questions
How is a jungle tank different from just neglecting a tank?
Intent and balance. Neglected tanks have algae, dying plants, and chaos without structure. Jungle tanks have healthy plants in deliberate layers, controlled growth, clean water, and thriving livestock — the wildness is curated. The difference is visible: a jungle tank looks lush, a neglected tank looks sick. Maintenance still happens; it's just structural rather than cosmetic.
Won't the fast growers kill the slow ones?
They will if you never intervene — that's the "preventing collapse" maintenance. Monthly structural trims keep fast stems from shading out crypts and anubias below. Think of yourself as the disturbance regime: in nature, floods and herbivores prune jungles; in your tank, that's you with scissors, monthly.
Can I do a jungle tank low-tech?
Absolutely — jungle is the best low-tech style. The plant palette is undemanding, density compensates for slower growth, and the aesthetic welcomes the slightly wilder look of low-tech growth. Our low-tech guide plus this article is the complete recipe. CO2 is optional speed, not required infrastructure.
How do I stop it looking messy instead of lush?
Three things separate lush from messy: healthy plants (no algae-covered, rotting foliage — prune it), visible layering (maintain the foreground/midground/background structure even as it grows wild), and clean water (crystal water makes chaos look intentional; murky water makes it look neglected). Get those right and wild reads as jungle, not mess.
What do I do when it's completely overgrown?
The hard reset: remove 50–60% of plant mass in one session, keeping the structural plants (swords, wood-attached ferns, crypt mounds) and removing excess stems. It looks brutal for a week, then regrows better than before — jungle plants respond to hard pruning with vigorous fresh growth. Do this every 6–12 months.
Is jungle style good for breeding fish?
Excellent — arguably the best style for natural breeding. The dense cover, varied microhabitats, infusoria-rich environment, and broken sightlines are exactly what spawning fish and fry need. Many jungle keepers find fish breeding spontaneously: our breeding tank plant setup describes the same principles in dedicated form.
The Jungle Payoff
A mature jungle tank is the hobby's living wilderness — layers of green from substrate to surface, fish appearing and vanishing in the thicket, new growth visibly emerging every day. It's the lowest-stress aquascaping style and among the most rewarding: plant heavily, intervene lightly, and let the tank become what it wants to be. The jungle knows what it's doing.
For the plant science behind fast-growing species, see the 2Hr Aquarist aquarium plant care guides.
Tissue-culture plants are the exception — they’re grown in sterile gel and adapt with minimal melting, which is part of what you’re paying for. Plants bought submersed from another hobbyist’s tank also transition with little melt, since they’re already in the right form.
Which Plants Melt Most (and Least)
Heavy melters (expect significant leaf loss)
- Cryptocorynes — infamous for “crypt melt,” sometimes dropping every leaf after any disturbance. They almost always recover from the roots within weeks.
- Stem plants grown emersed — rotala, ludwigia, and hygrophila often shed lower emersed leaves while the growing tips transition.
- Amazon swords — emersed-grown swords typically lose their broad oval aerial leaves and replace them with longer submersed ribbon leaves.
Light melters
- Anubias, java fern, bucephalandra — slow-growing rhizome plants transition gradually; occasional old-leaf melt but rarely dramatic.
- Vallisneria — usually transitions well, though it dislikes the move itself and may sulk for a week.
- Floating plants — minimal melt since their leaves were already at the air-water interface.
The Acclimation Protocol
Step 1: Quarantine or dip first
Before acclimating to your tank’s conditions, make sure you’re not acclimating pests along with the plant. Run new arrivals through our quarantine and dip protocol — it adds days upfront but prevents months of regret.
Step 2: Float to temperature-match (30 minutes)
Float the bag or container in your tank for 20–30 minutes to equalize temperature. Plants are less temperature-sensitive than fish, but a 10°F shock on top of transplant stress is an avoidable insult.
Step 3: Trim before planting
Remove any leaves that are already damaged, yellowing, or heavily algae-covered — they won’t recover and they’ll rot in your tank, feeding algae. For stem plants, trim off the bottom inch and any emersed leaves that look unlikely to adapt; the plant wastes energy maintaining leaves it’s going to shed anyway. Keep the healthy growing tips — that’s where recovery starts.
Step 4: Plant correctly the first time
Follow our planting guide — right depth, crown exposed on rosettes, rhizomes unburied on epiphytes. Every uprooting and replanting restarts the acclimation clock, so get placement right on the first attempt. Decide where each plant goes before it goes in the water.
Step 5: Run a gentle first week
For the first 7 days after planting:
- Moderate light — run your normal photoperiod but consider dropping intensity 20–30% if your light is dimmable. Blast-level light on a melting plant grows algae on the dying leaves, not recovery.
- Stable CO2 — if you inject CO2, keep it consistent. Fluctuating CO2 during acclimation is a melt accelerator. If you’re low-tech, this doesn’t apply — see growing without CO2.
- Half-strength fertilizer — new plants with damaged leaves can’t use full dosing, and the excess feeds algae. Ramp to full strength over 2–3 weeks per our fertilizer schedule.
- No disturbance — don’t move, trim, or “check on” new plants for at least two weeks. Every touch resets root establishment. This is especially critical for crypts.
Step 6: Remove melt, keep the base
As emersed leaves melt, remove the mushy material promptly — decaying leaves release ammonia and grow fungus that can spread to healthy tissue. But never discard the plant while the crown, rhizome, or roots are firm and alive. A crypt that’s lost every leaf but has firm roots is a plant that’s about to recover, not a dead plant. Give it 3–4 weeks before judging.
Telling Normal Melt From Real Problems
Normal transition melt:
- Affects oldest/emersed leaves first, newest growth last
- New submersed leaves emerge even as old ones dissolve
- Roots and crown stay firm and white/green
- Timeline: 1–4 weeks, then obvious new growth
Concerning melt (see our full melting diagnosis guide):
- New growth also melts or emerges deformed
- Rhizome or crown turns mushy and brown — this is rot, not transition
- Entire plant dissolves within days with no new growth after 4+ weeks
- Melting spreads to established plants that weren’t recently moved
Buying Tips to Minimize Melt
- Buy submersed-grown when available — hobbyist-grown cuttings transition with almost no melt.
- Choose tissue culture for sensitive species — crypts and delicate stems establish far more reliably from sterile cups.
- Avoid plants already melting in the store tank — some melt is normal, but a plant that’s mostly mush at purchase has less energy for recovery.
- Transport carefully — keep plants damp and out of direct sun/heat. A plant that dries out or cooks in a hot car melts far worse than one transported properly.
The First-Month Timeline: What to Expect Week by Week
Knowing what’s normal when removes most acclimation anxiety. Here’s the typical timeline for a healthy plant adapting to a new tank:
Week 1: The quiet week
Almost nothing visible happens. The plant is growing roots you can’t see and assessing its new environment. Some species (vallisneria, stem plants) may start shedding their lowest leaves. This is normal. Resist the urge to “help” — no moving, no extra fertilizer, no light changes. The most common beginner mistake is intervening during a week when the correct action is nothing.
Week 2: Melt peaks
This is when emersed leaves give up in earnest. Crypts may drop everything; swords shed their broad aerial leaves; stem plants lose lower foliage. It looks catastrophic and it’s usually fine. Keep removing mushy material, keep conditions stable, and watch the crown and growing tips — if those are firm and green, recovery is already underway.
Week 3: The turn
New submersed-adapted leaves emerge — smaller, thinner, often a slightly different shade of green than the emersed foliage. Stem plant tips start growing visibly; crypts push tiny curled leaves from the crown; swords unfurl narrow ribbon leaves. This is the moment most beginners exhale for the first time.
Week 4+: Established
New growth outpaces melt, and the plant is functionally yours. You can resume full-strength fertilizer, normal trimming, and stop treating it as fragile. Some slow growers (anubias, bucephalandra) take 6–8 weeks to show obvious progress — that’s their normal speed, not a problem.
Acclimating Different Plant Formats
Tissue-culture cups
Sterile, pest-free, and already adapted to high-humidity (not emersed) growth — tissue cultures melt the least of any format. Rinse the agar gel off gently (leftover gel rots and feeds fungus), split the portion into small plantlets, and plant per our planting guide. They establish slowly for the first two weeks, then accelerate. No dip needed, minimal acclimation stress — this is the premium experience you’re paying for.
Potted plants
Remove the pot and strip away the rockwool completely — leftover rockwool traps debris and rots. Tease the root mass apart gently; if it’s a dense mat, splitting it into 2–3 smaller portions actually establishes faster than planting one big clump (more growing points, better water flow around roots). Potted plants are usually emersed-grown, so expect the standard 2–4 week melt cycle.
Bare-root / bunched stems
Typically sold as weighted bunches. Remove any bands, foam, or weights, strip the lower leaves, and plant stems individually or in small groups. Bunched stems from the store are often already transitioning — check for new submersed growth at the tips, which tells you the plant is mid-adaptation and will settle quickly.
Hobbyist cuttings
Already submersed-grown and the fastest to establish — often showing new growth within days. The main acclimation factor is water-parameter difference between the two tanks. Float to temperature-match, plant promptly, and they’ll usually take off with minimal melt. This is why experienced hobbyists prefer trading cuttings over buying potted plants.
Frequently Asked Questions
Should I use a “plant starter” or transplant fertilizer?
Products marketed for transplant shock are mostly B-vitamins and mild hormones. They don’t hurt, but there’s no strong evidence they help aquarium plants specifically. Stable conditions and patience outperform any bottle. Save the money for more plants.
My new plant melted completely — bare crown, no leaves. Is it dead?
Probably not, if the crown or rhizome is firm. Crypts and swords routinely lose 100% of their leaves and regrow from the base within a month. The test is firmness: firm and pale/green means alive; mushy and brown/black means rot. Give firm-but-leafless plants a full 4 weeks before declaring them dead.
Can I speed up acclimation with extra light or CO2?
No — and trying usually backfires. A melting plant can’t use extra light; the excess just grows algae on its dying leaves. Keep light moderate and CO2 stable (not boosted) during acclimation. Growth speed comes from the plant’s own adaptation timeline, which you can’t rush, only avoid delaying.
Should new plants go straight into my main display tank?
After quarantine/dipping, yes — there’s no benefit to a separate “growing-in” tank for most plants. They acclimate to your water fastest in the tank they’ll live in. The exception is very delicate species going into a tank with boisterous fish; give those a few weeks in a calm corner or breeder box first.
The Patience Rule
The single most important acclimation skill is restraint: plant it right, set gentle conditions, remove decay, and then leave it alone for a month. The hobbyists with the best plant growth aren’t doing something clever in week one — they’re simply not interfering in weeks two through four while the plants do what they’ve evolved to do. Melt looks like failure and feels like failure, but in most cases it’s the visible part of a plant successfully becoming yours.